
The Professional OSINT Practitioner
From Theoretical Frameworks to Actionable Intelligence


This is not a theoretical course. It is a practical, hands-on deep dive into the mindset and methodologies of a professional OSINT investigator. Every module is designed to answer not just the “what,” but the “how” and the “why,” with a strict focus on legal, ethical, and operational security (OPSEC) considerations. The goal is to transform a student from a curious beginner into a capable, analytical investigator.
Volume 2: Technical Intelligence, Network Analysis, & Advanced Attribution
Prerequisites Completed (Volume 1) Module 0 to Module 4: Operational Security, IMINT, Username/Email Attribution, and SOCMINT Deep Dives.
Advanced Syllabus Index
Module 5: Communication, Business, Historical Intelligence & People OSINT
Lecture 5.1: Phone Number OSINT
Lecture 5.2: Wayback Machine & The Internet Archive Workflows
Lecture 5.3: Corporate Org Charts & Business Intelligence
Module 6: Website OSINT & Technical Intelligence
Lecture 6.1: Domain Reconnaissance — WHOIS, DNS, and Registration History
Lecture 6.2: Subdomain Discovery & Enumeration
Lecture 6.3: Technology Stack Fingerprinting
Lecture 6.4: Directory Enumeration & Exposed Files
Lecture 6.5: SSL/TLS Certificate Analysis
Lecture 6.7: Automated Email Discovery with EmailCrawl
Lecture 6.8: Advanced Document Discovery — Extracting Hidden Files from Target Websites
Module 7: Advanced Investigative Tradecraft
Lecture 7.1: Sock Puppet Management & Anti-Suspension Tactics
Lecture 7.2: Structured Analytic Techniques for OSINT
Lecture 7.3: The Art of Pivoting
Module 8: Dark Web Intelligence & .onion Investigation
Lecture 8.1: Understanding the Dark Web — How It Actually Works
Lecture 8.2: Setting Up a Safe Investigation Environment
Lecture 8.3: Navigating the Dark Web — Finding .onion Sites
Lecture 8.4: Investigating .onion Sites — What to Document
Lecture 8.5: Extracting Intelligence from Dark Web Content
Lecture 8.6: Cryptocurrency Tracing Basics
Lecture 8.7: OSINT Tools for the Dark Web
Lecture 8.8: Legal and Ethical Boundaries
Lecture 8.9: Practical Investigation Workflow Summary
Lecture 8.10: Practical Investigation — From Dark Web Marketplace to Real-World Attribution
Module 9: Image Forensics & Hidden Data Recovery
Lecture 9.1: Introduction to Image Forensics — What Images Hide
Lecture 9.2: Photopea for Investigators — Image Manipulation & Analysis
Lecture 9.3: Darkening and Restoration — Revealing Hidden Details
Lecture 9.4: Hiding and Recovering Secret Text with Darkening Techniques
Lecture 9.5: CyberChef for OSINT — Encoding & Decoding Basics
Lecture 9.6: Caesar Cipher — Manual and Automated Decoding
Lecture 9.7: Base64, Hex, and Binary — Decoding Common Encodings
Lecture 9.8: Steganography — Finding Hidden Files Inside Images
Module 10: Transportation OSINT — Tracing Cars, Vessels, and Aircraft
Lecture 10.1: Vehicle Identification — Make, Model, and Year from a Photo
Lecture 10.2: License Plate Lookup — Country-Specific Databases
Lecture 10.3: VIN Decoding — What a Vehicle Identification Number Reveals
Lecture 10.4: Marine Traffic Tracking — Following Ships in Real Time
Lecture 10.5: Aircraft Tracking — Following Planes by Tail Number
Lecture 10.6: Aircraft Registration Lookup
Lecture 10.7: Satellite Imagery for Vehicle Tracking
Lecture 10.8: Building Movement Patterns from Vehicle Data
Module 11: Geospatial Intelligence (GEOINT) — Mapping the World from Open Sources
Lecture 11.1: Commercial Satellite Imagery — Your Eyes in the Sky
Lecture 11.2: Historical Imagery and Change Detection
Lecture 11.3: QGIS for OSINT — Professional Geospatial Analysis
Lecture 11.4: Coordinate Systems — Making Sense of the Numbers
Lecture 11.5: Sun Positioning and Shadow Analysis — How to Use SunCalc
Lecture 11.6: OpenStreetMap for Investigations
Lecture 11.7: Overpass Turbo for OSINT — Extracting Contact Data and Business Intelligence
Lecture 11.8: 3D Terrain Analysis
Module 12: Python for OSINT Automation — Building Your Own Tools
Lecture 12.1: The Automation Development Framework
Lecture 12.2: Setting Up Your Kali Linux Development Environment
Lecture 12.3: Using AI as Your Coding Assistant
Scripting Lab 1: Multi-Engine Dork Orchestrator
Scripting Lab 2: Bulk EXIF Extractor & Geolocation Plotter
Scripting Lab 3: Intelligent Permutation & Availability Engine
Scripting Lab 4: Username-to-User ID Cross-Reference Tool
Scripting Lab 5: Reddit Historical Monitoring Bot
Lecture 12.4: Building Your Personal Automation Toolkit
Module 13: Intelligence Report Writing & Entity Graph Visualization
Lecture 13.1: Structuring the Intelligence Report
Lecture 13.2: Writing for Your Audience — Client, Legal, or Internal
Lecture 13.3: Evidence Documentation & Source Citation Standards
Lecture 13.4: Entity Graph Visualization — Tools & Methodology
Lecture 13.5: Building the Final Intelligence Package
Capstone Course: The Integrated Investigation
Case File: Michael Hall & HALL OR NOTHING MANAGEMENT LIMITED
Full-Spectrum Intelligence Report
Final Submission & Grading Criteria
Appendices
Appendix A: Glossary of OSINT Terms
Appendix B: Complete Tools Index
Module 5: Communication, Business, Historical Intelligence & People OSINT
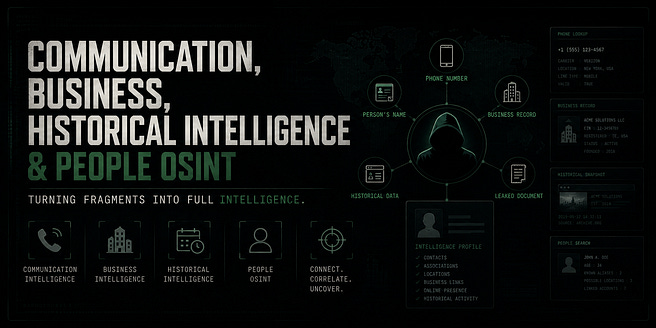
This module shifts your focus from platforms to pivot points. A phone number. A business record. A historical snapshot of a website. A person’s name. These are the raw materials of investigation. You do not always start with a social media handle. Sometimes all you have is a phone number on a leaked receipt, a company name on a job posting, or a person’s name mentioned in a report. This module teaches you how to turn those fragments into full intelligence profiles.
Lecture 5.1: Phone Number OSINT
A phone number is one of the most valuable starting points in any investigation. It is tied to a physical device. It is linked to messaging apps. It appears in data breaches, public records, and social media databases. If you know how to work a phone number properly, you can extract a name, a location, a profile picture, and a list of connected accounts without ever making a call.
This lecture walks you through the complete phone number investigation workflow. No theory without practice. Every technique is something you can do right now.
Part 1: The Number’s Address — Understanding the Numbering Plan
Before you plug a phone number into any tool, stop. Look at the number itself. A phone number is structured. It contains a country code, an area code or mobile prefix, and a subscriber number. Reading this structure tells you where in the world the number lives before you run a single search.
Every phone number on the planet follows the E.164 international numbering plan. The format is:
+[Country Code] [National Destination Code] [Subscriber Number]Take this number as an example: +234 802 345 67**
Break it down.
The +234 is the country code. That is Nigeria. You now know the country. That is your geographic anchor. Everything else you find about this number should be consistent with Nigeria. If a tool tells you the carrier is in Germany, something is wrong.
The 802 is the mobile prefix. In Nigeria, prefixes like 802, 803, 809, and others are assigned to specific mobile networks. 802 typically belongs to Airtel Nigeria. You now know the carrier without looking it up.
The remaining digits are the subscriber number. These are unique to the individual line.
Now take another example: +1 212 555 0199
The +1 is the country code for the United States, Canada, and several Caribbean nations. That narrows you to North America.
The 212 is the area code. That is Manhattan, New York City. You now have a city-level location.
The 555 prefix is reserved for fictional numbers in US media. This specific number is a fake. You just identified a dummy number by reading its structure.
This is the skill. Before tools, use your eyes. The number itself tells a story. Learn the major country codes. Learn the mobile prefixes for the regions you investigate most often. The more you can determine without touching a keyboard, the faster and more accurate your investigation becomes.
Part 2: Carrier and Line Type Lookup
Once you have identified the country and general region from the number structure, your next step is to confirm the carrier and determine the line type. Is this a mobile number, a landline, or a VoIP number? The answer changes how you investigate.
Tool: FreeCarrierLookup.com
Go to freecarrierlookup.com. Enter the full phone number with country code. The tool returns:
The carrier name.
The line type (mobile, landline, VoIP).
The original carrier, even if the number has been ported.
A mobile number is tied to a physical SIM card and a device. This is what you want. A VoIP number from a service like Google Voice or TextNow is essentially disposable. It can be created in minutes and abandoned just as fast. Knowing this upfront saves you from spending hours investigating a burner.
Tool: PhoneValidator.com
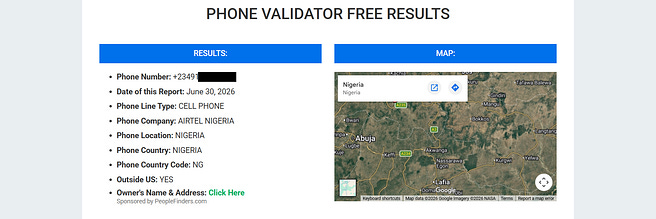
phonevalidator.com - is another free lookup tool. It provides similar carrier and line type data, plus it sometimes returns the city and state associated with the area code. Use it as a second source to confirm what FreeCarrierLookup told you. Never trust a single tool. Always validate.
Part 3: True People Search and Spydialer — Name Discovery
Now you want to put a name to the number. In the United States, two free tools dominate this space.
True People Search
Go to truepeoplesearch.com. Enter the phone number. If the number is in their database, the tool returns:
First and last name.
Current and previous addresses.
Email addresses associated with the number.
Possible relatives or associates.
This is aggregated from public records, marketing databases, and consumer data. It is not guaranteed to be accurate, but it is a strong starting point. If you get a name, cross-reference it immediately against social media platforms to confirm the association.
Spydialer
Go to spydialer.com. Enter the phone number. Spydialer works differently. It does not pull from consumer databases. It checks the number’s voicemail greeting without actually ringing the phone.
Here is how it works. Spydialer calls the number, waits for the voicemail system to pick up, and records the greeting. If the voicemail message says “You have reached John Smith. Please leave a message,” Spydialer captures that audio and transcribes the name. You never spoke to the target. The target’s phone never rang. You just extracted their name from their own voicemail greeting.
This is passive. It is legal. It works because people voluntarily record their name on their voicemail. Spydialer simply listens to what they chose to make public.
Use Spydialer for US numbers. For international numbers, the tool is less effective because voicemail systems vary by country. But for US targets, it is one of the most reliable name discovery tools available.
Part 4: Messenger App Querying — The Most Powerful Technique
This is the technique I told you about at the start. It is simple. It is passive. It works across WhatsApp, Signal, and Telegram. And it produces results faster than any database lookup.
The concept is straightforward. Messaging apps allow you to see certain information about a user if you have their phone number saved in your contacts. You do not need to message them. You do not need to call them. You just add them and look.
Open WhatsApp on your sock puppet device. Save the target phone number to your device contacts with the full international format (including the + and country code). Give the contact a fake name in your address book. Open WhatsApp. Wait a few seconds for the app to sync. If the number is registered on WhatsApp, the contact appears in your WhatsApp contact list.
Now, tap on the contact. You will see:
Profile Picture: The image the user set as their WhatsApp avatar. This is often the same photo they use on Instagram, Facebook, or LinkedIn. Save it. Run it through perceptual hash matching.
Status: A short text status that may contain location, mood, or activity hints.
Last Seen: A timestamp showing when the user last opened WhatsApp. This reveals their active hours.
About: A longer bio section. Users often list their job title, location, or other social media handles here.
You have just extracted a profile picture, an activity timestamp, and biographical information from nothing but a phone number. No message was sent. No notification was triggered. The target has no idea you are looking at them.
Signal
The process is identical. Save the number. Open Signal. If the number is registered, the contact appears. Signal shows the profile picture and display name. Signal does not show a “last seen” status by default unless the user has enabled it, but the profile picture alone is worth the effort.
Telegram
You already know this from the Telegram lecture. Save the number. Open Telegram. If the number is registered, the account appears in your contacts with the display name, username, and profile picture. Now you have the Telegram @handle, which you can use for all the Telegram OSINT techniques covered in Lecture 4.8.
Why This Technique Is So Powerful
A phone number is private, right? People guard their phone numbers. But they voluntarily link them to messaging apps. And those apps display profile pictures, bios, and activity timestamps to anyone who has the number saved. The target thinks their number is hidden. They do not realize their WhatsApp profile picture is visible to every contact who adds them, including the investigator who just saved their number to a sock puppet device.
This is not a hack. It is not a bypass. It is the intended functionality of these apps. You are simply using the features as designed. The ethical boundary is clear. You look. You document. You do not message. You do not call. You do not interact.
Part 5: Phone Number to Social Media Discovery
A phone number is often used to register accounts on Facebook, Instagram, Twitter, and other platforms. Most platforms allow you to search for contacts by syncing your phone’s address book. This is the reverse of the messenger technique. Instead of checking individual apps, you use the platform’s contact sync feature to find every account linked to that number at once.
Facebook Contact Sync
On your sock puppet Facebook account, go to Settings. Find the “Find Friends” or “Upload Contacts” option. Upload a contact file containing only the target phone number. Facebook processes the file and returns any account associated with that number. If a match is found, you see the profile name, profile picture, and a link to the account.
This is more aggressive than the WhatsApp technique because you are uploading data to Facebook. Understand the risk. Use a properly maintained sock puppet. Never use your real account.
Instagram Contact Sync
Instagram offers a similar feature. Go to your sock puppet Instagram profile. Navigate to “Discover People” or “Connect Contacts.” Sync your device contacts, which includes the target number. Instagram shows you any account linked to that number.
The Workflow
Save the target number to your sock puppet device.
Check WhatsApp, Signal, and Telegram for profile pictures and bios.
Sync contacts on Facebook and Instagram to find linked accounts.
Document every account found. Cross-reference usernames and profile pictures across platforms.
Never message. Never call. Never interact.
Part 6: Phone Number to Email Discovery
Phone numbers and email addresses are often linked in data breaches, consumer databases, and public records. Several tools allow you to search a phone number and find associated email addresses.
That’s Them
Go to thatsthem.com. Enter the phone number. The tool returns associated names, email addresses, and physical addresses from public records and marketing databases. Free to use with a daily limit.
FastPeopleSearch
Go to fastpeoplesearch.com. Enter the phone number. The tool returns name, address history, and sometimes associated email addresses. This is another consumer data aggregator. Use it as a second source.
Sync.me / Truecaller.com
sync.me / truecaller.com is a caller ID and spam blocking app that also works as a reverse phone lookup. Search the number on their website or through the app. It returns the name and sometimes the profile picture associated with the number from their user-contributed database.
Email Extraction Workflow
Run the phone number through That’s Them, FastPeopleSearch, and Sync.me, truecaller.com.
Collect any email addresses returned.
Plug those emails into your Module 3 email intelligence workflow.
Search the emails on breach databases like HaveIBeenPwned, DeHashed, and IntelX.
Cross-reference the emails against social media platforms.
A single phone number can lead to an email address, which leads to a Facebook profile, which leads to a LinkedIn account, which gives you their full employment history. This is the chain. Pull one link, and the rest follows.
Part 7: International Phone Number Resources
Not all phone numbers are US-based. Different countries have different lookup tools. Here is a quick reference for major regions.
Europe
Asia
jpnumber.com— Japan.truecaller.com— India (and global, but strongest in India).
Global
numlookup.com— Free reverse lookup for many countries.truecaller.com— Global caller ID and spam detection. Requires an account.sync.me— Global, user-contributed database.
Part 8: Practical Investigation Workflow Summary
Read the number. Identify the country code and area code without any tools.
Run a carrier and line type lookup using FreeCarrierLookup and PhoneValidator.
If the number is US-based, search True People Search and Spydialer for a name.
Save the number to your sock puppet device.
Check WhatsApp, Signal, and Telegram for profile pictures, bios, and activity timestamps.
Sync contacts on Facebook and Instagram to find linked accounts.
Run the number through That’s Them, FastPeopleSearch, and Sync.me, Truecaller for email addresses.
Plug any discovered emails into your email intelligence workflow.
Cross-reference every name, username, email, and profile picture across all platforms.
Document everything. Screenshots, timestamps, tool outputs, and your analysis.
Part 9: Quick Reference
Objective______________Tool/Method
Country and area identification: Manual E.164 analysis
Carrier and line: type
freecarrierlookup.com,phonevalidator.comName discovery (US):
truepeoplesearch.com,spydialer.comVoicemail name extraction:
spydialer.comWhatsApp profile: Save number → check WhatsApp
Signal profile: Save number → check Signal
Telegram profile: Save number → check Telegram
Social media account discovery: Facebook and Instagram contact sync
Email discovery:
thatsthem.com,fastpeoplesearch.com,sync.meInternational lookups:
numlookup.com,truecaller.com, country-specific directories
This is phone number OSINT. Not just searching a database. Reading the number. Confirming the carrier. Extracting the name from the voicemail they recorded themselves. Pulling their profile picture from the messaging apps they voluntarily linked. Building the chain from a single ten-digit string to a full identity profile.
Master this, and a phone number stops being a dead end. It becomes one of your most productive starting points.
Lecture 5.2: Wayback Machine & The Internet Archive
The internet forgets nothing. It just buries things. Websites change. Pages get deleted. Social media profiles get wiped. Companies remove controversial statements. Executives scrub their bios. Products with embarrassing specifications disappear from official pages. But before any of that happened, the Internet Archive was watching.
The Wayback Machine at archive.org has been taking snapshots of the web since 1996. It has captured over 800 billion pages. For an investigator, this is not a history tool. It is a time machine. It lets you visit a website as it existed on any date a snapshot was taken. You can read deleted blog posts. You can find old employee directories. You can recover social media profiles that were deleted years ago. You can compare a page from 2018 to the same page in 2022 and see exactly what changed, what was removed, and what someone tried to hide.
This lecture is about using the Wayback Machine like a professional. Not just pasting a URL and hoping for the best. Systematic collection, wildcard discovery, change detection, and evidence preservation.
Part 1: The Basics — Viewing a Single Page
You have a URL. You want to see what it looked like in the past. The most direct method is the Wayback Machine’s main interface.
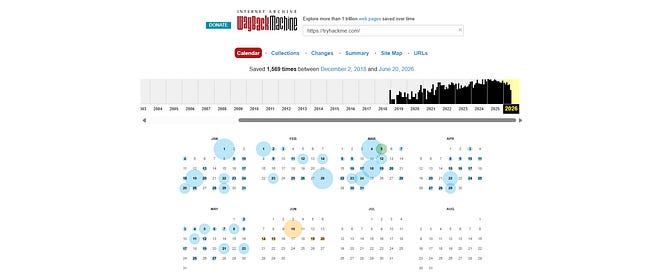
Go to archive.org/web/. Paste the URL into the search bar and press Enter. The Wayback Machine displays a calendar with colored circles. Blue circles mean a successful snapshot exists. Green circles mean a redirect was captured. The darker the circle, the more snapshots exist on that date.
Click a date. The page loads exactly as it appeared at that moment. The images, the text, the links. Everything is preserved.
But this is the surface. You are not here for surface-level browsing.
Part 2: The Wildcard Operator — Downloading Entire Directories
This is the technique that separates amateurs from professionals. The Wayback Machine allows you to use the * wildcard to download every file in a directory, every snapshot of every file, across all time.
The format is:
https://web.archive.org/web/*/example.com/staff/*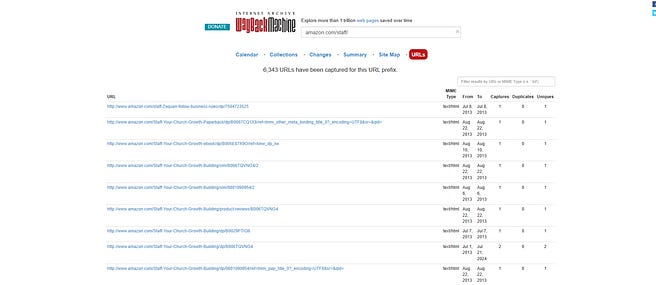
Let me break this down.
https://web.archive.org/web/is the base URL for the Wayback Machine.The first
*means “every date.” It tells the Wayback Machine to return snapshots from all available dates, not just one.example.com/staff/is the directory you are targeting.The second
*means “every file in that directory.”
When you open this URL, the Wayback Machine returns a list of every file it ever captured in that directory, sorted by filename. You will see old staff profile pages, deleted bios, removed documents, and anything else that was once publicly accessible in that folder.
Here is a practical example. Say you are investigating a company called Acme Corp. You want to find old employee profiles. You navigate to:
https://web.archive.org/web/*/acmecorp.com/about/team/*The Wayback Machine returns every snapshot of every file in the /about/team/ directory. You see entries like:
acmecorp.com/about/team/john-doe.html 2018-03-15
acmecorp.com/about/team/jane-smith.html 2019-11-02
acmecorp.com/about/team/former-executive.html 2017-06-20
Click on any of these. The page loads as it existed on that date. You are now reading the bio of an executive who left the company three years ago and whose profile was deleted from the live site. The Wayback Machine kept it.
Part 3: Targeting Specific File Types
The wildcard technique becomes surgical when you target specific file extensions. Companies accidentally leave PDFs, Excel spreadsheets, Word documents, and other files in publicly accessible directories. The Wayback Machine captures them.
To find every PDF ever hosted on a domain:
https://web.archive.org/web/*/example.com/*.pdfTo find every Excel spreadsheet in a specific directory:
https://web.archive.org/web/*/example.com/internal/*.xlsxTo find every Word document:
https://web.archive.org/web/*/example.com/*.docTo find every CSV file:
https://web.archive.org/web/*/example.com/*.csvI have used this technique to find internal strategy documents, financial spreadsheets, employee directories, and training manuals. Files that were never meant to be public but were placed in directories with no access control. The company removed them years ago. The Wayback Machine did not.
Part 4: Investigating Social Media Profiles
Social media profiles change constantly. Bios get updated. Profile pictures get swapped. Posts get deleted. The Wayback Machine captures public social media pages just like any other website. This is how you recover what someone tried to erase.
Twitter/X Profiles
Paste the profile URL into the Wayback Machine:
https://web.archive.org/web/*/x.com/usernameOr the old Twitter domain:
https://web.archive.org/web/*/twitter.com/usernameThe calendar shows every date a snapshot was taken. Click through different dates. You will see old display names, old bios, old profile pictures, and the tweets that were visible on that date. If the target deleted controversial tweets, they may still be visible in older snapshots.
LinkedIn Profiles
LinkedIn blocks some Wayback Machine snapshots, but public profiles are often captured:
https://web.archive.org/web/*/linkedin.com/in/usernameIf a target removed a previous job from their profile, the old version may still list it. If they changed their headline or summary, the old version shows what they used to claim.
Instagram Profiles
Instagram is harder to archive due to its dynamic loading, but public profile pages are sometimes captured:
https://web.archive.org/web/*/instagram.com/usernameFocus on older snapshots. The bio, profile picture, and follower count may be different. These changes tell a story.
Facebook Profiles
Facebook actively blocks archival of logged-in pages, but public pages and public profiles occasionally get captured:
https://web.archive.org/web/*/facebook.com/usernameDo not expect full timelines. But bios, profile pictures, and public posts sometimes survive.
YouTube Channels
YouTube channel pages are archived regularly:
https://web.archive.org/web/*/youtube.com/@handleOr
https://web.archive.org/web/*/youtube.com/channel/UCxxxxxxxxxxxxxxxxOld snapshots show previous channel names, old banner images, and video titles that have since been changed or deleted.
Part 5: Change Detection — Comparing Pages Side by Side
This is the technique that turns the Wayback Machine from a history viewer into an investigative tool. You do not just look at one snapshot. You compare two snapshots from different dates and document exactly what changed.
Here is the practical workflow
Step 1: Identify the Target Page
Pick a page that is likely to change over time. An executive team page. A product description page. A company’s “About Us” page. A privacy policy. A terms of service.
Step 2: Pick Two Dates
Choose a date from the past and a more recent date. For example, compare the page as it existed in 2018 to the page as it existed in 2022. The wider the gap, the more changes you are likely to find.
Step 3: Open Both Snapshots Side by Side
Open two browser windows. Load the 2018 snapshot in one. Load the 2022 snapshot in the other. Place them next to each other on your screen.
Step 4: Go Line by Line
Read both pages. Compare the text. Look for:
Removed personnel. An executive bio that existed in 2018 but is gone in 2022. That person left the company. When did they leave? Why?
Changed job titles. A person listed as “VP of Engineering” in 2018 is now “Advisor” in 2022. They were demoted or moved to a non-operational role. That is intelligence.
Removed product descriptions. A product page in 2020 listed specific technical specifications. The 2023 version removed those specs. The company is hiding something about the product’s capabilities.
Changed contact information. The 2019 page lists a phone number and email address. The 2022 page lists different ones. Both are now pivot points.
Deleted statements. A company’s “Our Values” page in 2021 mentioned a commitment to a specific cause. The 2024 version removed all references. The company quietly changed its public stance.
Step 5: Document Every Change
Screenshot both versions. Highlight the differences. Write a brief note explaining what changed and what it implies. This is your evidence package.
Part 6: The Save Page Now Feature — Preserving Evidence in Real Time
The Wayback Machine is not just for looking at the past. You can force it to capture a page right now. This is critical for evidence preservation.
Go to archive.org/web/. Look for the “Save Page Now“ section. Paste the URL you want to capture. Click “Save Page.” The Wayback Machine takes an immediate snapshot and gives you a permanent link to that snapshot.
Use this when:
You find a page that might be deleted soon.
A target posts something controversial that they are likely to remove.
You need a timestamped record of a page as it exists at this exact moment.
You are building an evidence file and need a permanent, verifiable copy of the source.
The snapshot link is permanent. Even if the original page is deleted, your snapshot remains.
Part 7: Using the Wayback Machine CDX API for Bulk Discovery
The browser interface is fine for single pages. For large-scale discovery, you use the CDX API. This is a machine-readable interface that returns a list of all snapshots matching your query.
The base URL is:
https://web.archive.org/cdx/search/cdx?url=example.com&output=textThis returns a plain text list of every snapshot of every page on example.com. Each line contains the timestamp, the URL, and the HTTP status code.
To filter by file type:
https://web.archive.org/cdx/search/cdx?url=example.com&matchType=prefix&filter=mimetype:application/pdf&output=textThis returns only PDF files.
To filter by year:
https://web.archive.org/cdx/search/cdx?url=example.com&from=2020&to=2021&output=textThis returns only snapshots taken in 2020 and 2021.
To download the results for analysis:
curl “https://web.archive.org/cdx/search/cdx?url=example.com&output=text” > wayback_results.txtYou now have a complete inventory of every page the Wayback Machine ever captured from that domain. Use this to discover directories, files, and pages you would never find through the browser interface.
Part 8: Investigating Deleted Websites
Sometimes the entire website is gone. The domain expired. The company shut down. The content was removed. The Wayback Machine may still have it.
Paste the domain into the Wayback Machine search bar. If snapshots exist, the calendar appears. Browse the site as it existed when it was live.
To find every page ever captured from a defunct domain, use the wildcard:
https://web.archive.org/web/*/defunctsite.com/*This returns a list of every page, every image, every file the Wayback Machine captured before the site disappeared. You can reconstruct the entire website from these snapshots.
Part 9: Browser Extensions for Faster Access
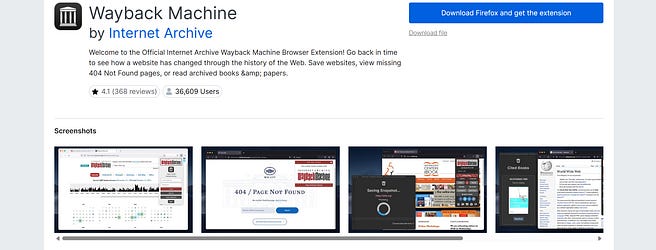
Wayback Machine (Official Extension)
The Internet Archive provides an official browser extension for Chrome and Firefox. Install it. When you encounter a page that is down or you want to check its history, click the extension icon. It shows you if snapshots exist and lets you load them with one click.
Chrome: https://chromewebstore.google.com/detail/wayback-machine/fpnmgdkabkmnadcjpehmlllkndpkmiak
Firefox: https://addons.mozilla.org/en-US/firefox/addon/wayback-machine_new/
Go Full Page (Screenshot Capture)
When preserving evidence from a Wayback Machine snapshot, you need a full-page screenshot. The Go Full Page extension captures the entire scrollable page as a single image.
Chrome: https://chromewebstore.google.com/detail/gofullpage-full-page-scre/fdpohaocaechififmbbbbbknoalclacl
Part 10: Practical Investigation Workflow Summary
Start with a URL. Paste it into
archive.org/web/.Browse the calendar. Identify key dates when significant changes likely occurred.
Use the wildcard operator to discover hidden directories and files:
*/example.com/staff/*.Target specific file types:
*.pdf,*.xlsx,*.doc,*.csv.For social media profiles, check snapshots across multiple dates to find deleted bios, old profile pictures, and removed posts.
Perform change detection. Compare two snapshots side by side. Document what was added, removed, or altered.
Use the CDX API for bulk discovery across entire domains.
Use “Save Page Now” to preserve any page that might disappear.
Screenshot everything. Save the snapshot URLs. Build your evidence file.
Part 11: Quick Reference
Objective_____________Method
View a single page:
archive.org/web/→ paste URLDiscover all files in a directory:
*/example.com/directory/*Find specific file types:
*/example.com/*.pdfCompare pages over time: Open two snapshots side by side
Preserve a page now:
archive.org/web/→ Save Page NowBulk snapshot discoveryCDX API:
web.archive.org/cdx/search/cdx?url=...Twitter/X profile history:
*/x.com/usernameLinkedIn profile history:
*/linkedin.com/in/usernameYouTube channel history:
*/youtube.com/@handleReconstruct defunct websites:
*/defunctsite.com/*Quick access browser extension: Wayback Machine official extension
This is the Wayback Machine. Not a history book. An investigative tool. Use the wildcard to discover what was hidden. Compare snapshots to document what was changed. Preserve what is about to disappear. Master this, and you can investigate any website, any social media profile, any online presence across time. The internet remembers. Now you do too.
Lecture 5.3: Business Intelligence for the Investigator
Companies hide things. Not always illegally. Sometimes they just structure themselves in ways that make it hard to see who really owns what, who supplies whom, and where the money flows. Your job as an investigator is to cut through that structure and find the truth.
Business intelligence is not about reading annual reports and nodding along. It is about pulling the right records from the right registries, tracing ownership chains through multiple jurisdictions, and mapping supply networks from raw trade data. When you finish this lecture, you will be able to look at any company and tell a story about who really controls it, who it does business with, and what it might be trying to hide.
Part 1: Corporate Registries — The Foundation
Every legitimate company is registered somewhere. That registration creates a public record. The record contains names, addresses, dates, and ownership structures. Your first task is always the same: find the company’s official registration and pull everything you can.
UK Companies House
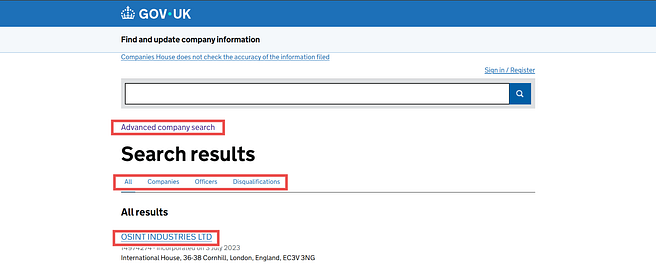
Companies House is the UK’s corporate registry, and it is one of the most transparent in the world. It is free to use. No account required. The data is deep.
Go to find-and-update.company-information.service.gov.uk. Search for the company by name or registration number. The company profile page gives you:
Registered office address.
Company status (active, dissolved, in liquidation).
Incorporation date.
Last accounts filed.
Next accounts due.
Nature of business (SIC code).
List of officers (directors and company secretary).
Persons with Significant Control (PSCs).
The PSC register is the goldmine. A Person with Significant Control is anyone who owns more than 25% of the company’s shares or voting rights, or who otherwise exercises significant influence. This is UK law. Companies must declare their real owners.
Click on each PSC. You will see:
Full name.
Date of birth (month and year).
Nationality.
Correspondence address.
Nature of control (ownership of shares, voting rights, etc.).
This is the real owner. Not a nominee director. Not a shell. The person who ultimately benefits from the company’s existence.
Now, click on each director. You will see their full name, date of birth (month and year), role, and sometimes a service address. Cross-reference these names against other companies. A director who appears in five different companies, some of which are dissolved, is building a pattern.
Click the “Filing History” tab. This contains every document the company has filed since incorporation. Annual returns. Changes of address. Appointment and resignation of directors. Share allotments. Mortgage charges. These documents tell the story of the company’s evolution. Read them chronologically. You are building a timeline.
US SEC EDGAR
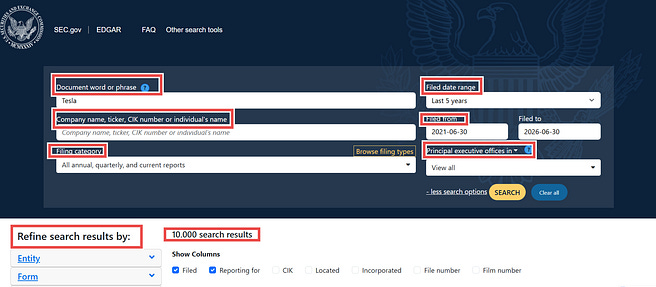
In the United States, publicly traded companies file with the Securities and Exchange Commission. EDGAR is the database.
Go to sec.gov/edgar/search. Search by company name or ticker symbol. The results include:
10-K (annual report) — Comprehensive overview of the business, risks, and financials.
10-Q (quarterly report) — Quarterly financial updates.
8-K (current report) — Material events like acquisitions, bankruptcies, or leadership changes.
Proxy statements — Executive compensation, board member details, and shareholder voting.
Insider trading filings (Forms 3, 4, 5) — When executives buy or sell company stock.
The 10-K is your starting point. It contains a detailed description of the business, its revenue streams, its risk factors, its legal proceedings, its properties, and its subsidiaries. The “Risk Factors” section is particularly valuable. The company is legally required to disclose what could go wrong. Read it. They are telling you their vulnerabilities.
The proxy statement lists the board of directors, their backgrounds, their compensation, and their relationships with the company. This is how you map the power structure.
Insider trading filings tell you whether executives are buying or selling. A CEO selling a large block of shares before bad news becomes public is a signal. The filings are public. Connect the dates.
OpenCorporates
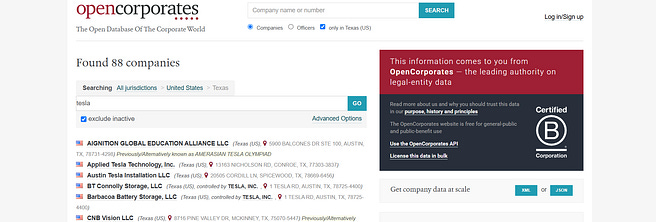
OpenCorporates at opencorporates.com is a global aggregator. It pulls data from over 140 jurisdictions into one searchable database.
Search by company name, officer name, or address. The results show:
Company name and registration number.
Jurisdiction.
Current status.
Directors and officers.
Sometimes the ultimate beneficial owners.
The real power of OpenCorporates is the address search. Enter an address, and it returns every company registered at that location. If you find fifty companies registered at the same small office in Delaware, you have found a corporate service provider that creates shell companies. That is a lead.
The officer search is equally powerful. Enter a name, and OpenCorporates returns every company that person is associated with across all jurisdictions. A single director search can reveal a hidden network of connected entities.
Part 2: Tracing Beneficial Ownership Through Layers
Companies hide ownership by layering. Company A is owned by Company B, which is owned by Company C, which is owned by a trust in a jurisdiction that does not require public disclosure. Your job is to follow the chain as far as it goes and identify where it goes dark.
Start with the company you are investigating. Pull its registration. Identify the declared owners. If the owner is another company, pull that company’s registration. Repeat. Each layer takes you deeper.
Here is the practical workflow.
Pull the target company’s registration from its home jurisdiction.
Identify the shareholders or PSCs.
If a shareholder is another company, search that company in its home jurisdiction.
Repeat until you reach either a natural person or a jurisdiction that does not disclose ownership (like Panama, British Virgin Islands, or Cayman Islands).
When the chain goes dark, document the last known entity and the jurisdiction where the trail ends. This is your transparency boundary. The fact that ownership disappears into a secrecy jurisdiction is intelligence in itself.
Tools that help with this:
OpenCorporates — Cross-jurisdictional officer and company search.
ICIJ Offshore Leaks Database —
offshoreleaks.icij.org— Data from the Panama Papers, Paradise Papers, and other leaks. Search by name, company, or address.OCCRP Aleph —
aleph.occrp.org— A search engine for investigative data, including corporate registries, sanctions lists, and leaked records.
Part 3: Supply Chain Mapping — Who Really Does Business With Whom
Companies claim to have ethical supply chains. They claim to source from approved vendors. They claim to have no business with sanctioned entities. Import and export records tell you the truth.
When goods cross international borders, customs agencies record the shipment. The bill of lading contains the shipper, the consignee, the product description, the quantity, the weight, and the date. These records are aggregated by commercial services, and many offer free access to partial data.
ImportYeti
Go to importyeti.com. Search for a company name. ImportYeti returns US import records associated with that company, including:
Supplier names and locations.
Product descriptions.
Shipment quantities and weights.
Port of entry.
Date of shipment.
This is how you find a company’s real suppliers. Not the ones they list on their website. The ones they actually buy from. Search a company you are investigating. Look at the supplier list. Cross-reference those suppliers against sanctions lists, blacklists, and adverse media.
Panjiva (Free Tier)
Panjiva at panjiva.com is a more detailed trade data platform owned by S&P Global. The free tier allows limited searches. Enter a company name. Panjiva returns shipment records with buyer and seller names, product descriptions, and shipping routes.
Sayari (Commercial, Free Trial Available)
Sayari at sayari.com is a commercial supply chain intelligence platform. It maps corporate ownership and trade relationships globally. If you have access through your organization, use it. If not, the free trial may be sufficient for a single investigation.
The Supply Chain Workflow
Search the target company on ImportYeti.
Document every supplier and customer listed in the shipment records.
Search each supplier on OpenCorporates to identify their ownership.
Cross-reference supplier names against sanctions lists using
sanctionssearch.ofac.treas.gov(US OFAC) andsanctionsmap.eu(EU).Look for discrepancies. A company that claims to source from ethical suppliers but imports from a blacklisted factory is exposed by the trade data
Part 4: Beyond Registries — Finding What They Did Not Declare
Corporate registries show what the company chose to file. Investigations show what they did not. Use the techniques from previous modules to build a fuller picture.
Wayback Machine
Paste the company’s website into the Wayback Machine. Look at old versions of the “About Us” page, the “Team” page, and the “Products” page. Find executives who were listed in 2018 but disappeared in 2022. Find products that were once advertised but are now removed. Find contact details that were changed. Every edit is a decision. Every removal is something they did not want you to see.
Social Media Cross-Referencing
Take the names of directors and PSCs. Search them on LinkedIn, Twitter, Facebook, and Instagram. A director who lists “CEO at XYZ Corp” on LinkedIn but is not listed as a director on Companies House is a red flag. A PSC who posts about a luxury lifestyle on Instagram while their company files for bankruptcy is a signal.
Phone Number and Email OSINT
Take the phone numbers and email addresses listed on the corporate registry filings. Run them through the techniques from Lecture 5.1. Find the personal accounts linked to those numbers. A corporate phone number that traces back to a personal WhatsApp profile picture tells you more than any filing.
News and Adverse Media
Search the company name and director names on Google News. Use the site:news.google.com dork. Search for lawsuits, regulatory actions, protests, and scandals. One negative article does not damn a company. Five articles from different sources over three years about the same type of problem is a pattern.
Part 5: Practical Investigation Workflow Summary
Search the company on its home jurisdiction’s corporate registry. Pull all filings.
Identify the directors and Persons with Significant Control.
Search every director and PSC on OpenCorporates to find all associated companies.
Trace the ownership chain through multiple jurisdictions until you reach a natural person or a secrecy wall.
Check the ICIJ Offshore Leaks database and OCCRP Aleph for connections to leaked records.
Search the company on ImportYeti to map its real suppliers and customers.
Cross-reference suppliers against OFAC and EU sanctions lists.
Run the company’s website through the Wayback Machine. Compare old and new versions.
Search director and PSC names on LinkedIn, Twitter, Facebook, and Instagram.
Run phone numbers and emails from filings through Phone OSINT and Email OSINT workflows.
Search for adverse media on Google News.
Compile a report with a risk rating based on your findings.
Part 6: Quick Reference
Objective_____________Tool/Resource
UK company search:
find-and-update.company-information.service.gov.ukUS public company filings:
sec.gov/edgar/searchGlobal company search:
opencorporates.comOffshore leaks database:
offshoreleaks.icij.orgInvestigative data search:
aleph.occrp.orgUS import/export records:
importyeti.comTrade data platform:
panjiva.comOFAC sanctions check:
sanctionssearch.ofac.treas.govEU sanctions check:
sanctionsmap.euWebsite history:
archive.org/web/Adverse media:
news.google.com
This is business intelligence investigation. Not just reading filings. Tracing ownership. Mapping supply chains. Recovering deleted history. Building a complete picture from fragmented public data. Master this, and you can investigate any company on Earth.
Module 6: Website OSINT & Technical Intelligence
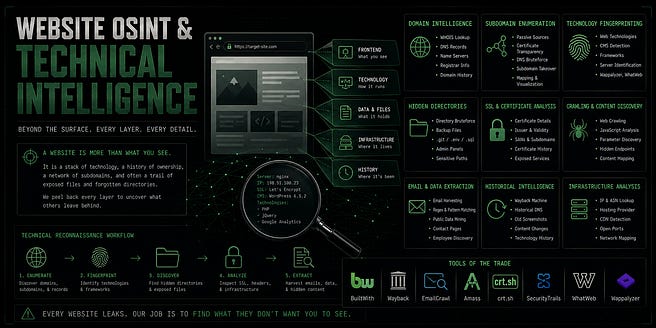
A website is not just pages and text. It is a stack of technology, a history of ownership, a network of subdomains, and often a trail of exposed files and forgotten directories. Investigating a website means peeling back every layer until you understand who built it, how it runs, and what it accidentally left in the open.
This module is about technical reconnaissance. You will learn to pull domain records, map subdomains, fingerprint the technology behind a site, discover hidden directories, analyze SSL certificates, crawl for hidden content, and extract email addresses at scale. Every lecture is hands-on. Every tool has a purpose.
Lecture 6.1: Domain Reconnaissance — WHOIS, DNS, and Registration History
Before you touch the website itself, you investigate the domain. The domain tells you who registered it, when, through which service, and what servers handle its traffic. This is foundational intelligence.
WHOIS Lookup
WHOIS is a protocol that queries domain registration databases. When someone registers a domain, they must provide contact information. That information is stored in the WHOIS record.
Start with a simple WHOIS lookup. The command line gives you the raw data:
whois example.comThis returns the registrar name, registration date, expiration date, name servers, and sometimes the registrant’s name, organization, email, phone number, and physical address.
Many domains now use privacy protection services that redact the registrant’s personal details. You will see “REDACTED FOR PRIVACY” or the registrar’s own proxy address. Do not stop there. The privacy shield only hides the current record. Historical WHOIS data often predates the privacy implementation or was captured before the owner enabled it.
WHOIS History
Use whois.domaintools.com or whoisology.com to pull historical WHOIS records. A domain registered in 2010 may have had public contact details for the first five years before the owner learned about privacy protection. The historical record shows you those early details.
I have found personal email addresses, home addresses, and phone numbers in WHOIS records from 2015 that were redacted by 2018. People change their domains less often than you think. An old email address from a WHOIS record is a permanent pivot point.
DNS Records
DNS records tell you how the domain is configured. The dig command pulls them:
dig example.com ANYKey record types:
A Record: Maps the domain to an IPv4 address. This is the server’s IP.
AAAA Record: Maps to an IPv6 address.
MX Record: Mail exchange server. Tells you where email for this domain is handled.
NS Record: Name server. Tells you which DNS provider manages the domain.
TXT Record: Text data. Often contains SPF records (email sending policies), DMARC policies, and sometimes verification tokens that reveal which services the domain uses.
CNAME Record: Canonical name. Points one domain to another. Useful for finding related domains.
The MX record is particularly valuable. If a domain uses Google Workspace for email, the MX record points to Google’s servers. That tells you their login portal is at a standard Google URL. If they use Microsoft 365, it points to Microsoft. If they self-host, the MX record may reveal their internal mail server hostname and IP.
Reverse IP Lookup
Once you have the server’s IP address from the A record, find every other domain hosted on that same IP. This is a reverse IP lookup.
Use viewdns.info/reverseip/ or yougetsignal.com/tools/web-sites-on-web-server/. Enter the IP address. The tool returns all domains sharing that server.
If your target domain shares an IP with five other domains, investigate those domains too. They may be related projects, test environments, or personal sites owned by the same individual. One of them may have a less careful configuration and leak information the target domain protects.
Practical Workflow
Run
whois example.com. Document registrar, dates, and name servers.Check historical WHOIS on
whois.domaintools.com. Look for unredacted records.Run
dig example.com ANY. Document A, MX, NS, and TXT records.Run a reverse IP lookup on the A record IP. Investigate all co-hosted domains.
Cross-reference any discovered emails, names, or phone numbers against other modules.
Lecture 6.2: Subdomain Discovery & Enumeration
A domain is rarely just a single website. Organizations set up subdomains for different services. mail.example.com for email. dev.example.com for development. staging.example.com for testing. admin.example.com for internal tools. Many of these are not meant to be public. Some are exposed anyway.
Certificate Transparency Logs
When a TLS/SSL certificate is issued for a domain, the certificate authority logs it in a public transparency database. This database contains every subdomain that has ever had a certificate issued.
Go to crt.sh. Enter the domain name. The site returns every subdomain that has appeared in a certificate. You will see current subdomains, old subdomains that no longer exist, and internal subdomains the organization never intended to be public.
Example output for — example.com:
example.com
www.example.com
mail.example.com
dev.example.com
staging.example.com
admin.example.com
vpn.example.com
Every one of these is a new target for reconnaissance.
Subdomain Enumeration Tools
Sublist3r automates subdomain discovery by querying multiple sources including search engines, certificate transparency logs, and DNS databases.
Install and run:
git clone https://github.com/aboul3la/Sublist3r.git

cd Sublist3r

python sublist3r.py -d example.com
Amass is a more advanced tool from OWASP. It maps the entire attack surface of a domain by combining DNS enumeration, certificate transparency, web archives, and active scanning.
amass enum -d example.comAmass produces a comprehensive list of subdomains and can output the results in formats suitable for further analysis.
Subfinder is a fast, lightweight subdomain discovery tool that focuses on passive sources.
subfinder -d example.comGoogle Dorks for Subdomain Discovery
You can also use Google to find subdomains that have been indexed:
site:*.example.com -wwwThis returns all indexed subdomains except the main www site. Combine with keyword filters to find specific services:
site:*.example.com inurl:admin

site:*.example.com inurl:login

site:*.example.com inurl:dev
Practical Workflow
Search the domain on
crt.sh. Document every subdomain found.Run Sublist3r, Amass, or Subfinder for automated discovery.
Use Google dorks to find indexed subdomains.
For each discovered subdomain, visit it. Document what service runs there.
Prioritize
dev,staging,admin, andinternalsubdomains. These are most likely to be misconfigured.
Lecture 6.3: Technology Stack Fingerprinting
Every website is built on a stack of technologies. The web server, the programming language, the content management system, the JavaScript frameworks, the analytics tools, the hosting provider. Identifying this stack tells you what vulnerabilities may exist and how the site is maintained.
Wappalyzer
Wappalyzer is a browser extension that fingerprints the technology stack of any website you visit. Install it on your investigation browser. Visit the target site. Click the Wappalyzer icon. It displays:
Web server (Apache, Nginx, IIS)
CMS (WordPress, Drupal, Joomla)
JavaScript frameworks (React, Angular, Vue)
Analytics (Google Analytics, Hotjar)
CDN (Cloudflare, Fastly)
Hosting provide
This takes five seconds and gives you a complete technical profile.
BuiltWith
BuiltWith is a web-based tool that goes deeper than Wappalyzer. Enter a domain. BuiltWith returns the technology stack, technology history (showing when tools were added or removed), and a list of other sites using the same technologies.
The technology history is the unique value here. You can see that a site switched from WordPress to Shopify in 2022, or that they stopped using a particular analytics tool. Changes in technology stack indicate organizational changes.
WhatWeb
WhatWeb is a command-line tool for bulk technology fingerprinting. Install it:
git clone https://github.com/urbanadventurer/WhatWeb.git

cd WhatWeb

./whatweb example.com
The output is a single line of identified technologies. WhatWeb can scan multiple domains in sequence, which is useful when you have a list of subdomains to profile.
Practical Workflow
Install Wappalyzer. Visit the target site. Document the technology stack.
Run the domain through BuiltWith. Document the technology history.
For bulk analysis across subdomains, use WhatWeb.
Cross-reference identified technologies against known vulnerability databases. An outdated WordPress version or an exposed phpMyAdmin instance is a red flag.
Document everything. The technology stack tells you how the site is built and maintained. That context informs every other step of your investigation.
Lecture 6.4: Directory Enumeration & Exposed Files
Web servers sometimes have directory listing enabled. This means you can browse the server’s file structure like a folder on your desktop. Even without directory listing, predictable directory names often exist and can be discovered through brute-force enumeration.
Manual Directory Discovery
Start with common paths. Append these to the target domain and see what loads:
example.com/robots.txt

/robots.txt
/sitemap.xml
/admin/
/login/
/backup/
/uploads/
/.git/
/.env
/wp-admin/
/phpmyadmin/
/server-status/
robots.txt is especially valuable. It tells search engines what not to crawl. Those disallowed paths are often the most sensitive directories on the site. Read them carefully.
Gobuster
Gobuster is a directory and file brute-forcing tool. It takes a wordlist of common directory names and tests each one against the target domain.
Install:
sudo apt install gobusterRun:
gobuster dir -u https://example.com -w /usr/share/wordlists/dirb/common.txtGobuster returns every directory that exists on the server, including hidden ones. Common wordlists include common.txt, big.txt, and specialized lists for specific CMS platforms.
Dirb
Dirb is a simpler alternative to Gobuster. It does the same job with less configuration:
dirb https://example.comffuf
ffuf (Fuzz Faster U Fool) is a high-speed web fuzzer that can enumerate directories, files, parameters, and subdomains.
ffuf -u https://example.com/FUZZ -w /usr/share/wordlists/dirb/common.txtThe FUZZ keyword is replaced by each entry in the wordlist. ffuf is fast and highly configurable.
Finding Exposed Files
Use Google dorks to find exposed files that search engines have already indexed:
site:example.com filetype:pdf

site:example.com filetype:xlsx

site:example.com filetype:sql

site:example.com filetype:env

site:example.com filetype:log

site:example.com filetype:bak
These queries find PDF documents, spreadsheets, database backups, environment configuration files, server logs, and backup files that are publicly accessible.
Practical Workflow
Manually check common paths like
/robots.txt,/admin/,/.env, and/backup/.Run Gobuster or ffuf with a comprehensive wordlist.
Use Google dorks to find indexed exposed files.
For any discovered files, download them. Analyze them. A
.envfile may contain database credentials. A.sqlfile may contain an entire database dump. A.logfile may contain internal IP addresses and server paths.Document every exposed resource. These are security failures, and they are intelligence gold.
Lecture 6.5: SSL/TLS Certificate Analysis
SSL/TLS certificates encrypt traffic between the user and the server. But the certificates themselves are public. They contain domain names, organization details, and issuance dates. Analyzing certificates reveals related domains and organizational information.
Viewing a Certificate
Click the padlock icon in your browser’s address bar. View the certificate details. You will see:
Issued to (domain name).
Issued by (certificate authority).
Validity period.
Subject Alternative Names (SANs) — other domains covered by the same certificate.
The SAN list is the most valuable field. A single certificate may cover example.com, www.example.com, mail.example.com, and internal.example.com. All of these are now known subdomains.
crt.sh
As covered in Lecture 6.2, crt.sh searches certificate transparency logs. Enter a domain. The site returns every certificate ever issued for that domain and its subdomains. This is passive and comprehensive.
SSLScan
SSLScan tests a server’s SSL/TLS configuration and reports supported protocols, cipher suites, and certificate details.
sslscan example.comThe output shows whether the server supports outdated protocols like SSLv3 or TLS 1.0, which are vulnerable to known attacks. This is useful for vulnerability assessment, but as an OSINT investigator, you are documenting it as a finding about the organization’s security posture.
Practical Workflow
View the certificate in your browser. Document the SAN list.
Search the domain on
crt.sh. Document all historical certificates and their SANs.Run
sslscanfor a technical profile of the server’s SSL configuration.Cross-reference any new subdomains discovered through certificate analysis against the other lectures in this module.
Lecture 6.7: Automated Email Discovery with EmailCrawl
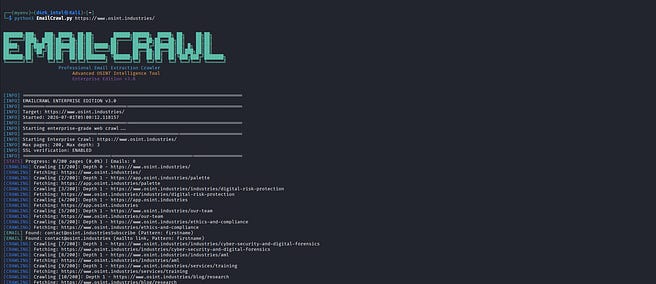
Finding email addresses manually across a website is slow. You can scan the page source of each page, check the contact section, and look through the footer. But on a large site with hundreds of pages, you will miss things. EMAIL-CRAWL automates this.
What EMAIL-CRAWL Is
EMAIL-CRAWL is an open-source Python tool that spiders a target domain, crawls every page it finds, and extracts every email address embedded in the HTML. It is designed specifically for OSINT reconnaissance and email intelligence gathering.
GitHub repository: https://github.com/techenthusiast167/EMAIL-CRAWL
Installation & Dependencies
Step 1: Download the script directly using wget with the 'Raw' link

wget -O EmailCrawl.py https[:]//gist.github.com/techenthusiast167/ed827569e6c464b042bbdd2a53847675

Step 2: Open the script in nano for verification

nano EmailCrawl.py

Step 3: Install the required Python dependencies

pip3 install requests beautifulsoup4 colorama tldextract tabulate lxml

EMAIL-CRAWL uses requests and beautifulsoup4 for HTTP requests and HTML parsing, along with a crawling engine to move through the site. The requirements file handles all dependencies.
Basic Usage
Run EMAIL-CRAWL against a target domain:
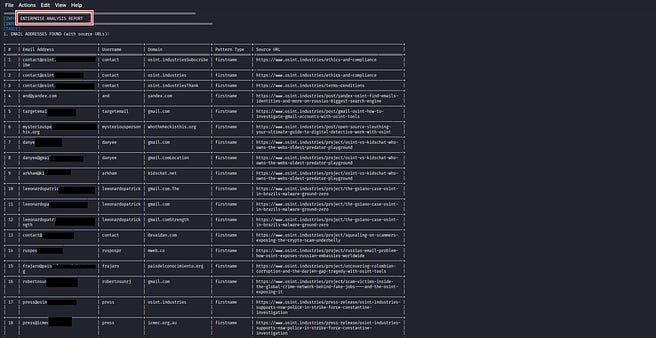
python emailcrawl.py example.comEMAIL-CRAWL starts at the homepage, follows every internal link it finds, and extracts any email address from each page. The output is a deduplicated list of every email address discovered across the entire site arranged in tabular format for easy analysis.
Example output:
Controlling the Crawl Depth
Large sites can take time to crawl fully. You control the scope with two flags:
python emailcrawl.py example.com --max-pages 100 --max-depth 2--max-pages 100limits the crawl to 100 pages maximum. Once the tool hits this number, it stops. This prevents endless crawling on massive sites.--max-depth 2controls how deep the crawler goes. Depth 0 is the starting page. Depth 1 is pages linked from the starting page. Depth 2 is pages linked from those pages.
For most investigations, a max depth of 2 and a page limit of 100 is sufficient to cover the main sections of a site without getting lost in archives, blog pagination, or infinite loops.
Output to File
Save the results for your investigation records:
python3 EmailCrawl.py https://target-company.com --output ./intel/results.jsonThe --output flag specifies the file path where results are saved. In this example, the tool writes all discovered emails to results.json inside the intel directory. The output is structured JSON, which means you can parse it programmatically, import it into other tools, or read it directly.
Each entry contains the email address and the page where it was found, giving you full traceability back to the source.
What You Do With the Emails
Every email address EMAIL-CRAWL extracts becomes a pivot point. Plug each one into your email investigation workflow from Module 3. Run them through Google dorks. Search them on breach databases. Check if they are linked to social media accounts. A single corporate email address can lead to LinkedIn profiles, GitHub accounts, and personal websites.
If EMAIL-CRAWL finds john.doe@target.com, and you already know from LinkedIn that John Doe is the CTO, you have just confirmed his corporate email address. That is a direct contact path and an attribution anchor.
Practical Workflow
Clone and install EMAIL-CRAWL from GitHub.
Run it against the target domain with
--max-pages 100 --max-depth 2.Filter for corporate domain emails.
Plug each email into your email intelligence workflow from Module 3.
Cross-reference discovered emails against LinkedIn, breach databases, and social media.
Document the emails, their sources, and any associated intelligence.
Full Documentation
For complete usage instructions, all available flags, advanced configuration options, and output formats, refer to the official repository documentation:https://github.com/techenthusiast167/EMAIL-CRAWL
The README covers everything from installation to advanced crawling strategies. If you need to customize the crawl behavior beyond what was covered here, the documentation is your first stop.
Lecture 6.8: Advanced Document Discovery — Extracting Hidden Files from Target Websites
Sometimes the most valuable intelligence on a website is not on the pages. It is in the files the owner forgot about. Backups. Internal PDFs. Spreadsheets. Configuration files. Database dumps. These files sit in directories with no links pointing to them. You cannot find them by browsing. You find them by thinking like an attacker and using the same techniques security professionals use to map exposed surfaces.
This lecture covers ethical, passive techniques to discover and extract publicly accessible documents from websites. Everything covered here works on files that are openly available. You are not bypassing authentication. You are not exploiting vulnerabilities. You are finding what was left in the open.
Part 1: Common File Types That Leak Intelligence
Before you start searching, know what you are looking for. Certain file types are more likely to contain valuable data.
File Type_____________What It Might Contain
.pdf> Internal reports, strategy documents, training manuals, board minutes.xlsx/.xls> Financial data, employee lists, project plans, client databases.docx/.doc> Contracts, policies, internal memos, executive correspondence.csv> Exported databases, contact lists, transaction records.sql> Database dumps with user data, credentials, and table structures.env> Environment configuration files with API keys and database passwords.log> Server logs with internal IPs, error messages, and user activity.bak/.backup> Backup files of websites, databases, or configuration.json> API responses, configuration files, structured data exports.xml> Sitemaps, configuration files, data exports.txt> Notes, credentials, internal documentation.pem/.key> Private keys and certificates
Each of these is a potential intelligence goldmine. Your job is to find them.
Part 2: Google Dorking for File Discovery
Start passive. Google has already indexed millions of exposed files. Use dorks to find them.
Find Specific File Types on a Domain
site:target.com filetype:pdf

site:target.com filetype:xlsx

site:target.com filetype:sql

site:target.com filetype:env

site:target.com filetype:log

site:target.com filetype:bak
Find Files with Specific Keywords
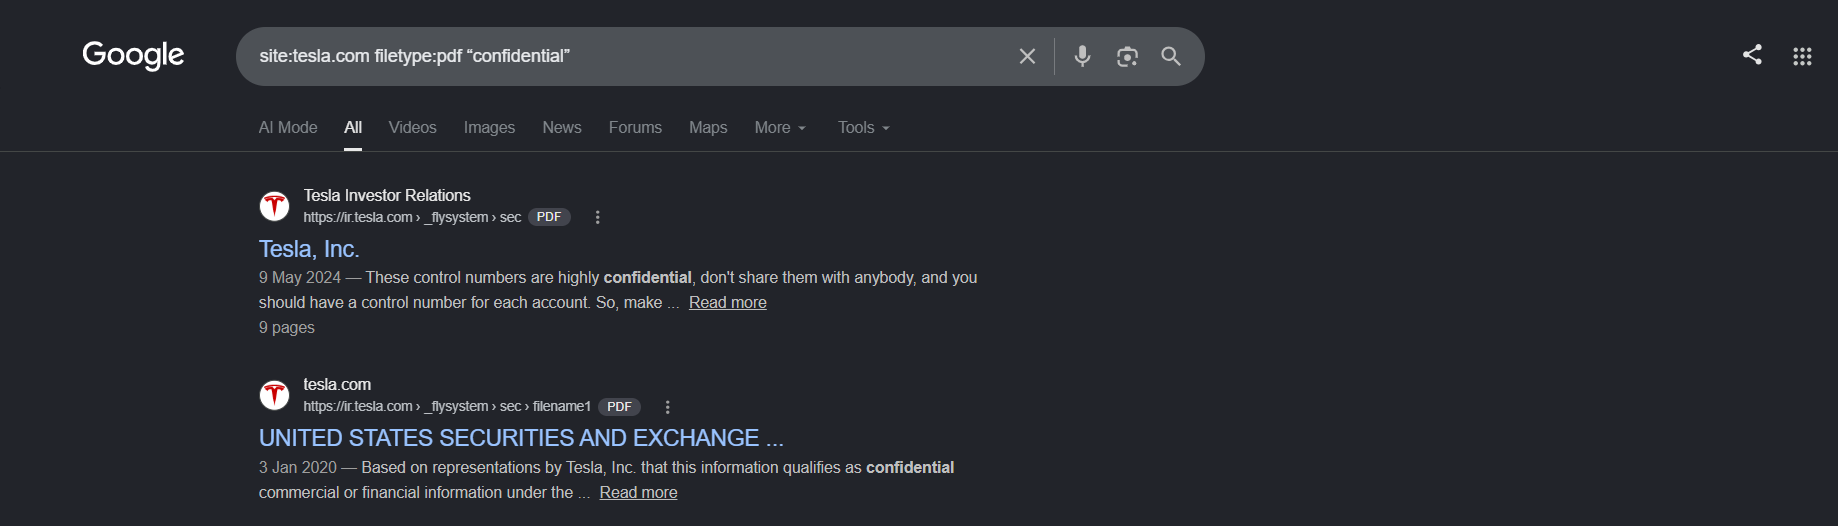
site:target.com filetype:pdf “confidential”

site:target.com filetype:xlsx “password”

site:target.com filetype:sql “CREATE TABLE”

site:target.com filetype:env “DATABASE_URL”

site:target.com filetype:docx “internal”
Find Backup Files
site:target.com inurl:backup

site:target.com intitle:”index of” “backup”

site:target.com ext:bak
Find Directory Listings with Exposed Files
site:target.com intitle:”index of” “parent directory”

site:target.com intitle:”index of” “.pdf”

site:target.com intitle:”index of” “.sql”
These dorks return files that are publicly accessible. Google found them. You can access them. Download and analyze.
Keep in mind, what Google missed might be present on Yandex. Different search engines crawl different parts of the web. Google dominates the Western internet. Yandex indexes more deeply into Eastern European and Russian content. Bing often catches what both miss. Endeavor to run the same dorks across Google, Yandex, and Bing for effective intelligence gathering. A PDF invisible to Google may be the first result on Yandex. Do not leave intelligence on the table because you only searched one engine.
Part 3: How to Discover File Paths Before Downloading
You cannot download what you cannot find. Before you run any download command, you need to know the file exists and where it lives. Here are the techniques to discover hidden file paths.
Method 1: Search Engines (Passive Discovery)
The fastest way to find exposed files is to let search engines do the work. Each result is a direct URL to a file already indexed. You did not guess it. The search engine found it for you. Run dorks across Google, Yandex, and Bing. Collect every URL found.
Method 2: robots.txt Mining
The robots.txt file tells search engines what not to crawl. These disallowed paths are often the most sensitive areas of the site. The owner is literally telling you where the good stuff lives.
curl -s https://target.com/robots.txtIf the output shows:
Disallow: /internal-docs/
Disallow: /wp-content/uploads/private/
Disallow: /backup/
You now have three directory paths to investigate. Every disallowed path is a directory worth probing. The owner does not want these indexed. That means they contain something worth hiding.
Method 3: Sitemap.xml Enumeration
The sitemap lists every page the owner wants search engines to find. Sometimes it includes files they did not realize were listed.
curl -s https://target.com/sitemap.xml | grep -i “.pdf”

curl -s https://target.com/sitemap.xml | grep -i “.xlsx”

curl -s https://target.com/sitemap.xml | grep -i “.sql”
Any matching URLs are direct file paths. The owner published them. You just extracted them.
Method 4: Directory Listing Discovery
Some servers leave directory listing enabled. When you visit a directory URL, instead of a web page, you see a list of every file in that folder.
Find these with Google:
site:target.com intitle:”index of” “parent directory”Or probe common upload directories directly in your browser:
https://target.com/uploads/

https://target.com/wp-content/uploads/

https://target.com/files/

https://target.com/documents/

https://target.com/backup/

https://target.com/media/
If any of these display a file list instead of a 403 or 404 error, you have found an open directory. Every filename in that list is a direct download path.
Method 5: Curl Header Probing
Once you suspect a file exists, confirm it without downloading.
You think there might be a backup file at:
https://target.com/backup/database.sqlProbe it:
curl -I https://target.com/backup/database.sqlIf the response is 200 OK, the file exists. You now have a confirmed path. If the response is 404 Not Found, it is not there. Move on to the next candidate.
Method 6: Wordlist-Based File Discovery
This technique lets you probe a website for common files without manually typing each URL. You create a list of filenames, then run a script that checks each one automatically.
Step 1: Create the Wordlist File
Open your terminal. Create a new file called common_files.txt:
nano common_files.txtPaste the following list into the file:
backup.zip
database.sql
backup.sql
dump.sql
export.csv
report.pdf
users.xlsx
config.json
.env
archive.tar.gz
old_site.zip
internal-report.pdf
wp-config.php
phpinfo.php
adminer.php
server-status
.git/config
.DS_Store
Save and exit. In nano, press Ctrl + X, then Y, then Enter .
Step 2: Write the Bash Loop Script
Create a new script file:
nano probe_files.shPaste the following:
#!/bin/bash


# Check if a directory URL was provided
if [ -z “$1” ]; then
    echo “Usage: bash probe_files.sh https://target.com/uploads/”
    echo “Make sure the URL ends with a forward slash.”
    exit 1
fi

TARGET_DIR=”$1”
WORDLIST=”common_files.txt”

# Check if wordlist exists
if [ ! -f “$WORDLIST” ]; then
    echo “[-] Wordlist file ‘$WORDLIST’ not found.”
    echo “Create it with common filenames, one per line.”
    exit 1
fi

echo “[*] Probing files in: $TARGET_DIR”
echo “[*] Wordlist: $WORDLIST”
echo “”

while read file; do
    # Skip empty lines and comments
    [[ -z “$file” || “$file” =~ ^# ]] && continue

    response=$(curl -s -o /dev/null -w “%{http_code}” “${TARGET_DIR}${file}”)

    if [ “$response” = “200” ]; then
        echo “[FOUND] ${TARGET_DIR}${file} — Status: $response”
    elif [ “$response” = “301” ] || [ “$response” = “302” ]; then
        echo “[REDIRECT] ${TARGET_DIR}${file} — Status: $response”
    elif [ “$response” = “403” ]; then
        echo “[FORBIDDEN] ${TARGET_DIR}${file} — Exists but access denied”
    else
        echo “[NOT FOUND] ${TARGET_DIR}${file} — Status: $response”
    fi
done < “$WORDLIST”

echo “”
echo “[*] Probing complete.”
Save and exit (Ctrl + X, Y, Enter).
Step 3: Make the Script Executable
chmod +x probe_files.shStep 4: Run the Script
bash probe_files.sh https://target.com/uploads/Make sure the URL ends with a forward slash. The script appends each filename from your wordlist to this base URL and checks if it exists.
Step 5: Read the Output
The script shows the status of each probed file:
[*] Probing files in: https://target.com/uploads/
[*] Wordlist: common_files.txt

[NOT FOUND] https://target.com/uploads/backup.zip - Status: 404
[FOUND] https://target.com/uploads/database.sql - Status: 200
[NOT FOUND] https://target.com/uploads/backup.sql - Status: 404
[NOT FOUND] https://target.com/uploads/dump.sql - Status: 404
[FOUND] https://target.com/uploads/export.csv - Status: 200
[FOUND] https://target.com/uploads/report.pdf - Status: 200
[FORBIDDEN] https://target.com/uploads/.env - Exists but access denied
[NOT FOUND] https://target.com/uploads/archive.tar.gz - Status: 404
[*] Probing complete.
Every [FOUND] result is a confirmed file path. You discovered it through methodical probing. Now download it with curl -O.
Step 6: Download the Discovered Files
For each [FOUND] URL, run:
curl -O https://target.com/uploads/database.sql

curl -O https://target.com/uploads/export.csv

curl -O https://target.com/uploads/report.pdf
You now have local copies for analysis.
Step 7: Customizing Your Wordlist
Add more filenames to common_files.txt based on your target.
If you are investigating a WordPress site, add WordPress-specific files:
wp-config.php.bak
wp-config.php.old
wp-content/debug.log
If investigating a company, add company-specific guesses:
employee-list.xlsx
salary-2024.pdf
board-minutes.docx
The better your wordlist matches the target, the more files you will discover. Build your wordlists over time. Save them. Reuse them across investigations.
Method 7: Wayback Machine Discovery
The Wayback Machine archives files, not just pages. If a file was once publicly accessible, it might be archived.
Search for file paths on the Wayback Machine:
https://web.archive.org/web/*/target.com/uploads/*

https://web.archive.org/web/*/target.com/*.pdf
If a snapshot exists, the Wayback Machine gives you the direct URL the file once lived at. The original file may still be there. Probe it with curl -I. If it returns 200, download it.
Part 4: Curl for Header and File Probing
Curl is a command-line tool that fetches data from URLs. It is more surgical than a browser. You can probe for files, check headers, and download documents without ever clicking a link.
Check if a File Exists Without Downloading It
curl -I https://target.com/backup/database.sqlThe -I flag fetches only the HTTP headers. If the server returns 200 OK, the file exists. Document it.
Probe Common Backup and Config Files
curl -I https://target.com/.env

curl -I https://target.com/backup.zip

curl -I https://target.com/database.sql

curl -I https://target.com/admin/backup.tar.gz

curl -I https://target.com/robots.txt

curl -I https://target.com/sitemap.xml
Each 200 OK response tells you a file exists and is publicly accessible.
Download a File for Analysis
curl -O https://target.com/wp-content/uploads/2023/01/internal-report.pdfThe -O flag saves the file with its original filename. You can now open it, analyze it, and extract metadata.
Download and Pipe Directly to Analysis
curl -s https://target.com/document.pdf | strings | grep -i “password”This downloads the file, extracts readable strings, and searches for the word “password” all in one command. You never save the file. You just extract the intelligence.
Part 5: Recursive Download with Wget
Wget is a command-line downloader that can mirror entire directory structures. When you find an open directory, Wget downloads everything in it.
Mirror an Open Directory
wget -r -np -R “index.html*” https://target.com/uploads/Breakdown:
-r— Recursive. Follows links within the directory.-np— No parent. Stays within the specified directory.-R "index.html*"— Rejects index.html files. You want the documents, not the directory listing page.
Wget downloads every file in that directory. PDFs, spreadsheets, backups, everything. You now have a local copy for analysis.
Mirror with a Delay (Polite Scraping)
wget -r -np -w 2 --limit-rate=200k https://target.com/uploads/-w 2— Waits 2 seconds between requests. Polite. Reduces server load.--limit-rate=200k— Limits download speed to 200KB/s. Less aggressive.
Be polite. You are an investigator, not an attacker. Aggressive downloading can crash the target server and turns your ethical investigation into a denial-of-service attack.
Download Only Specific File Types
wget -r -np -A “*.pdf,*.xlsx,*.docx,*.sql” https://target.com/uploads/The -A flag accepts only the specified file types. Everything else is ignored. This is surgical extraction.
Part 6: Extracting Metadata from Discovered Documents
Once you have downloaded documents, extract their metadata. The same EXIF techniques from Module 2 apply here.
Extract PDF Metadata
exiftool document.pdfLook for:
Author name (often a real employee name).
Software used (reveals internal tools).
Creation and modification dates.
Embedded usernames or file paths.
Extract Office Document Metadata
exiftool report.docxWord and Excel documents embed author names, company names, and sometimes internal network paths. A document authored by “John Doe” with the company “Acme Corp” and the file path \\internal-server\shared\finance\ tells you who wrote it, where they work, and what their internal network structure looks like.
Part 7: Extracting Images from Target Websites for Analysis
Images on a website carry intelligence. Employee photos. Office locations. Product prototypes. Event photographs. Screenshots of internal tools. Every image is a potential source of metadata, geolocation data, and visual evidence.
This section covers how to discover, download, and analyze images from a target website ethically.
What Images Can Reveal
Image Type___________Potential Intelligence
Staff photos: Employee identities, dress code, office environment
Office photos: Interior layout, security measures, building location
Event photos: Attendees, partnerships, dates and venues
Product photos: Unreleased products, manufacturing details, prototypes
Screenshots: Internal software, usernames, project names
Document scans: Full documents accidentally published as images
Logo files: Brand assets, company identity
Background images: Office views that can be geolocated
Manual Extraction via Page Source
Before reaching for automated tools, learn to pull images directly from the page source. This works on any page, requires no tools, and often surfaces images that automated crawlers miss.
Step 1: Open the Page Source
Navigate to the target page. Right-click anywhere on the background. Select “View Page Source.” A new tab opens with the raw HTML.
Step 2: Search for Image Files
Press Ctrl + F to open the search bar. Search for common image extensions one at a time:
.jpg.jpeg.png.gif.svg.webp.ico
Each search jumps to a line containing that extension. You will see image URLs embedded in src, data-src, srcset, and content attributes.
Step 3: Extract the Full URLs
When you find a match, copy the full image URL. It will look something like:
<img src=”https://target.com/wp-content/uploads/2024/03/team-photo.jpg”>

<img data-src=”https://target.com/assets/office-interior.png”>

<meta property=”og:image” content=”https://target.com/images/preview.jpg”>
Open the URL in a new browser tab. If the image loads, right-click and save it to your investigation folder.
Step 4: Search for Hidden Image Paths
Some images are referenced in JavaScript, CSS, or JSON blobs. Search for these patterns:
background-imageurl(og:imagetwitter:imagefavicon
These often point to images not visible in standard img tags but still publicly accessible.
Step 5: Check the Page with Inspect Element
Right-click on any image on the page. Select “Inspect” or “Inspect Element.” The developer tools panel opens, highlighting the exact HTML that renders that image. Look for the src attribute. Copy the full URL. This method catches images loaded dynamically by JavaScript that may not appear in the static page source.
Step 6: Bulk Download from Manual Extraction
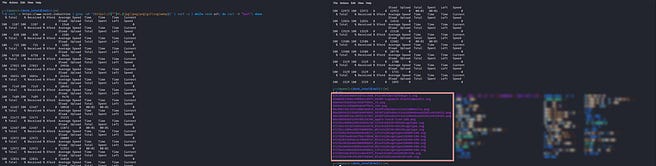
Once you have pulled image URLs from the page source, you do not need to open each one individually. Feed them all into a downloader at once.
Extract all image URLs from the page source and download them in one command.
curl -s https://target.com | grep -oP ‘(https?://[^”]*\.(jpg|jpeg|png|gif|svg|webp))’ | sort -u | while read url; do curl -O “$url”; doneBreakdown:
curl -s https://target.com— Fetches the page source silently.grep -oP '(https?://[^"]*\.(jpg|jpeg|png|gif|svg|webp))'— Extracts every image URL ending in common extensions.sort -u— Removes duplicates.while read url; do curl -O "$url"; done— Downloads each unique image to the current folder.
This is fast. One command. Every image on the page lands in your working directory.
Automated Image Extraction with WebRecon
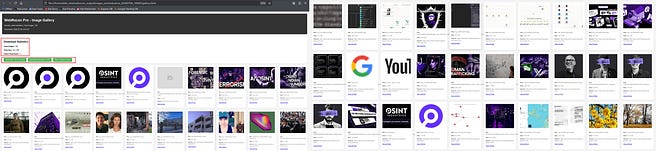
Manual extraction works for small pages. For comprehensive collection across an entire website, use WebRecon, a purpose-built OSINT image reconnaissance tool.
GitHub Repository: https://github.com/techenthusiast167/WebRecon
WebRecon crawls a target website, extracts every image it finds, and organizes everything into a structured intelligence package. No complex setup. No API keys. Point it at a URL and it handles the rest.
What WebRecon Produces

When you run WebRecon against a target, it generates a complete output folder containing:
Output__________Description
raw/>Full-resolution original images as they appear on the target sitethumbnails/> Smaller thumbnail versions for quick visual browsinggallery.html> An interactive HTML gallery with all images arranged neatly, filterable by filename, and displaying metadata alongside each imageimage_summary.csv> A spreadsheet containing every image URL, filename, alt text, file type, dimensions, and source pagemetadata.json>tructured JSON file with all extracted metadata for programmatic analysis or import into other tools
How to Use WebRecon
Step 1: Direct Download using Wget
wget -O WebRecon.py https://gist.githubusercontent.com/techenthusiast167/dfdaff3b49df63a86e7860376288b7d3/raw/64ae31387c8e79cb39a7d0ace8f706a4cc6c06af/webrecon.pyStep 2: Install Dependencies
pip install requests beautifulsoup4 colorama tabulate tldextract dnspython python-whois pillow networkx pyvis lxml html5lib pysocks urllib3Step 3: Run WebRecon
python3 webrecon.py https://target.comWebRecon begins crawling the target site. It discovers images embedded in img tags, srcset attributes, CSS backgrounds, meta tags, and lazy-loaded elements. All images are downloaded and organized into the output folder.
Step 4: Open the Gallery
Navigate to the output folder and open gallery.html in your browser. You will see every image displayed with its filename, source URL, alt text, and file type. Use the filter bar to search images by keyword. Click any image to open the full-resolution version.
Step 5: Analyze the CSV
Open image_summary.csv in any spreadsheet application. Sort by filename, file type, or source page. Identify patterns. All staff photos in one directory. All product images in another. The CSV gives you a bird’s-eye view of every image asset on the target site.
Step 6: Use the JSON Metadata
Load metadata.json into any analysis tool or script. The structured format allows you to automate further processing. Feed image URLs into reverse image search scripts. Cross-reference filenames against known patterns.
Reverse Image Search for Attribution
Every image extracted can be traced back to its source or found elsewhere on the internet using reverse image search. This is how you discover if a staff photo appears on LinkedIn, if a product image matches a competitor’s catalog, or if a background photo has been used elsewhere with location tags.
Take any image from the raw/ folder or one you manually extracted. Upload it to:
Google Lens: https://lens.google.com — Best for general search and object identification.
Yandex Images:
https://yandex.com/images— Superior for facial matching and Eastern European sources.TinEye: https://tineye.com — Best for tracking when and where an image first appeared.
Bing Images:
https://www.bing.com/images— Often catches results missed by Google.
If the image appears on a LinkedIn profile, you have a name. If it appears on a news article, you have context and a date. If it appears on a different domain, you have a connection between the two sites. Reverse image search turns a photograph into an attribution bridge.
Other WebRecon Capabilities
WebRecon is a full-spectrum website reconnaissance tool built for OSINT investigators. It handles crawling, email harvesting, social media discovery, image extraction, technology detection, DNS enumeration, document discovery, relationship graphing, and reporting.
For full documentation, usage examples, and configuration options, refer to the repository: https://github.com/techenthusiast167/WebRecon
Part 8: Practical Workflow Summary
Phase 1: Passive Discovery
Google dork the domain. Run
site:target.com filetype:pdfand all other file type dorks. Repeat every dork on Yandex and Bing. Different engines index different files. Do not leave intelligence on the table.Check
robots.txt. Pullcurl -s https://target.com/robots.txt. Note every disallowed directory. The owner is telling you where the sensitive files live. Probe each one.Pull
sitemap.xml. Runcurl -s https://target.com/sitemap.xml | grep -i ".pdf"and repeat for.xlsx,.sql,.docx, and other extensions. Files listed here were published by the owner.Check the Wayback Machine. Search
https://web.archive.org/web/*/target.com/*.pdf. Historical snapshots reveal file paths no longer on the live site.
Phase 2: Active Probing
5. Visit common directories in your browser. Try /uploads/, /wp-content/uploads/, /files/, /documents/, /backup/, /media/, /assets/. Look for directory listings. If you see a file list instead of a 403 or 404, you found an open directory.
6. Probe suspected file paths with curl -I. Confirm existence without downloading. 200 OK means the file is there. 404 means move on.
Phase 3: Download
7. Mirror open directories with wget. Run wget -r -np -R "index.html*" to download everything inside. Add -w 2 to be polite. Add -A to filter by file type.
8. Download discovered files with curl -O. For individual confirmed files, pull them directly.
9. Extract images. Start manual. View the page source and search for .jpg, .png, .gif, .svg, .webp. Extract key images directly. Use Inspect Element on images that appear on the page but not in the static source. For bulk download, extract all image URLs with curl -s https://target.com | grep -oP '(https?://[^"]*\.(jpg|jpeg|png|gif|svg|webp))' | sort -u > image_urls.txt and download.
10. For full coverage, run WebRecon. python3 webrecon.py https://target.com. Open gallery.html for visual browsing. Review image_summary.csv for structured data. Use metadata.json for programmatic analysis.
Phase 4: Analysis
11. Extract metadata from every document. Run exiftool on PDFs, Office documents, and images. Pull author names, software versions, creation dates, GPS coordinates, and internal file paths.
12. Run reverse image search on key images. Use Google Lens, Yandex, TinEye, and Bing. Find where else they appear. Cross-reference with LinkedIn, news articles, and other domains.
13. Document everything. File names, full URLs, metadata fields, dates of access, and your analysis. If it is not documented, it did not happen.
Ethical Reminder
Every technique in this lecture targets publicly accessible files. You are not bypassing logins. You are not exploiting vulnerabilities. You are not accessing anything the server does not willingly serve to anyone who asks.
If a file is protected by authentication, you stop. If a directory returns 403 Forbidden, you move on. Aggressive scanning can crash a server. Use delays between requests. Limit your download speed.
This is reconnaissance, not intrusion. Stay on the right side of that line. Your reputation and your freedom depend on it.
Module 7: Advanced Investigative Tradecraft
Most OSINT courses stop at tools and techniques. They teach you how to find data. They do not teach you how to think about what you found, how to protect the identity you use to find it, or how to move from one piece of data to the next without getting lost.
This module fills those gaps. You will learn how to build and maintain sock puppets that survive scrutiny. You will learn structured analytic techniques that force you to challenge your own conclusions. And you will learn how to pivot, the single most important skill in any investigation. Knowing how to move from one data point to the next, in the right order, without chasing noise, is what separates productive investigators from people who just collect bookmarks.
Lecture 7.1: Sock Puppet Management & Anti-Suspension Tactics
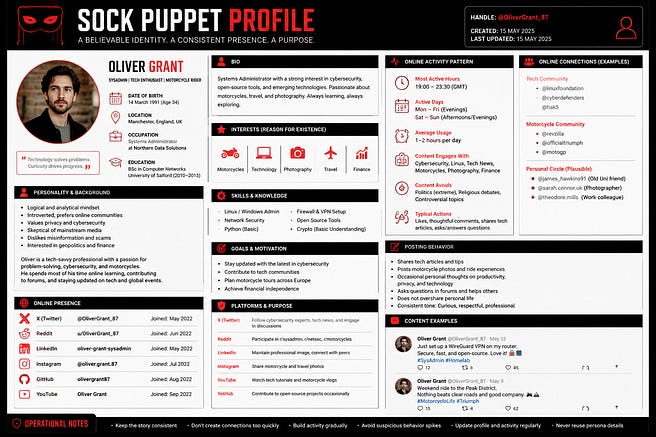
Module 0 taught you to create a sock puppet. That was the start. Creation is easy. Maintenance is hard. A sock puppet that gets suspended on day three is worse than no sock puppet at all because you lost the time you invested and potentially exposed your investigation.
This lecture is about keeping your persona alive, credible, and undetected for the duration of your investigation and beyond.
Part 1: Building a Believable Backstory
A sock puppet is not a username and a profile picture. It is a person. People have histories. They have interests. They have friends. They have opinions. The more complete your persona, the less likely a platform is to flag it as fake.
Start with the basics — Name, location, occupation. Keep these close to reality. If you have never been to Berlin, do not make your persona a Berlin native. You will slip up. A platform may ask for location verification. Someone may message you in German. Keep the persona within your own knowledge base.
Give the persona a plausible birth year — Not too young. Platforms flag accounts claiming to be 18 with zero digital history. Not too old. A 65-year-old joining TikTok for the first time is unusual. Aim for 25–40. Old enough to have a history. Young enough to be platform-native.
Give the persona interests — Three to five hobbies that align with the investigation’s needs. If you are investigating motorcycle forums, your persona should like motorcycles. If you are investigating corporate fraud, your persona should work in finance or compliance. The interests are your reason for being in the spaces you need to access.
Write this backstory down. Keep it in a text file inside your investigation VM. You will forget details over time. The file is your memory.
Part 2: Aging the Account
A brand-new account with zero friends, zero posts, and a profile picture uploaded ten minutes ago is a red flag. Platforms use account age and activity patterns to detect bots and fake profiles. You must age your sock puppet before you use it for any sensitive work.
Create the account — Upload a profile picture. Fill out the bio. Add a few interests. Then leave it alone for at least two weeks. Preferably a month. During this time, log in occasionally. Scroll the feed. Like a few posts from public figures or brands. Do not add friends yet. Do not join groups. Do not message anyone. Just exist.
After the aging period, start building activity slowly — Post once or twice a week. Nothing controversial. Nothing investigative. Share a news article with a neutral comment. Post a photo of a coffee cup with no location tag. Comment on a public post with something generic and friendly. The goal is to create a normal-looking activity history.
Add friends gradually — Five in the first week after aging. Ten the next. Do not add fifty people in one day. That is bot behavior. Accept friend requests from real accounts. Let the network build naturally.
Part 3: Anti-Suspension Tactics
Platforms suspend accounts that trigger their automated detection systems. You need to know what triggers them.
IP Consistency
Your sock puppet lives in a specific location. Its IP address should reflect that. If you created the account while connected through a VPN in Manchester, always log into that account through a Manchester IP. If you switch to a New York IP tomorrow, the platform sees a user who teleported across the Atlantic. That triggers a security check.
Use a dedicated VPN server for each sock puppet. Document which server belongs to which persona. Never mix them.
Browser Fingerprint Consistency
Your browser fingerprint is a combination of your screen resolution, installed fonts, timezone, language settings, browser version, and dozens of other data points. Platforms use this to identify you across sessions.
If you created the sock puppet in Firefox with a specific set of privacy extensions and a 1920x1080 screen resolution, always use that same configuration for that persona. The Brave browser’s fingerprinting protection helps, but consistency matters more than protection. A consistent fingerprint is a normal fingerprint.
Activity Patterns
Real people do not log in at 3 AM every day for exactly twelve minutes, perform the same actions, and log out. They check their phone throughout the day. Sometimes they spend an hour scrolling. Sometimes they check for thirty seconds and close the app. Vary your activity. Log in at different times. Stay logged in for different durations. Do different things.
Avoiding Platform Triggers
Do not send friend requests to strangers at high volume. Do not post the same message in multiple groups. Do not use temporary email addresses for account creation. Do not use phone numbers from free SMS verification services. These are all known bot patterns.
If a platform asks for phone verification, provide it from a real number. Burner phones are an operational expense. Accept it. A $30 prepaid phone saves a sock puppet you spent a month building.
Part 4: When to Retire a Sock Puppet
No sock puppet lasts forever. Eventually, it will be compromised, suspended, or simply outlive its usefulness. Know when to retire it.
Signs it is time to retire:
The platform has requested identity verification you cannot provide.
The account has received unusual attention from other users suggesting someone is investigating you back.
The account has been flagged or restricted by the platform.
The investigation it was built for is complete and the persona is no longer needed.
You suspect your canary tokens have been triggered, indicating someone has accessed files or links associated with the puppet.
When retiring, do not delete the account abruptly. That looks suspicious. Wind it down. Post less. Engage less. Let it go dormant. If you need to return to the same investigative space later, you do not want a trail of deleted accounts connected to your operational IP range.
Part 5: Tools for Sock Puppet Management
Burner phones: Prepaid SIM cards from local retailers. Cash purchase. No ID required.
Dedicated VPN servers: One per persona. Document the mapping.
Password manager: Store credentials inside your investigation VM. Never on your host machine.
Canary tokens: Embed these in documents or links associated with your persona. If someone accesses them, you receive an alert. This tells you someone is investigating you.
This Person Does Not Exist:
thispersondoesnotexist.comgenerates AI-created faces for profile pictures. Reverse image search returns nothing. The face is not real. It cannot be traced to a real person.
Lecture 7.2: Structured Analytic Techniques for OSINT
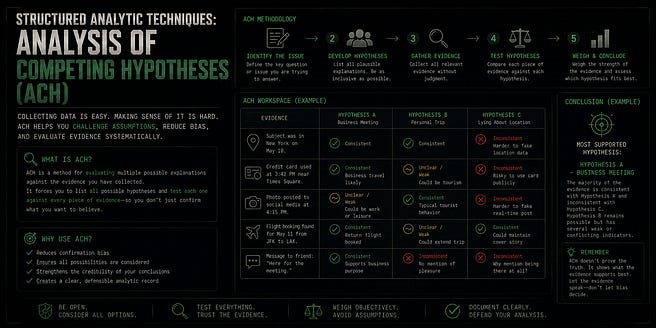
Collecting data is easy. Making sense of it is hard. Structured analytic techniques are frameworks developed by the intelligence community to reduce bias, challenge assumptions, and evaluate evidence systematically. They turn a pile of findings into a defensible conclusion.
Part 1: Analysis of Competing Hypotheses (ACH)
ACH is a method for evaluating multiple possible explanations against the evidence you have collected. Instead of picking the explanation you like and looking for evidence to support it, ACH forces you to list all possible explanations and test each one against every piece of evidence.
Here is the process
Step 1: Define the Question
Be specific — “Who is behind the anonymous account @Allen123?” Not “What is going on with this account?” Precision matters.
Step 2: List All Possible Hypotheses
Write down every possible answer — Do not filter yet. Include options you think are unlikely. Include options you do not want to be true. The goal is to exhaust the possibilities.
Example:
H1: The account is operated by a lone individual with no affiliation.
H2: The account is operated by a competitor conducting corporate espionage.
H3: The account is operated by a state-sponsored actor.
H4: The account is operated by an insider at the target company.
H5: The account is a bot or automated persona with no human operator.
Step 3: List All Evidence
Write down every piece of evidence you have collected. Only include verified evidence. Not assumptions. Not guesses. Things you can source.
Example:
E1: Account created March 2025.
E2: Posts exclusively during 9 AM–5 PM GMT.
E3: Profile picture hashes to a LinkedIn photo of a known competitor employee.
E4: Writing style uses British English spelling.
E5: Account has never posted from a mobile device (only web client).
Step 4: Create a Matrix
Put hypotheses across the top. Put evidence down the side. For each cell, rate whether the evidence is consistent ©, inconsistent (I), or neutral (N) with that hypothesis.
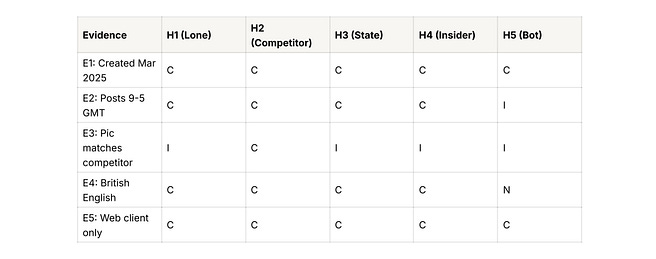
Step 5: Refine and Eliminate
Look at the matrix. H2 (Competitor) has the fewest inconsistencies. H1 has an inconsistency on E3. H5 has an inconsistency on E2 (bots do not keep office hours). The evidence points toward H2. You do not conclude H2 is correct. You conclude H2 is the most consistent with the available evidence. That is an important distinction.
Step 6: Identify Gaps
What evidence would disprove your leading hypothesis? If H2 is correct, you would expect the account to post about competitor products. If it does not, that weakens H2. Identify the missing evidence. Go find it.
ACH does not give you certainty. It gives you clarity about what the evidence actually supports and where your gaps are.
Part 2: Key Assumption Check
Every investigation rests on assumptions. Some are explicit. Most are not. A Key Assumption Check forces you to list your assumptions and test whether they are valid.
Step 1: List Your Assumptions
Write down everything you are assuming about the investigation. Be honest.
Example:
“The target is operating from the country their IP address suggests.”
“The target’s LinkedIn profile accurately reflects their employment.”
“The email address found on the website belongs to the target.”
“The profile picture is actually a photo of the target.”
“The target is a single individual, not a group.”
Step 2: Rate Each Assumption
For each assumption, ask: what evidence supports this? If the answer is “none” or “it seems reasonable,” the assumption is weak.
Rate them:
Solid: Supported by multiple independent sources.
Plausible: Supported by some evidence but not confirmed.
Weak: No supporting evidence. Just feels true.
Step 3: Challenge the Weak Assumptions
For every weak assumption, ask: what if this is wrong? How would that change my conclusions?
If you assumed the target is in the UK because their IP says London, but they are actually using a VPN, your entire location assessment is wrong. If you assumed the LinkedIn profile is real but it is a fabricated persona, your attribution falls apart.
Step 4: Document the Check
Write down your assumptions, their ratings, and the impact if they are wrong. Include this in your report. It shows the client you have thought critically about your own work. It protects you if an assumption later proves false.
Part 3: Cognitive Biases to Guard Against
Your brain works against you in investigations. Here are the biases that destroy OSINT work.
Confirmation Bias: You look for evidence that supports your initial theory and ignore evidence against it. Counter this by actively searching for disconfirming evidence. If you think the target is in London, search for evidence they are not in London.
Anchoring Bias: The first piece of information you receive carries disproportionate weight. A flashy finding early in an investigation can anchor your thinking even if later evidence contradicts it. Counter this by revisiting early conclusions regularly.
Availability Bias: You overweight information that is easy to recall. A dramatic news article about a company feels more significant than a dry regulatory filing, even if the filing contains more relevant information. Counter this by weighting evidence based on reliability, not memorability.
Stereotyping Bias: You assume patterns based on demographic characteristics. “The target is a young male, so he must be technically skilled.” This is lazy. Counter this by building your profile on evidence, not assumptions.
Knowing these biases exist does not make you immune. The structured techniques exist because even trained analysts fall for them. Use the frameworks. They protect you from yourself.
Part 4: Evidence Evaluation and Confidence Ratings
Not all evidence is equal. Rate your evidence by source reliability and information credibility.
Source Reliability:
A: Reliable — Proven track record. Official records. Verified accounts.
B: Usually Reliable — Generally trustworthy. Minor inconsistencies.
C: Unreliable — History of inaccuracy. Unverified claims.
D: Unknown — New source. No track record.
Information Credibility:
1: Confirmed — Corroborated by multiple independent sources.
2: Probably True — Consistent with other evidence but not independently confirmed.
3: Possibly True — Plausible but unconfirmed.
4: Doubtful — Inconsistent with other evidence.
5: Unlikely — Contradicted by reliable evidence.
Every finding in your report should carry a rating. “The target’s date of birth is May 1962” with a rating of A1 (Reliable source, independently confirmed) is solid. “The target may have ties to a competitor” with a rating of D3 (Unknown source, unconfirmed) is speculation. Label it accordingly.
Lecture 7.3: The Art of Pivoting
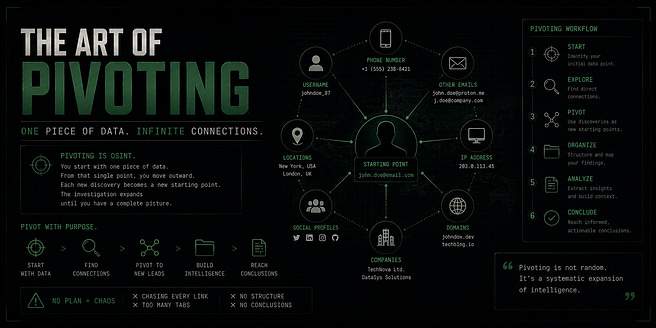
Pivoting is the core skill of OSINT investigation. You start with one piece of data. An email address. A username. A phone number. From that single point, you move outward. Each new discovery becomes a new starting point. The investigation expands until you have a complete picture.
Pivoting without a plan leads to chaos. You chase every link. You open fifty tabs. You collect data with no structure. At the end of the day, you have a lot of bookmarks and no conclusions.
This lecture teaches you to pivot with purpose.
Part 1: What Is a Pivot Point
A pivot point is any piece of data that connects to another piece of data. It is the bridge between where you are and where you need to go.
Common pivot points:
Email address → Links to social media accounts, breach databases, domain registrations.
Username → Links to other platforms, forum posts, GitHub repositories.
Phone number → Links to messaging apps, public records, carrier lookups.
Profile picture → Links to other accounts via perceptual hash matching.
Name → Links to corporate registries, news articles, court records.
Domain → Links to WHOIS records, subdomains, email servers, IP addresses.
Physical address → Links to property records, other residents, nearby businesses.
Every piece of data you collect is a potential pivot point. Not every pivot point is worth pursuing. Knowing which ones to chase and in what order is the skill.
Part 2: The Pivot Hierarchy
When you have multiple pivot points available, pursue them in this order. This hierarchy prioritizes high-value, high-reliability pivots over speculative ones.
Tier 1: Official Records
Corporate registries. Court filings. Property records. Government databases. These are the most reliable sources available. They carry legal weight. They are rarely falsified. If you have a name, pivot to Companies House or SEC EDGAR first. If you have an address, pivot to property records first. Official records anchor your investigation in verifiable fact.
Tier 2: Platform Metadata
User IDs. Account creation dates. Linked accounts. These are platform-assigned and unchangeable. A numeric user ID extracted from Facebook page source is a permanent identifier. An account creation timestamp from GitHub is a temporal anchor. These pivots are technically verifiable and resistant to manipulation.
Tier 3: Self-Reported Identity Data
Social media bios. LinkedIn profiles. Personal websites. Forum signatures. These are what the target says about themselves. They may be accurate. They may be aspirational. They may be fabricated. Treat them as leads, not facts. Verify against Tier 1 and Tier 2 before relying on them.
Tier 4: Third-Party Mentions
News articles. Blog posts. Other people’s social media posts. These are what others say about the target. They provide context but are subject to the biases and errors of the source. A news article quoting the target is Tier 4. The court filing the article references is Tier 1. Always trace back to the original source.
Tier 5: Inferred Connections
Patterns you observe but cannot directly verify. Similar writing styles. Overlapping interests. Timezone correlations. These are analytical leads, not evidence. They guide further investigation. They do not go in your final report as facts.
Part 3: The Pivot Decision Framework
When you are at a data point and deciding where to pivot next, ask yourself four questions.
Question 1: What question am I trying to answer?
Every pivot should serve an investigative objective. “I need to confirm the target’s location.” “I need to find a corporate email address.” “I need to link this anonymous account to a real identity.” If a pivot does not help answer a specific question, deprioritize it.
Question 2: Is this pivot point reliable?
A corporate registry filing is reliable. A random forum post claiming the target lives in a specific city is not. Prioritize Tier 1 and Tier 2 pivots before chasing Tier 4 and 5.
Question 3: Will this pivot produce new pivot points?
Some pivots are dead ends. A profile picture that hashes to nothing on other platforms stops there. An email address that appears in zero breach databases stops there. That is fine. Not every pivot produces results. But prioritize pivots likely to open new investigation paths.
Question 4: Am I drifting from the objective?
It is easy to fall down rabbit holes. You start investigating a target’s business partner, who leads to their spouse, who leads to their charity work, and suddenly you are three degrees removed from the original question. Set a timer. Every thirty minutes, ask yourself: am I still investigating the right thing?
Part 4: Building a Pivot Map
A pivot map is a visual or written record of every pivot you have made and every pivot still available. It prevents duplication. It shows you where you have been and where you can go next.
The format is simple. For each entity you discover, record:
Entity: What you found (email address, username, company name).
Source: Where you found it (Companies House, Instagram page source, GitHub commit).
Confidence: A1 through D5 based on the rating system from Lecture 9.2.
Pivot Options: What new paths this entity opens.
Status: Pending, In Progress, Completed, Dead End.
Example:
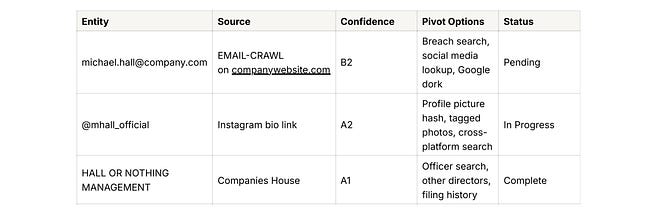
This map keeps your investigation organized. When you hit a dead end, you consult the map and see what other pivots are still pending. You never waste time wondering what to do next.
Part 5: Knowing When to Stop Pivoting
Pivoting is addictive. There is always one more link to follow. One more profile to check. One more database to search. The best investigators know when to stop.
Stop pivoting when:
You have answered the investigative question. The client asked for a risk assessment on a potential business partner. You have confirmed their identity, their corporate associations, their adverse media status, and their digital footprint. You have enough. Stop.
New pivots are producing diminishing returns. Each new branch yields less relevant information. You are learning about the target’s third cousin’s former roommate. This is not intelligence. This is noise.
You are circling back to already-visited entities. If your pivot map shows you revisiting the same types of sources without new findings, you have exhausted the available open source intelligence.
The cost of further investigation outweighs the value. Every hour you spend is an hour the client pays for. If two more days of investigation will not change the risk rating, deliver the report.
You now have the operational tradecraft to sustain investigations over time without burning your persona. You have the analytic frameworks to evaluate what you find and challenge your own conclusions. You have the pivoting methodology to move through an investigation with purpose, not chaos.
Anyone can learn to run a tool. Anyone can memorize dorks. What you have now is different. You know how to think through an investigation. How to structure your analysis. How to protect yourself while you work. How to move from one data point to the next with discipline.
These are the skills that separate collectors from analysts. A collector gathers data. An analyst understands what it means. Be the analyst.
Module 8: Dark Web Intelligence & .onion Investigation
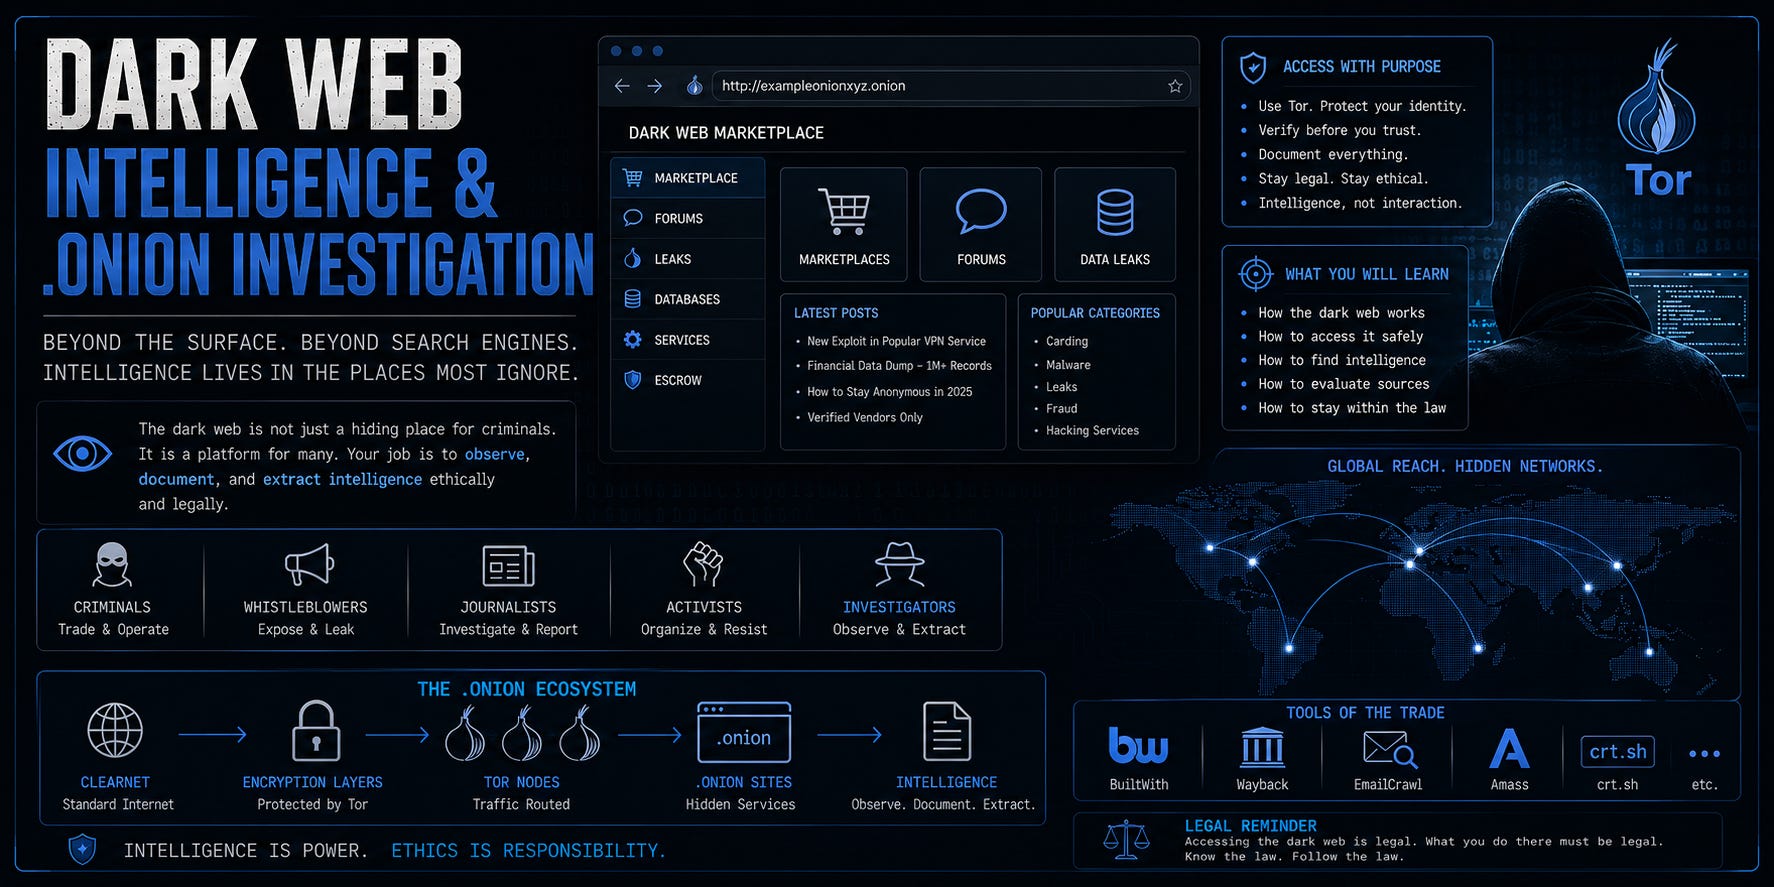
The dark web is not as mysterious as movies make it seem. It is simply a part of the internet that is not indexed by standard search engines and requires specific software to access. Criminals use it. Whistleblowers use it. Journalists use it. Activists use it. For an investigator, it is another intelligence source. Nothing more. Nothing less.
Most OSINT courses either ignore the dark web entirely or treat it like forbidden territory. This module takes a different approach. You will learn how the dark web works, how to access it safely, how to find intelligence on it, and how to stay on the right side of the law while doing it.
This is not a hacking module. You will not learn to buy anything. You will not learn to exploit anyone. You will learn to observe, document, and extract intelligence from a part of the internet most investigators never touch.
Lecture 8.1: Understanding the Dark Web — How It Actually Works
Before you access anything, you need to understand the infrastructure.
The Three Layers of the Internet
The internet is not one thing. It has layers.
Surface Web: Everything indexed by Google, Bing, and Yandex. News sites, social media, corporate websites. This is where you have spent the entire course so far. The surface web is about 4% of the total internet.
Deep Web: Everything not indexed by search engines but still accessible with a standard browser. Your email inbox. Your bank account after login. Private databases. Paid research portals. Company intranets. You access the deep web every day. It is not illegal. It is just not indexed.
Dark Web: Websites that require specific software to access. The most common is Tor, which uses .onion domains. These sites are not indexed by Google. They cannot be reached through Chrome or Firefox without Tor. The dark web is a small fraction of the deep web.
The dark web is not inherently criminal. Tor was created by the US Naval Research Laboratory. It is used by journalists, activists, whistleblowers, and privacy-conscious individuals. Criminals also use it because it provides anonymity. Your job is to navigate it professionally and ethically.
How Tor Works
Tor stands for The Onion Router. It works by encrypting your traffic in layers and bouncing it through three random relays around the world.
Your traffic enters the Tor network through a guard relay.
It passes through a middle relay.
It exits through an exit relay and reaches the destination website.
Each relay only knows the previous hop and the next hop. No single relay knows both where the traffic came from and where it is going. This provides anonymity for both the user and the website operator.
When you visit a .onion site, the traffic never leaves the Tor network. There is no exit relay. Both you and the website remain anonymous.
Lecture 8.2: Setting Up a Safe Investigation Environment
You cannot investigate the dark web from your personal machine. You need a dedicated, isolated environment that protects your identity and contains any potential threats.
The Recommended Setup: Whonix
Whonix is an operating system designed for anonymous investigation. It runs as two virtual machines inside VirtualBox.
Whonix Gateway: Routes all traffic through Tor. No traffic can leave this VM without going through Tor.
Whonix Workstation: Your investigation environment. You do all your work here. It has no internet connection except through the Gateway.
If the Workstation is compromised, the attacker cannot find your real IP address because all traffic is forced through Tor via the Gateway. This is the safest setup for dark web investigation.
Installation Steps:
Install VirtualBox on your host machine.
Download Whonix from https://www.whonix.org. Choose the VirtualBox version.
Import both VMs (Gateway and Workstation) into VirtualBox.
Start the Gateway first. Wait for it to connect to Tor.
Start the Workstation. All internet access from the Workstation now routes through Tor.
Setting Up Whonix for ANONYMOUS Tor Browsing (Dark Web Documentary - By John Hammond:
Alternative: Tails OS
Tails is a live operating system that runs from a USB stick. It routes all traffic through Tor and leaves no trace on the host machine. It is designed for single-session use. When you shut down Tails, everything is wiped.
Tails is good for quick investigations. Whonix is better for ongoing work where you need to save evidence and return to it.
Browser Setup Inside Your Investigation Environment
The Tor Browser comes pre-installed in both Whonix and Tails. It is a modified version of Firefox configured for maximum privacy.
JavaScript is partially disabled on high-security settings.
Browser fingerprinting is minimized.
All traffic goes through Tor.
No plugins. No extensions. No exceptions.
Do not install Chrome. Do not install Firefox. Use only the Tor Browser inside your investigation VM. Anything else compromises your anonymity.
Dark Web Documentary 01 - Getting Setup with Tails Linux - by John Hammond:
Alternative Setup: Tor Browser on Kali Linux (Quick Start)
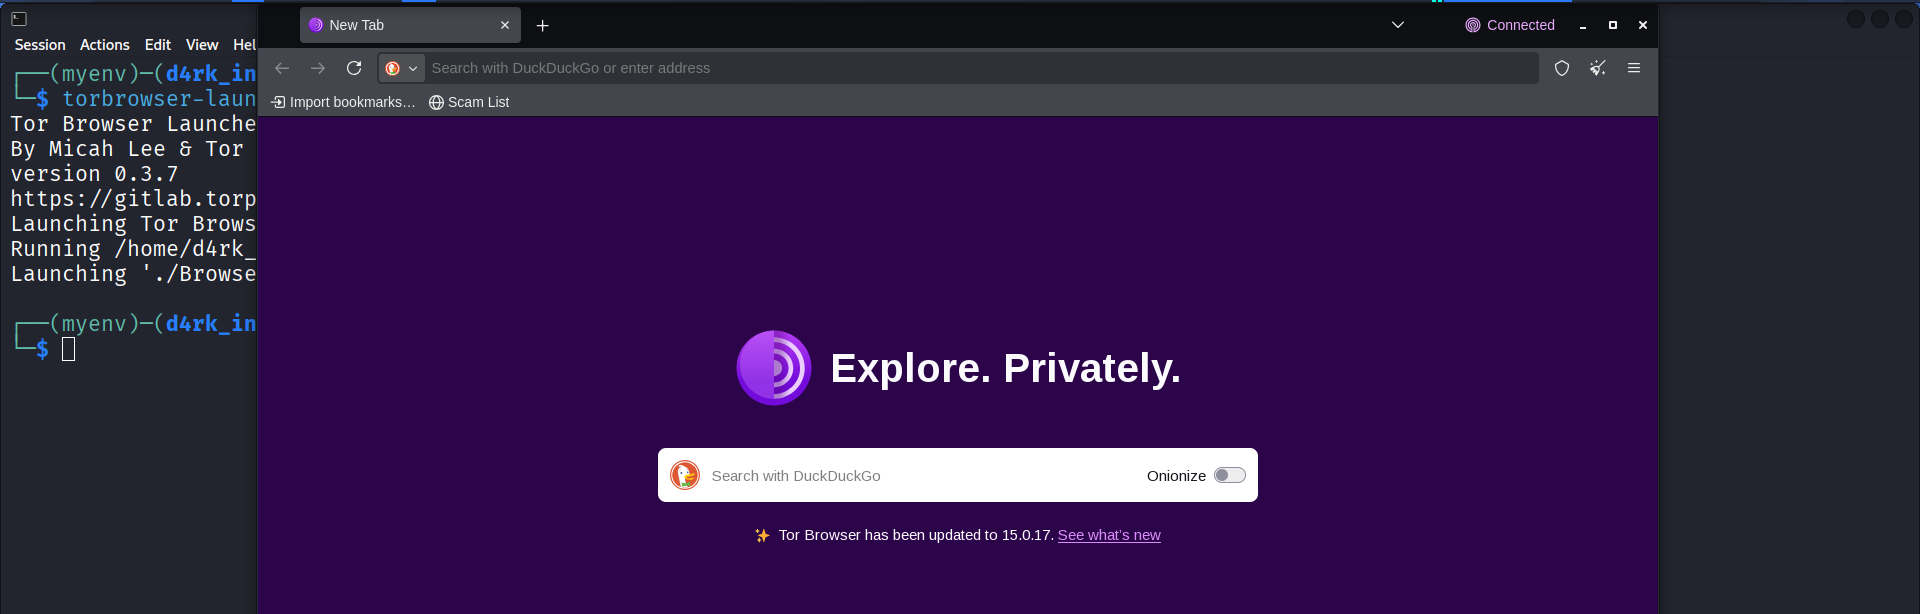
If you are using Kali Linux and need a fast, functional Tor setup without building virtual machines, install the Tor Browser directly.
Step 1: Install Tor Browser Launcher
Open your terminal and run:
sudo apt update
sudo apt install torbrowser-launcher -y
Step 2: Launch and Connect
Once installed, launch it from your Kali application menu by searching for “Tor Browser,” or run from the terminal:
torbrowser-launcherThe first time you run this, it automatically downloads the latest signature-verified version of the Tor Browser. This ensures you get an authentic, untampered copy.
Once it opens, click Connect to join the Tor network. You are now browsing through Tor.
Important Notes for This Setup:
This is a quick-start method. It is less isolated than Whonix. Your host machine’s IP is still visible to anyone who compromises your browser.
Use this for low-risk investigation and learning. For sensitive dark web work, switch to Whonix.
Never run Tor Browser as the root user. The launcher handles permissions correctly.
Keep Tor Browser updated. The launcher checks for updates on each launch.
When to Use Each Setup
Setup ————Best For ——— Security Level
Tor Browser on Kali > Quick lookups, learning, low-risk browsing > Basic
Tails OS > Single-session investigations, no trace left > High
Whonix > Ongoing investigations, evidence preservation > Maximum
Lecture 8.3: Navigating the Dark Web — Finding .onion Sites
There is no Google for the dark web. .onion sites are not indexed by traditional search engines. You need specialized tools to find them.
Dark Web Search Engines
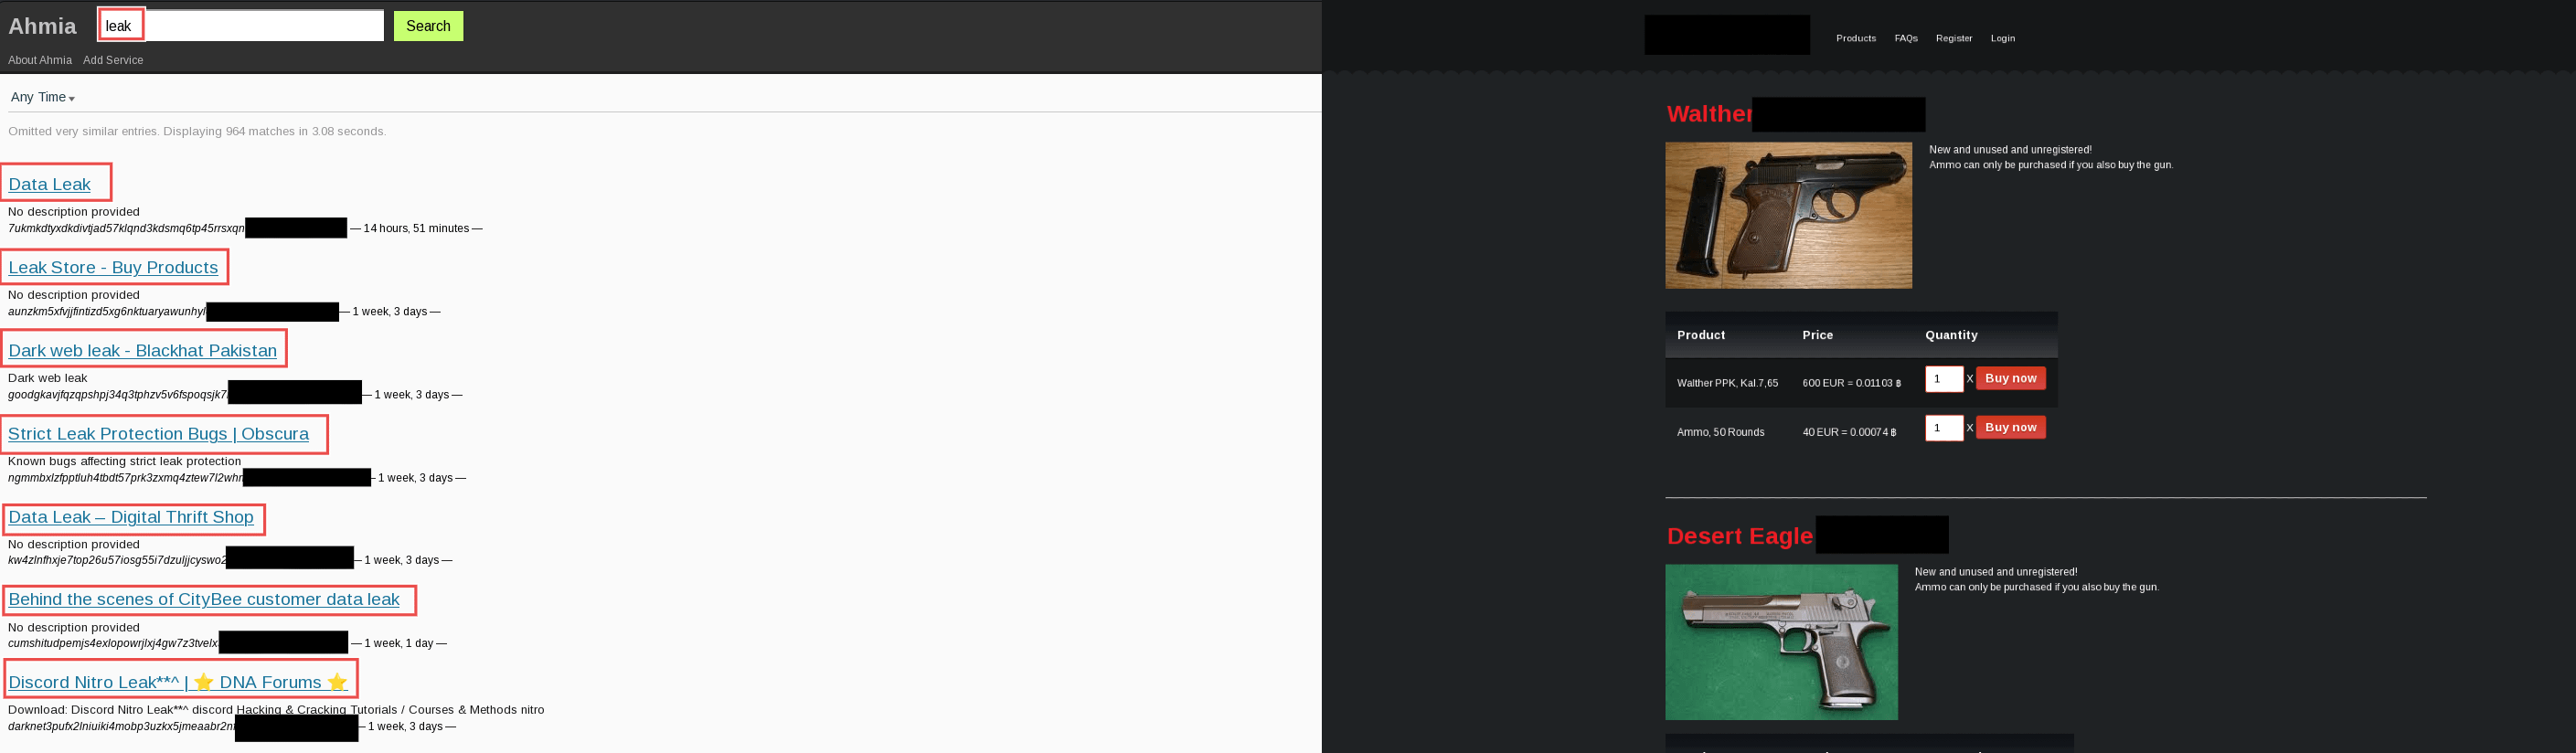
These search engines index .onion sites. They are accessible only through Tor.
Ahmia:
ahmia.fi— The most reliable dark web search engine. It indexes public .onion sites and filters out known malicious content. Also accessible on the surface web atahmia.fito search for .onion links.Torch:
torch.search.onion(accessible only via Tor) — One of the oldest dark web search engines. Larger index but less filtered than Ahmia.Darkfail:
darkfaillnbn.onion(accessible only via Tor) — A directory of known dark web sites with status indicators showing which are currently online.
Dark Web Directories and Wikis
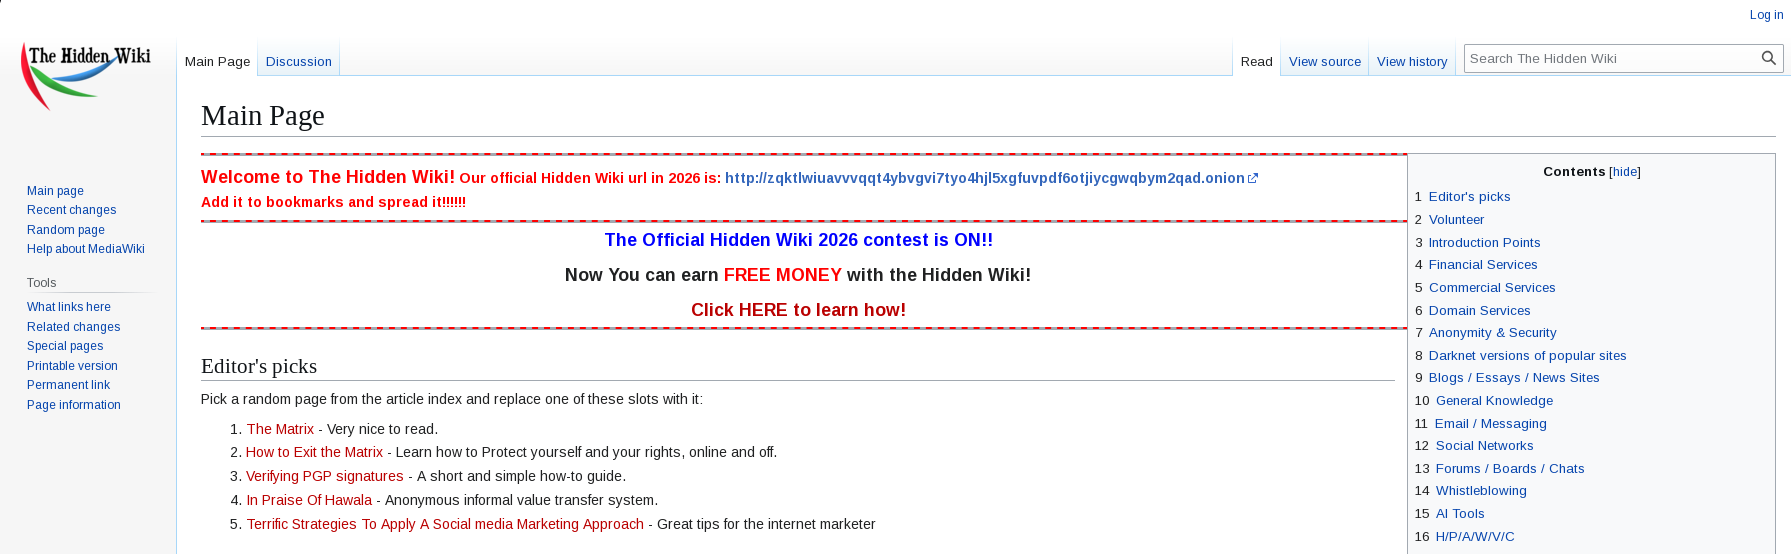
Directories are human-curated lists of .onion links organized by category.
The Hidden Wiki: Multiple versions exist. These are community-edited directories of dark web sites. Quality varies. Some links are outdated. Some point to scams. Navigate carefully.
Onion Links:
onionlinks.net— A surface web site that catalogs .onion links by category.
How to Search Effectively
Start with Ahmia. Search for keywords related to your investigation.
Check Darkfail for directories organized by topic.
Use The Hidden Wiki for categorized listings.
Document every .onion URL you find. Dark web sites disappear and reappear frequently.
Verify before trusting. A .onion site claiming to be a news outlet may be a front for disinformation.
Lecture 8.4: Investigating .onion Sites — What to Document
Once you find a .onion site, treat it like any other website investigation. Document everything.
What to Capture:
URL: The full .onion address. These are long, seemingly random strings.
Site Name and Purpose: What does the site claim to be?
Content Categories: Forums, marketplaces, information dumps, communication platforms.
Language: Many dark web sites are in English, but Russian, Chinese, and other languages are common.
Registration Requirements: Does the site require an account? If so, document the registration process. Do not register unless absolutely necessary for your investigation and you have legal authorization.
Date of Access: Dark web sites disappear. The date you accessed it matters.
Screenshots: Capture the homepage and key pages. Preserve evidence.
Public Content: Any messages, posts, files, or images that are publicly visible without login.
What NOT to Do:
Do not register an account without legal authorization. Many dark web sites are monitored by law enforcement. Registration may link your identity to a criminal platform.
Do not download files. Dark web files may contain malware. If you must download, do it inside a disposable VM with no network access.
Do not interact with users. You are an observer. Not a participant.
Do not purchase anything. Even for research. Even to see what happens. This crosses from investigation into criminal activity.
Lecture 8.5: Extracting Intelligence from Dark Web Content
Public dark web content carries intelligence just like surface web content.
Forum Reconnaissance
Many .onion sites are forums. Users post messages, share files, and discuss topics. Public forums can be read without an account.
Read thread titles. Find topics relevant to your investigation.
Document usernames. Cross-reference them against surface web platforms. Criminals sometimes reuse handles.
Look for PGP keys. Many dark web users sign messages with PGP keys. These keys are unique and can be cross-referenced.
Note posting patterns. Timezone indicators, language proficiency, and writing style are behavioral intelligence.
Document any linked accounts. Users sometimes mention their Telegram, Signal, or Jabber handles.
Marketplace Observation
Dark web marketplaces exist. You can browse some of them without an account.
Document the categories of goods sold. This tells you what the marketplace facilitates.
Note vendor usernames and ratings. Cross-reference vendors across multiple marketplaces.
Look for shipping restrictions. “Ships to EU only” tells you the vendor’s likely location.
Document accepted cryptocurrencies. Bitcoin and Monero are standard. Some accept newer privacy coins.
File and Document Analysis
Some .onion sites host files. Documents, databases, and images.
If a file is publicly downloadable and your investigation requires it, download it inside a disposable, air-gapped VM.
Extract metadata from the file using ExifTool.
Check the file hash against known malware databases.
Analyze the content offline. Disconnect the VM from all networks before opening any file.
Paste Sites and Information Dumps
Dark web paste sites are like Pastebin but on .onion domains. Users post text, code, credentials, and messages.
Search paste sites for email addresses, usernames, and keywords related to your target.
Document timestamps. Pastes have creation dates.
Cross-reference paste content with breach data from Module 10.
Lecture 8.6: Cryptocurrency Tracing Basics
Dark web transactions use cryptocurrency. Following the money is a core OSINT skill.
Bitcoin Tracing
Bitcoin is pseudonymous, not anonymous. Every transaction is recorded on a public ledger called the blockchain.
Tools:
Blockchain.com Explorer:
blockchain.com/explorer— Search any Bitcoin address or transaction ID.WalletExplorer:
walletexplorer.com— Links Bitcoin addresses to known wallets and services.OXT:
oxt.me— Visual Bitcoin transaction mapping tool.
What to Look For:
Transaction history of a known dark web wallet address.
Addresses that interact with known exchange wallets (Coinbase, Binance). These can be subpoenaed for identity information.
Clusters of addresses that appear to belong to the same entity.
Monero Tracing (Limited)
Monero is designed for privacy. Transactions are not publicly traceable like Bitcoin. However, OSINT techniques still apply.
Look for Monero addresses shared publicly on forums or paste sites.
Cross-reference the address with any surface web mentions.
Network analysis of who shares the same Monero address across different platforms.
Lecture 8.7: OSINT Tools for the Dark Web
Several surface web tools provide dark web intelligence without requiring direct access.
Ahmia.fi: Search .onion sites from the surface web.
OnionScan:
onionscan.org— Scans .onion sites for misconfigurations and exposed metadata.Hunchly: A web capture tool designed for OSINT investigations. Works with Tor Browser to automatically capture and timestamp pages you visit.
DarkSearch: A dark web search engine accessible on the surface web.
Lecture 8.8: Legal and Ethical Boundaries
The dark web is legally sensitive territory. Many sites host illegal content. You must operate within strict boundaries.
What Is Legal:
Accessing public .onion sites.
Viewing publicly visible content.
Documenting publicly available information.
Using Tor for privacy.
Cross-referencing dark web data with surface web sources.
What Is Not Legal:
Accessing sites that host child exploitation material. If you encounter this, close the browser immediately. In some jurisdictions, even accidental access carries legal risk. Report via appropriate channels if your role requires it.
Purchasing illegal goods or services.
Interacting with criminal actors without law enforcement coordination.
Downloading illegal content.
Hacking or attempting to bypass authentication on dark web sites.
If You Encounter Illegal Content:
Close the browser tab immediately.
Document the URL and the circumstances in your investigation notes.
Do not download anything. Do not screenshot illegal content.
If you are working with law enforcement, follow their reporting procedures.
If you are an independent investigator, consult a lawyer before proceeding further.
The dark web contains disturbing material. Be prepared for that. Have a plan for what you will do when you encounter it. Your psychological safety matters.
Lecture 8.9: Practical Investigation Workflow Summary
Set up a Whonix or Tails investigation environment. Never use your personal machine.
Launch the Tor Browser from inside the environment.
Use Ahmia and Darkfail to find .onion sites relevant to your investigation.
Document every .onion URL, site name, and category.
Browse public forums and pages. Screenshot key content. Document usernames, PGP keys, and posting patterns.
Cross-reference dark web usernames with surface web platforms.
Search paste sites for email addresses, usernames, and keywords.
Trace cryptocurrency addresses related to your target using blockchain explorers.
Never register accounts. Never download files to a network-connected machine. Never interact with users.
Document everything. Screenshots, URLs, timestamps, and your analysis.
Lecture 8.10: Practical Investigation — From Dark Web Marketplace to Real-World Attribution
This exercise walks you through a simulated investigation. You will trace a threat actor from a dark web marketplace to their real-world identity using only OSINT techniques. Every step applies what you learned in this module and across the entire course.
The Scenario
You are investigating a vendor on a dark web marketplace who sells stolen credentials and compromised accounts. The vendor uses the handle ShadowVendor88. Their marketplace profile shows:
Username:
ShadowVendor88Joined: March 2024
Ships from: “EU”
PGP Key ID:
0xABCD1234EFGH5678Accepted payment: Bitcoin and Monero
Public posts: 47 forum messages in the marketplace discussion section
Your objective is to identify the real-world person behind ShadowVendor88 using only publicly available information.
Phase 1: Profile Documentation
Start by documenting everything visible on the marketplace profile. You do not need an account to browse public sections of many marketplaces.
Document:
Username:
ShadowVendor88Join date: March 2024
Region: “EU”
PGP Key ID:
0xABCD1234EFGH5678Post count: 47
Writing style from visible posts
Any linked contact methods (Telegram, Jabber, email)
This is your baseline. Every piece of data is a potential pivot point.
Phase 2: PGP Key Cross-Referencing
The PGP key is your strongest lead. PGP keys are unique. If the same key appears anywhere on the surface web, you have a direct link.
Step 1: Copy the PGP Key ID: 0xABCD1234EFGH5678.
Step 2: Search the key ID on PGP key servers:
Enter the key ID. If the key is publicly registered, you will find the full public key and any associated email addresses or names.
Step 3: Search the key ID on Google:
“ABCD1234EFGH5678”
“0xABCD1234EFGH5678”
“ShadowVendor88” “PGP”
If the vendor reused this PGP key on a surface web forum, a GitHub repository, or a personal website, Google will find it.
What you might find:
The same PGP key associated with a GitHub account under a real name.
The same key used on a privacy-focused forum where the user also listed a Protonmail address.
The key registered on a keyserver with an email address attached.
Each of these is a direct bridge from the dark web persona to a surface web identity.
Phase 3: Username Cross-Referencing
Threat actors reuse usernames. It is lazy. It is human. Exploit it.
Step 1: Search ShadowVendor88 on Google, Yandex, and Bing.
“ShadowVendor88”
“ShadowVendor88” site:reddit.com
“ShadowVendor88” site:github.com
“ShadowVendor88” site:twitter.com
“ShadowVendor88” site:telegram.me
“ShadowVendor88” site:t.me
Step 2: Search username permutations. If ShadowVendor88 is taken on one platform, the user may use ShadowVendor, ShadowVendor8, Shadow.Vendor, or ShadowVendor_88 on others.
Step 3: Search username search engines:
whatsmyname.appSherlock
Maigret
What you might find:
A Reddit account with the same handle posting in
r/hackingandr/darknet.A GitHub account with a repository containing scripts for credential stuffing.
A Twitter account with the same handle discussing privacy tools.
Phase 4: Writing Style Analysis
Read the 47 forum posts from ShadowVendor88. Analyze the writing style.
Look for:
Spelling: British English or American English? “Colour” vs “Color” tells you where they learned English.
Grammar patterns: Do they use commas before “and”? Do they capitalize properly?
Slang and idioms: Regional phrases. “Mate” suggests UK or Australia. “Buddy” suggests North America.
Technical jargon: How they describe their products. What tools they reference.
Punctuation habits: Double spaces after periods. Em dash vs en dash. These are fingerprints.
Now search surface web forums, Reddit, and Twitter for posts with the same writing patterns. Use specific phrases from their dark web posts in quotes.
Example: If ShadowVendor88 wrote “fresh logs, guaranteed valid, no refunds” on the marketplace, search that exact phrase on Google. Threat actors often reuse the same sales copy across platforms.
Phase 5: Cryptocurrency Tracing
The vendor accepts Bitcoin. Their marketplace profile lists a Bitcoin address for payments.
Step 1: Copy the Bitcoin address.
Step 2: Search it on blockchain.com/explorer and walletexplorer.com.
Step 3: Look at transaction history:
Does the address send funds to a known exchange wallet? Coinbase, Binance, Kraken? Exchanges require identity verification. The exchange knows who owns that wallet.
Does the address receive funds from other known dark web wallets? This maps their network.
Does the address interact with any surface web services that require registration?
Step 4: Search the Bitcoin address on Google:
“1A1zP1eP5QGefi2DMPTfTL5SLmv7DivfNa” (example format)If the vendor ever posted this address on a forum, a social media post, or a website, Google finds it. Many threat actors share wallet addresses carelessly.
Phase 6: Email Discovery
Through PGP key searches, username cross-referencing, or cryptocurrency tracing, you may discover an email address.
Example: The PGP keyserver shows the key is registered to shadowvendor88@protonmail.com.
Now apply Module 3 email intelligence:
Search the email on breach databases (Have I Been Pwned, DeHashed, IntelX).
Search the email on Google:
"shadowvendor88@protonmail.com".Check if the email is linked to any surface web accounts via password reset probing (ethical, passive only).
Cross-reference the email against social media platforms.
If a breach database returns a real name, physical address, or phone number associated with that email, you have attribution.
Phase 7: Social Media Attribution
Through the email address or username, you found a LinkedIn profile, a Twitter account, or a GitHub repository.
Step 1: Open the surface web profile. Document everything.
Step 2: Compare the profile picture. Does it match any image posted by ShadowVendor88 on the marketplace?
Step 3: Compare the join date. If the surface web account was created in February 2024 and the dark web account in March 2024, you have a timeline correlation.
Step 4: Compare technical skills. If the LinkedIn profile lists “Penetration Testing” and “Python Scripting,” and the dark web vendor sells credential stuffing tools written in Python, you have a skill correlation.
Step 5: Compare location. If the dark web profile says “Ships from EU” and the LinkedIn profile says “Located in Frankfurt, Germany,” you have a geographic correlation.
Phase 8: Building the Attribution Case
You now have multiple correlation points. Present them as a structured attribution case.
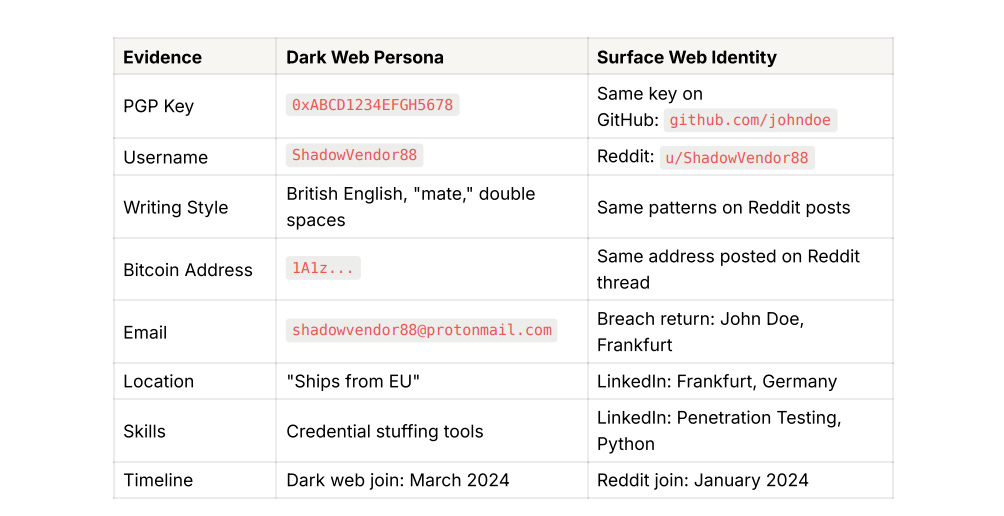
Phase 9: The Attribution Statement
Write a clear, evidence-backed attribution statement.
The dark web marketplace vendor operating under the handle
ShadowVendor88is identified as John Doe of Frankfurt, Germany. Attribution is established through: (1) PGP key correlation linking the dark web persona to a GitHub account under the name John Doe, (2) Username reuse across dark web and surface web platforms, (3) Consistent writing style patterns across both personas, (4) Bitcoin address shared between the dark web marketplace and a Reddit account linked to John Doe, (5) Email address correlation through breach data, (6) Geographic consistency between the dark web shipping region and surface web location, and (7) Professional skill alignment between the dark web activity and surface web employment history.
Phase 10: Reporting and Evidence Preservation
Compile all evidence into a structured report using Module 10 methodology.
Include an entity graph showing
ShadowVendor88connected to John Doe through PGP key, email, Bitcoin address, username, and writing style.Preserve all screenshots with timestamps.
Document all sources with access dates.
Store evidence in a secure, encrypted location.
If working with law enforcement, follow their chain of custody procedures.
What You Learned
This exercise applied techniques from across the entire course. Dark web reconnaissance. PGP key cross-referencing. Username permutation searching. Writing style analysis. Cryptocurrency tracing. Email intelligence. Social media attribution. Report writing.
Every dark web persona leaves traces on the surface web. Your job is to find them. The dark web provides anonymity, not invisibility. Mistakes happen. Keys get reused. Usernames get recycled. Writing styles remain consistent. Bitcoin addresses get posted publicly.
Follow the threads. Build the case. Attribute the actor.
Part 11: Quick Reference
Objective ________________Method
Safe investigation environment: Whonix (VirtualBox) or Tails (USB boot)
Browser: Tor Browser (pre-installed in Whonix/Tails)
Find .onion sites: Ahmia, Torch, Darkfail
Search dark web: Ahmia.fi (surface web accessible)
Cryptocurrency tracing: Blockchain.com Explorer, WalletExplorer, OXT
Evidence capture: Hunchly, manual screenshots
Username cross-reference: Dark web usernames → surface web search
PGP key cross-reference: Search PGP key fingerprints on surface web
File analysis: Disposable VM, ExifTool, hash check
This is Dark Web Intelligence. It is not magic. It is not forbidden. It is another intelligence source that requires discipline, preparation, and strict ethical boundaries. Set up your environment. Know what you are looking for. Document what you find. Get out safely. That is how professionals operate.
Module 9: Image Forensics & Hidden Data Recovery
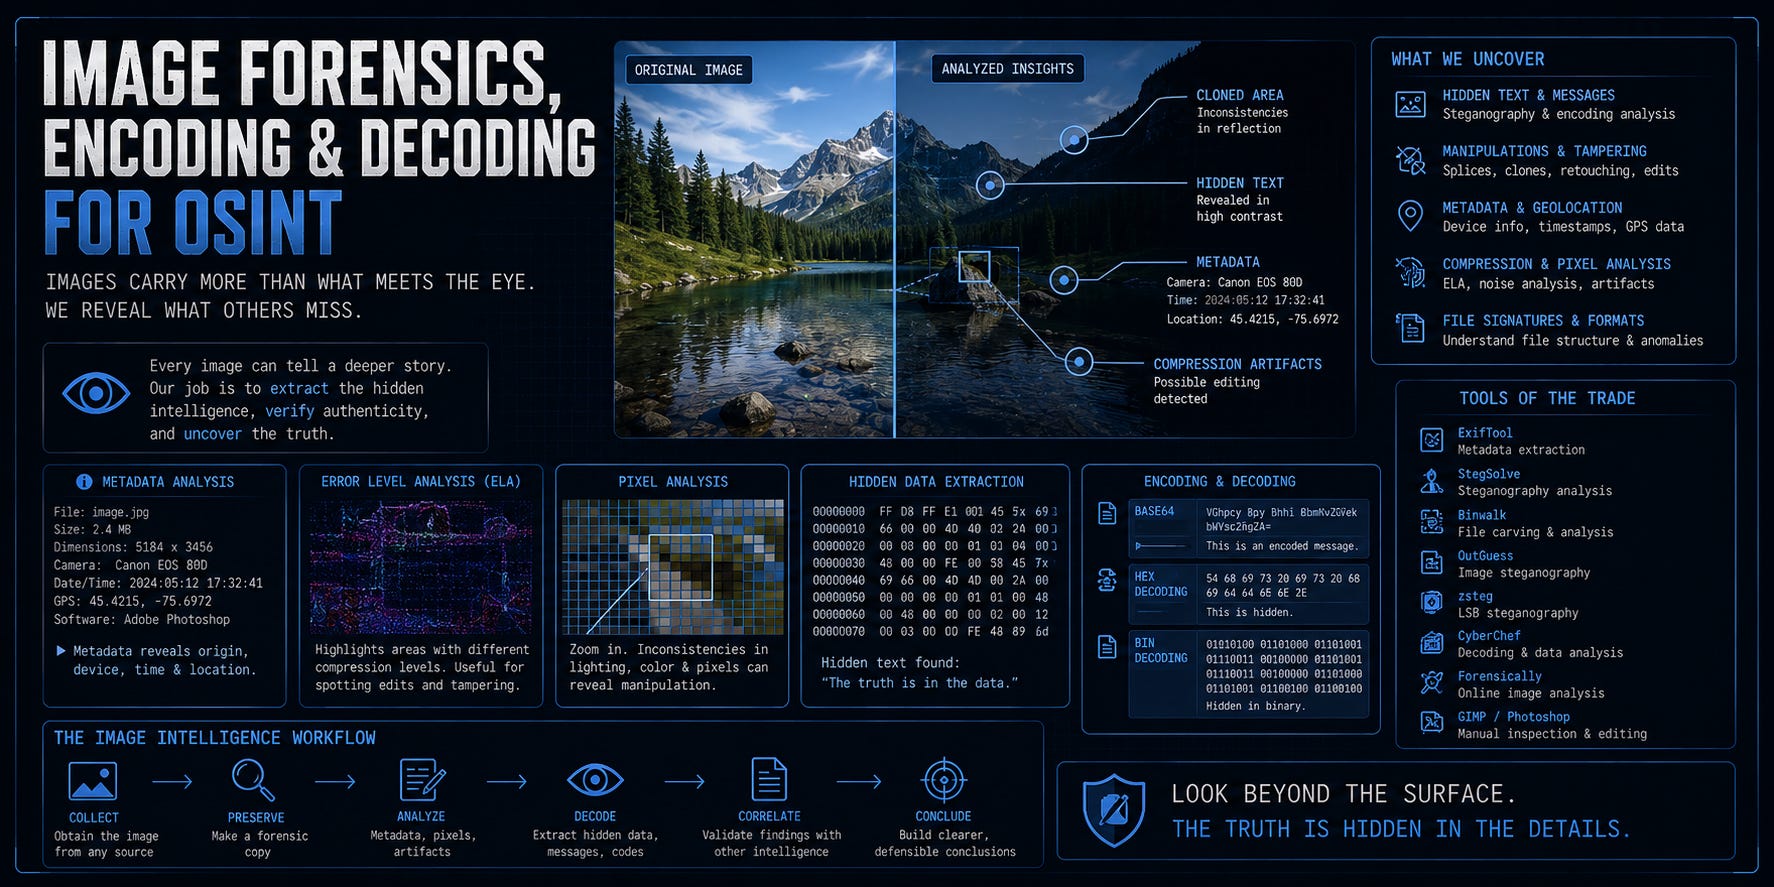
Images carry more than what meets the eye. Hidden text. Manipulated pixels. Encoded messages. Altered timestamps. An investigator who only looks at the surface of an image misses half the intelligence it contains.
This module teaches you how to analyze images forensically, recover hidden information, and decode encoded data. You will use free tools like Photopea for image manipulation, CyberChef for encoding and decoding, and Python scripts to automate the process. Every technique is practical. Every example is hands-on.
Lecture 9.1: Introduction to Image Forensics — What Images Hide
Images are not flat. They contain layers of information. Some of it is visible. Much of it is not.
Every image file carries metadata (EXIF, as covered in Module 2). Beyond metadata, images can contain:
Hidden text or objects concealed by darkening, blurring, or overlaying.
Encoded messages embedded in pixel values or color channels.
Manipulated regions where part of the image was altered or cloned.
Steganography where entire files are hidden inside the image data.
Compression artifacts that reveal whether an image was edited or resaved.
This module focuses on the practical techniques to uncover these hidden elements. You will not need expensive forensic software. Photopea/Forensically and CyberChef are free and browser-based. Everything you learn here works with tools you already have.
Lecture 9.2: Photopea for Investigators — Image Manipulation & Analysis
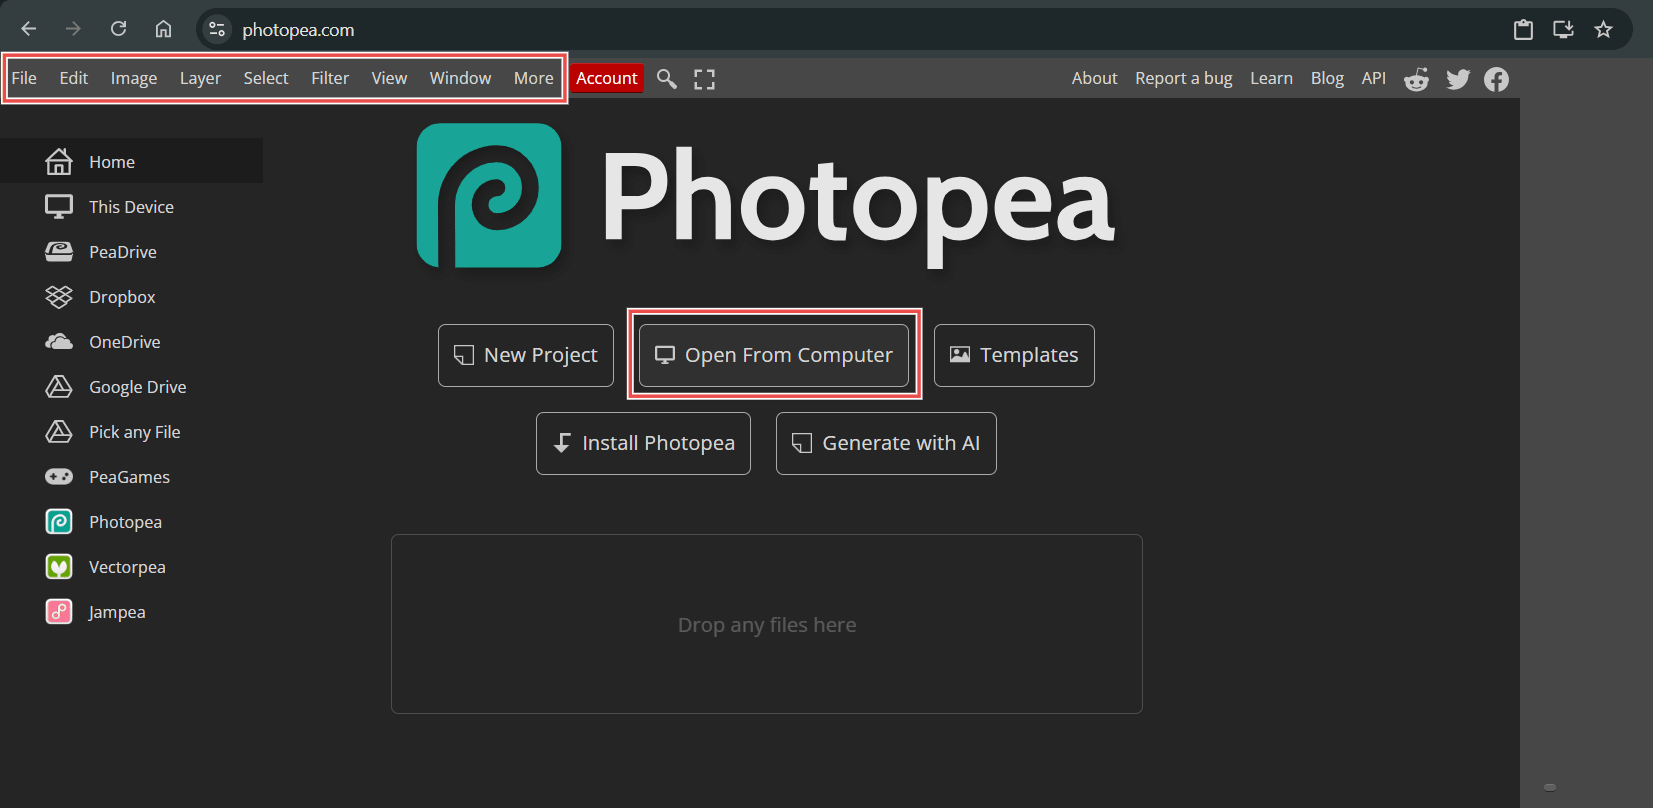
Photopea is a free, browser-based image editor. It works like Photoshop but requires no installation. You open it at https://www.photopea.com and start working immediately.
What Photopea Can Do for OSINT:

Adjust brightness, contrast, and exposure to reveal hidden details in dark images.
Zoom into high-resolution images without losing clarity.
Layer multiple images to compare differences.
Remove overlays and watermarks where possible.
Convert between file formats.
Analyze individual color channels (Red, Green, Blue) to see what each layer contains.
Getting Started:
Go to https://www.photopea.com
Click “Open From Computer” or drag an image file into the browser window.
The image opens in a workspace similar to Photoshop.
Key Tools for Investigation:
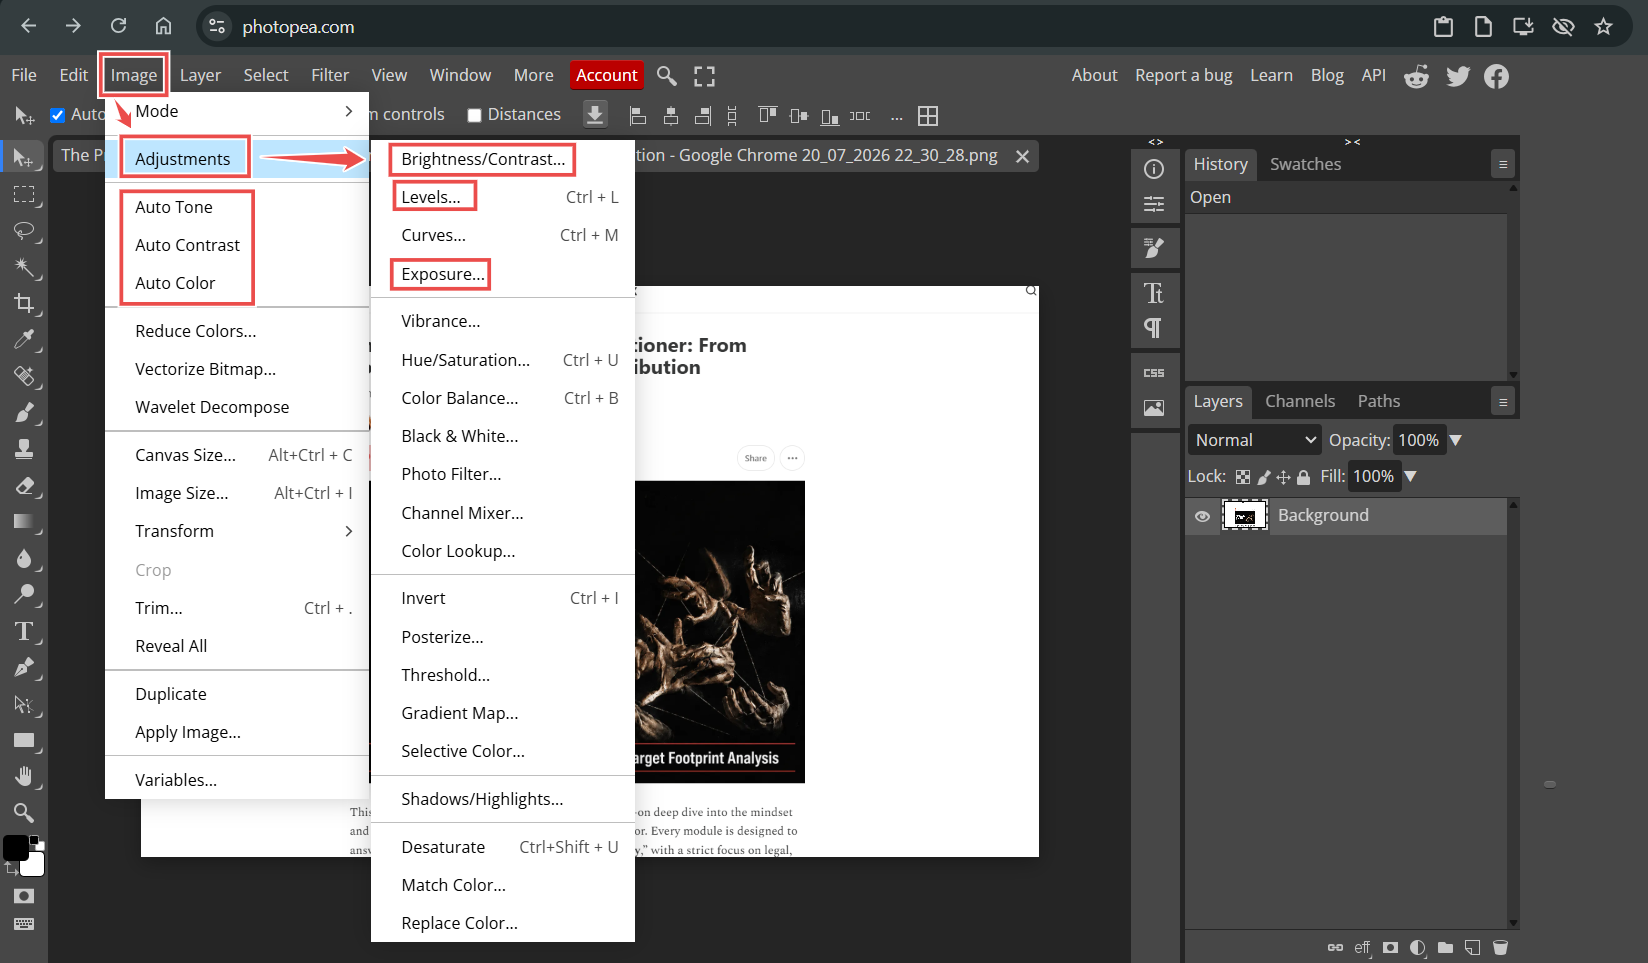
Brightness/Contrast: Image → Adjustments → Brightness/Contrast. Increase brightness on dark images to reveal details hidden in shadows.
Levels: Image → Adjustments → Levels. Drag the white slider left to brighten highlights. Drag the black slider right to darken shadows. This reveals details that a simple brightness adjustment misses.
Exposure: Image → Adjustments → Exposure. Increase exposure to lighten severely underexposed images.
Zoom Tool: Press
Zor use the magnifying glass icon. Zoom into specific areas. Look for pixel-level details.
Lecture 9.3: Darkening and Restoration — Revealing Hidden Details
One of the most common ways people hide information in images is by darkening the image until the content becomes invisible. A screenshot containing sensitive text is darkened until the text blends into the black background. The person sharing it assumes no one can read it. They are wrong.
How to Restore a Darkened Image in Photopea:
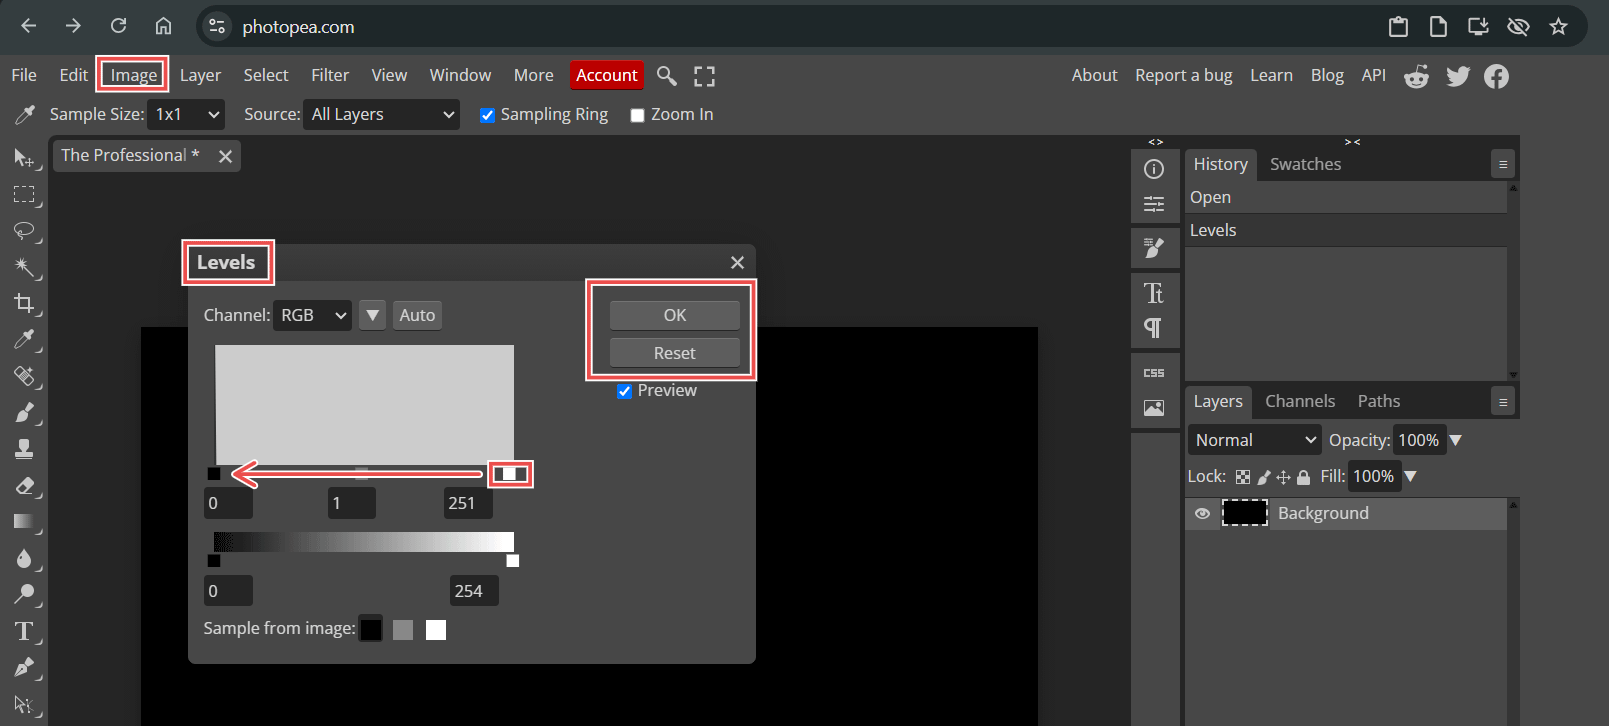
Step 1: Open the darkened image in Photopea.
Step 2: Go to Image → Adjustments → Levels.
Step 3: In the Levels window, you will see a histogram showing the distribution of dark and light pixels. A heavily darkened image has almost all pixels bunched on the left (dark) side.
Step 4: Grab the white slider (far right) and drag it left. As you drag, the image brightens. Hidden details emerge from the darkness.
Step 5: Adjust the middle (gray) slider to fine-tune the contrast. The goal is to make hidden content readable.
Step 6: If Levels is not enough, try the Auto Correction tools. Go to Image → Adjustments and use:

Auto Tune: Automatically balances brightness and contrast across the image. A good first step for quick restoration.
Auto Contrast: Adjusts the contrast automatically. Useful when the image has both very dark and very light areas.
Auto Color: Corrects color imbalances while adjusting brightness. Helps when the darkened image has a color tint.
Step 7: If details are still hidden, go to Image → Adjustments → Exposure. Increase the Exposure slider. This brightens every pixel uniformly and often reveals content that other adjustments miss.
Keep in mind that combining these options often produces better results than relying on a single adjustment. Start with Auto Tune. If that does not fully restore the image, apply Levels. If details remain hidden, add Exposure. The order matters. Experiment until the hidden content becomes readable.
Lecture 9.4: Hiding and Recovering Secret Text with Darkening Techniques
Some individuals intentionally hide text by making it the same color as the background. For example, white text on a white background, or black text on a black background. The text is there. The human eye cannot see it. The image data contains it.
How to Reveal Hidden Text:
Method 1: Levels Adjustment
Open the image in Photopea. Apply Levels as described in Lecture 12.3. If the text is slightly lighter or darker than the background, adjusting the levels will reveal it.
Method 2: Color Channel Isolation
On Photopea, go to Window → Channels. You will see the Red, Green, and Blue channels. Click each channel individually. Sometimes hidden text is visible in one channel but not the others. The Red channel might show text that is invisible in the full-color image.
Method 3: Invert Colors
Go to Image → Adjustments → Invert. This flips all colors to their opposites. Black becomes white. White becomes black. Hidden white text on a white background becomes black text on a black background after inversion, but subtle differences in shade may now be visible.
Method 4: Posterize
Go to Image → Adjustments → Posterize. Reduce the number of color levels. This simplifies the image into distinct color bands. Text that was only slightly different from the background may become clearly visible as a separate color band.
Practical Example:
A threat actor posts what appears to be a blank white image. You download it. Open it in Photopea. Isolate the Red channel. Text appears. It is a message. The actor used white text on a white background. The Red channel gave them away.
Lecture 9.5: CyberChef for OSINT — Encoding & Decoding Basics
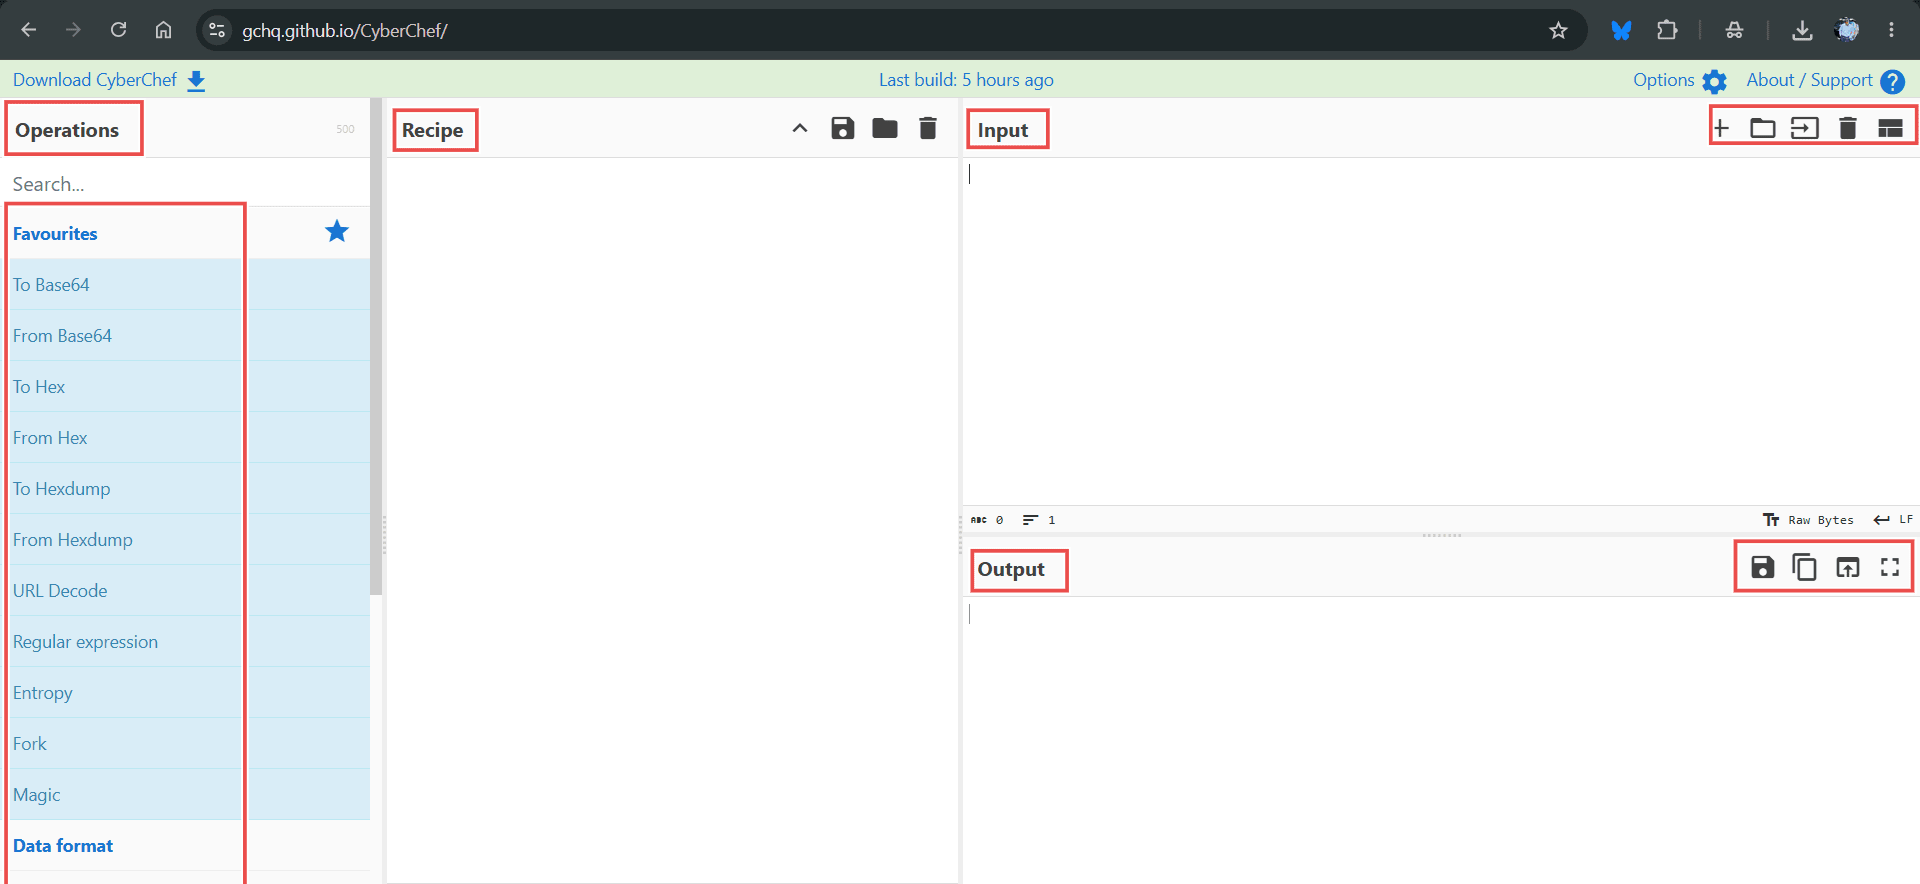
CyberChef is a free, browser-based data processing tool. It is often called the “Cyber Swiss Army Knife.” You open it at https://gchq.github.io/CyberChef. It requires no installation.
What CyberChef Can Do for OSINT:
Decode Base64, Hex, Binary, and other encodings.
Decrypt Caesar ciphers and other simple ciphers.
Convert between data formats.
Extract strings and patterns from raw data.
Analyze encoded messages found in images, documents, or communications.
How CyberChef Works:
CyberChef has four areas:
Operations Panel (left): A list of all available operations. You search for what you need.
Recipe Panel (center): The sequence of operations you apply to your data. You drag operations here.
Input Panel (top right): Where you paste the data you want to decode.
Output Panel (bottom right): Where the result appears.
Basic Workflow:
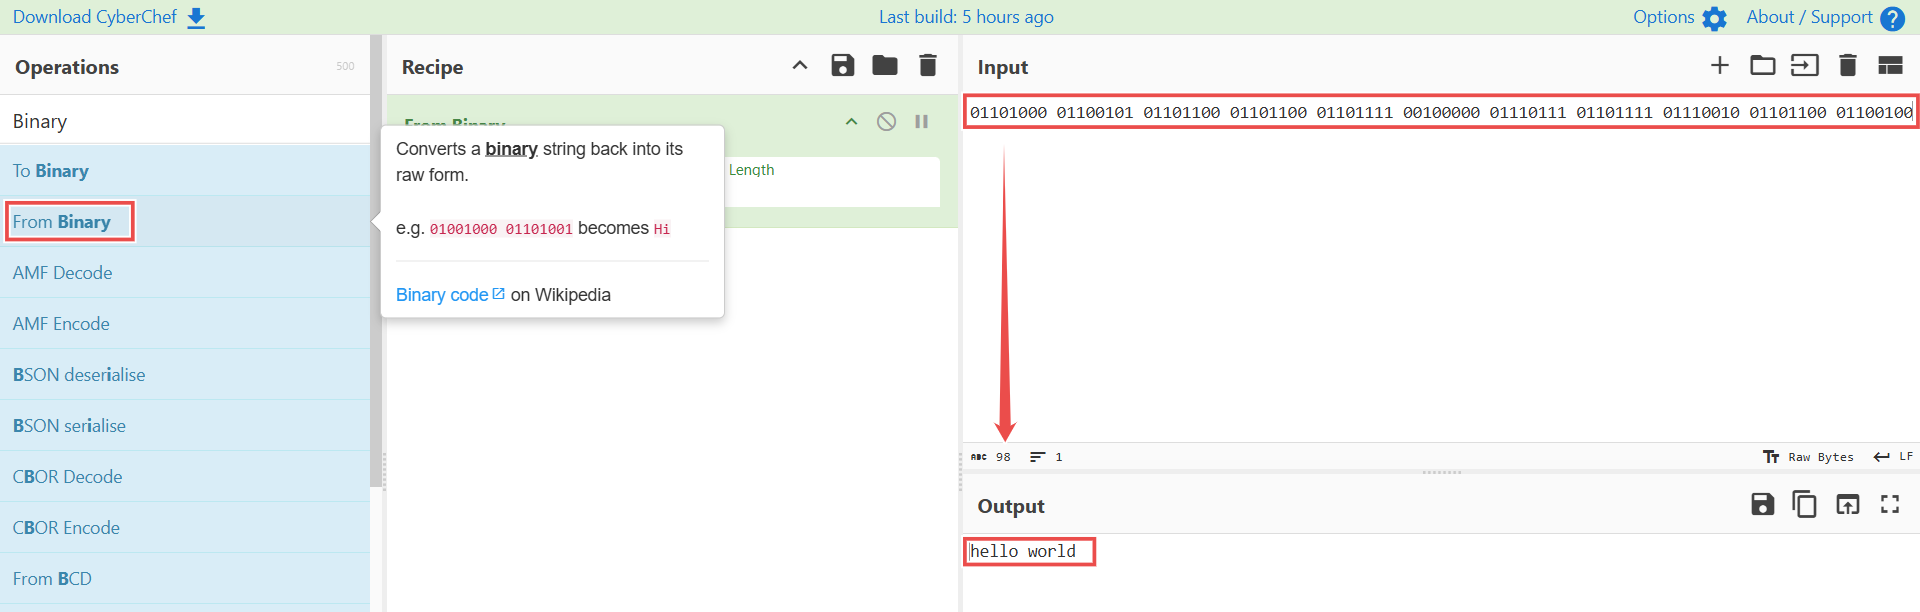
Copy encoded text from your source (an image caption, a forum post, a file).
Paste it into the Input panel.
Use the magic for auto detection of encoded words or search for the decoding operation you need in the Operations panel.
Double-click or drag it to the Recipe panel.
The Output panel shows the decoded result instantly.
Lecture 9.6: Caesar Cipher — Manual and Automated Decoding
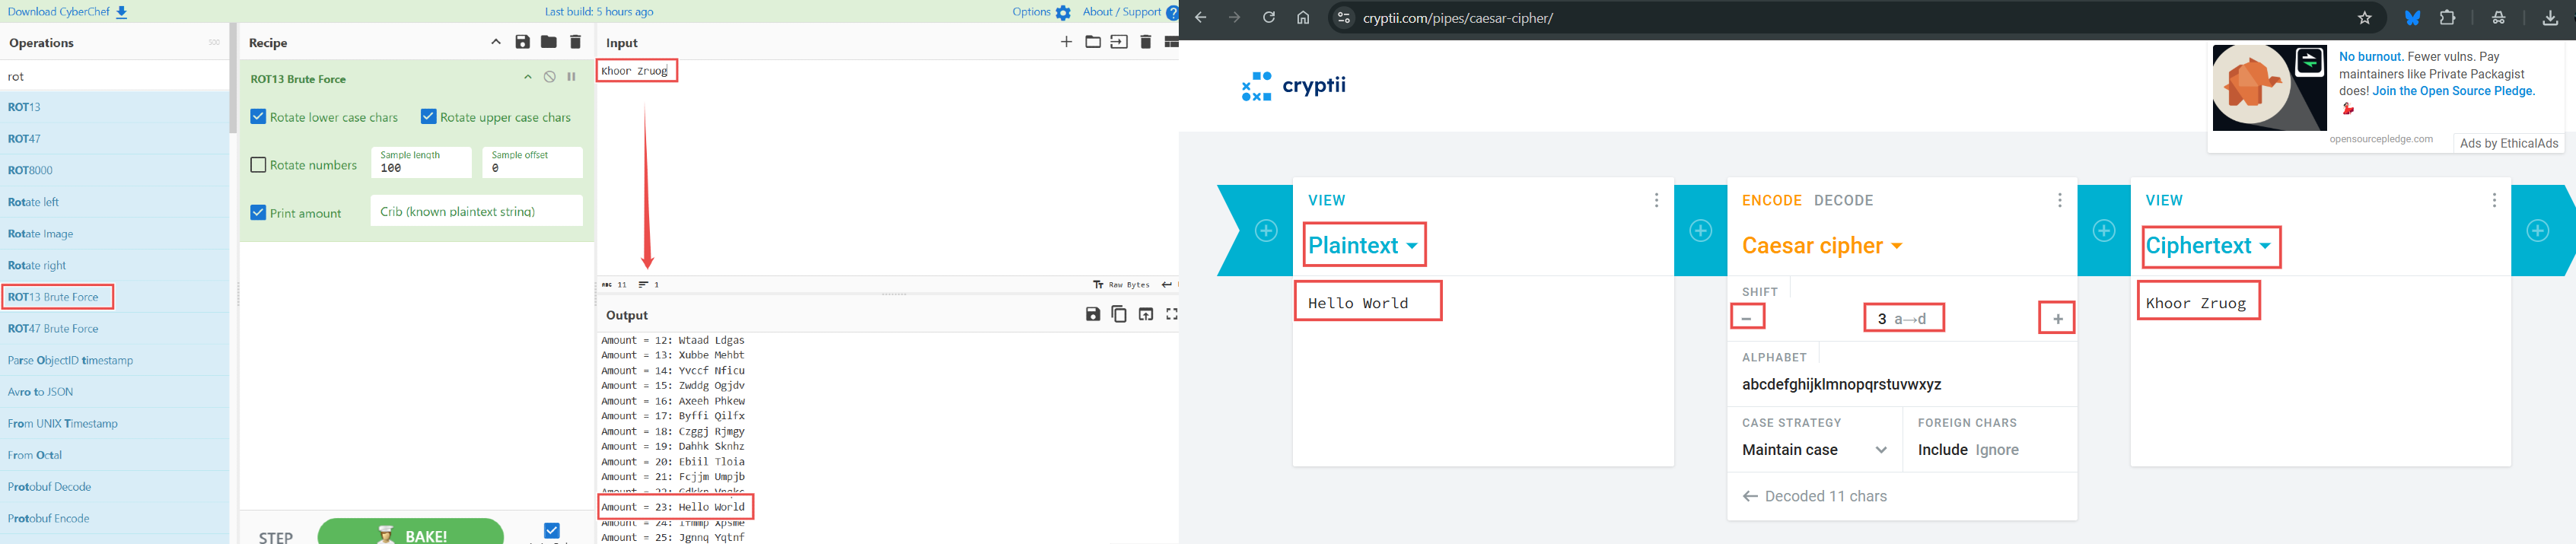
A Caesar cipher is one of the oldest and simplest encryption methods. Each letter in the message is shifted by a fixed number of positions in the alphabet. A shift of 3 turns A into D, B into E, and so on.
Threat actors, puzzle creators, and privacy-conscious individuals sometimes use Caesar ciphers to hide messages in plain sight. You will find them in social media bios, forum signatures, and image captions.
Manual Decoding:
Write out the alphabet. Shift each letter in the encoded message backward by the same number. If the shift is 3, D becomes A, E becomes B. Try different shift values until the message makes sense.
Automated Decoding with CyberChef:
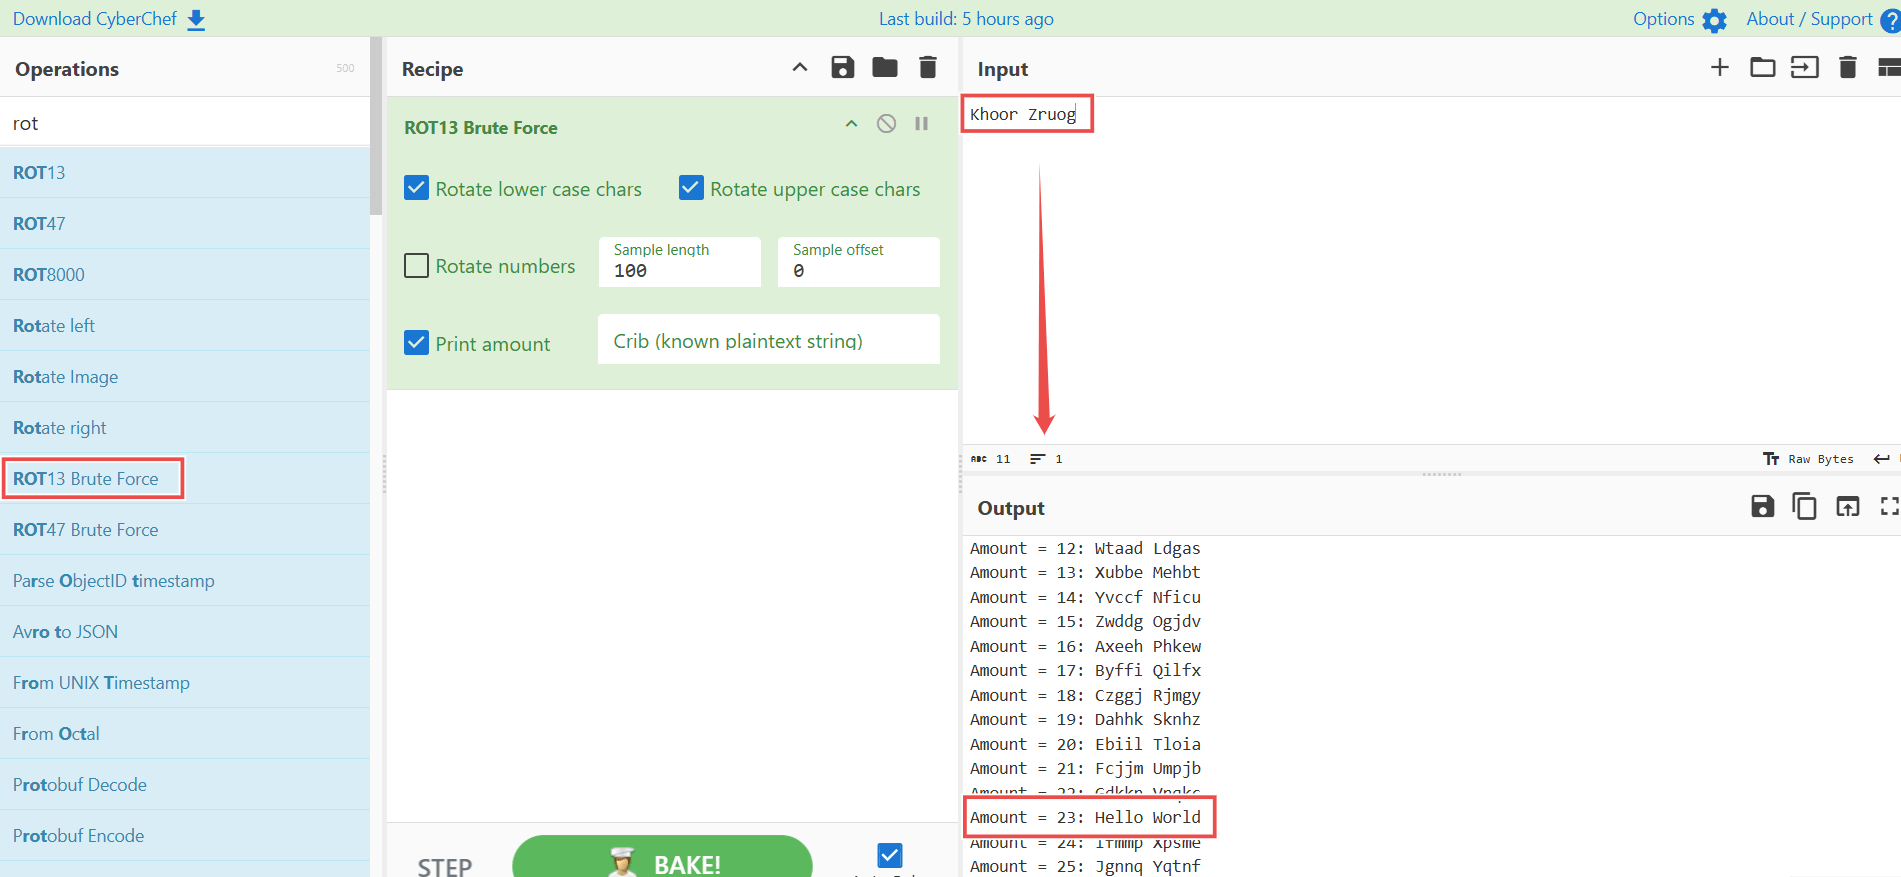
Copy the encoded text.
In the Operations panel, search for “ROT13” or “Caesar.” ROT13 is a Caesar cipher with a shift of 13.
Double-Click or drag it (ROT13) to the Recipe panel.
If ROT13 does not decode it, use the “ROT13 Brute Force” operation (as shown in the image). This tries every possible shift and shows all results. One of them will be readable.
If you prefer manual control over the decoding process, Cryptii is a great alternative. It is a browser-based tool at https://cryptii.com that lets you manually select the cipher type, set the shift value, and see the result in real time. Use it when you want to experiment with different shifts one at a time rather than brute forcing everything at once.
Lecture 9.7: Base64, Hex, and Binary — Decoding Common Encodings
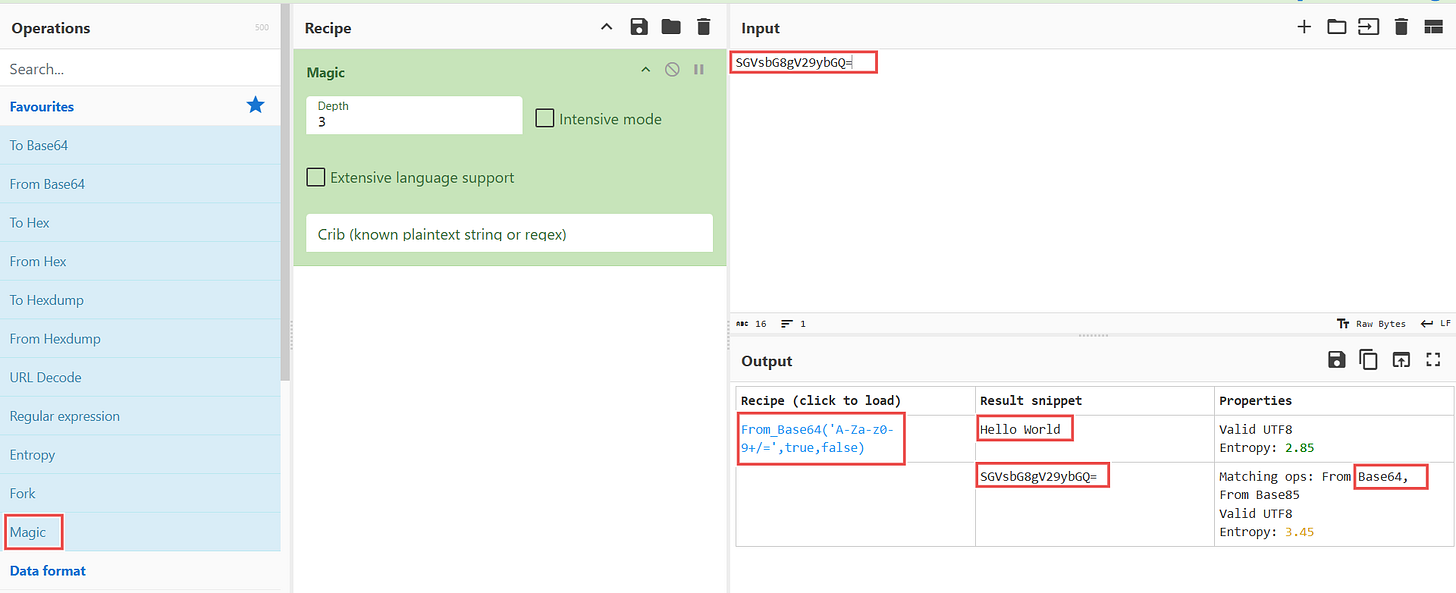
Not all encoded messages use ciphers. Many use data encodings designed for computers to read. These are common in OSINT investigations.
Base64:
Base64 encodes binary data as text. It looks like a random string of letters, numbers, and symbols, often ending with
=or==.Example:
SGVsbG8gV29ybGQ=To decode in CyberChef:
Paste the Base64 string into the Input panel.
Use the “Magic stick” for auto string detection or search for “From Base64” in Operations.
Drag it to the Recipe panel.
The Output shows:
Hello World
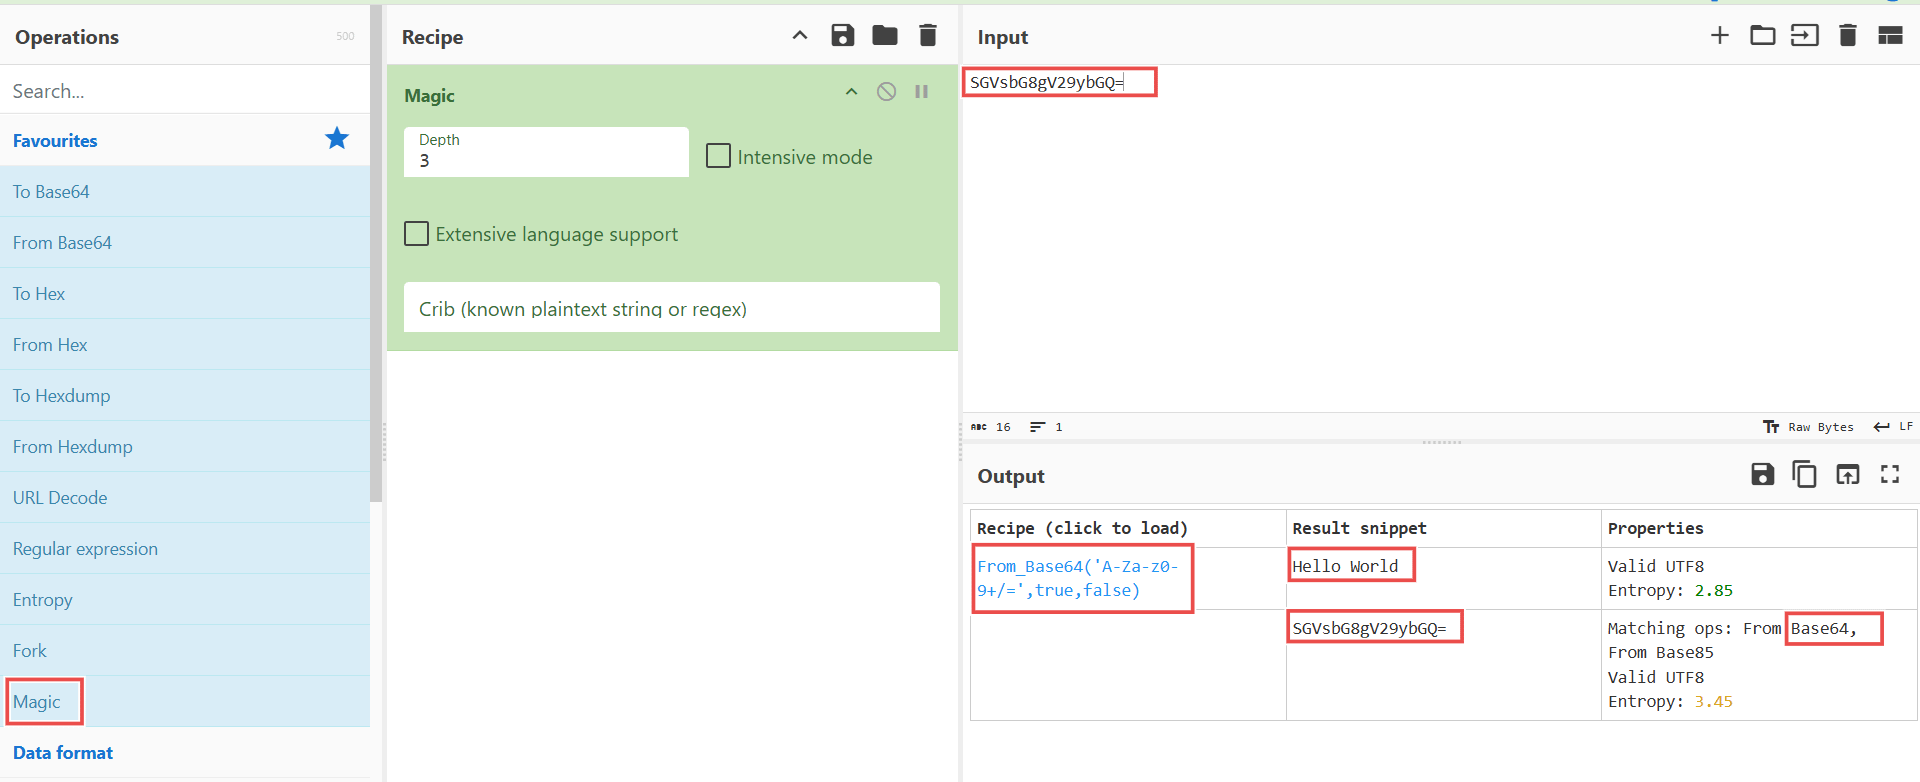
Hex:
Hexadecimal represents data using base-16 numbers (0-9 and A-F). It often appears in computer logs, error messages, and encoded files.
Example: 48656c6c6f20576f726c64
To decode in CyberChef:
Paste the Hex string into the Input panel.
Search for “From Hex” in Operations.
Drag it to the Recipe panel.
The Output shows: Hello World
Binary:
Binary uses only 0s and 1s. Each group of 8 bits represents one character.
Example: 01001000 01100101 01101100 01101100 01101111
To decode in CyberChef:
Paste the Binary string into the Input panel.
Search for “From Binary” in Operations.
Drag it to the Recipe panel.
The Output shows:
Hello World
Where You Find These Encodings:
Social media bios (Base64-encoded contact details).
Forum signatures (Hex-encoded messages).
Image metadata fields (Base64-encoded data).
Paste sites (Binary-encoded messages).
Email headers (Base64-encoded subject lines).
Lecture 9.8: Steganography — Finding Hidden Files Inside Images
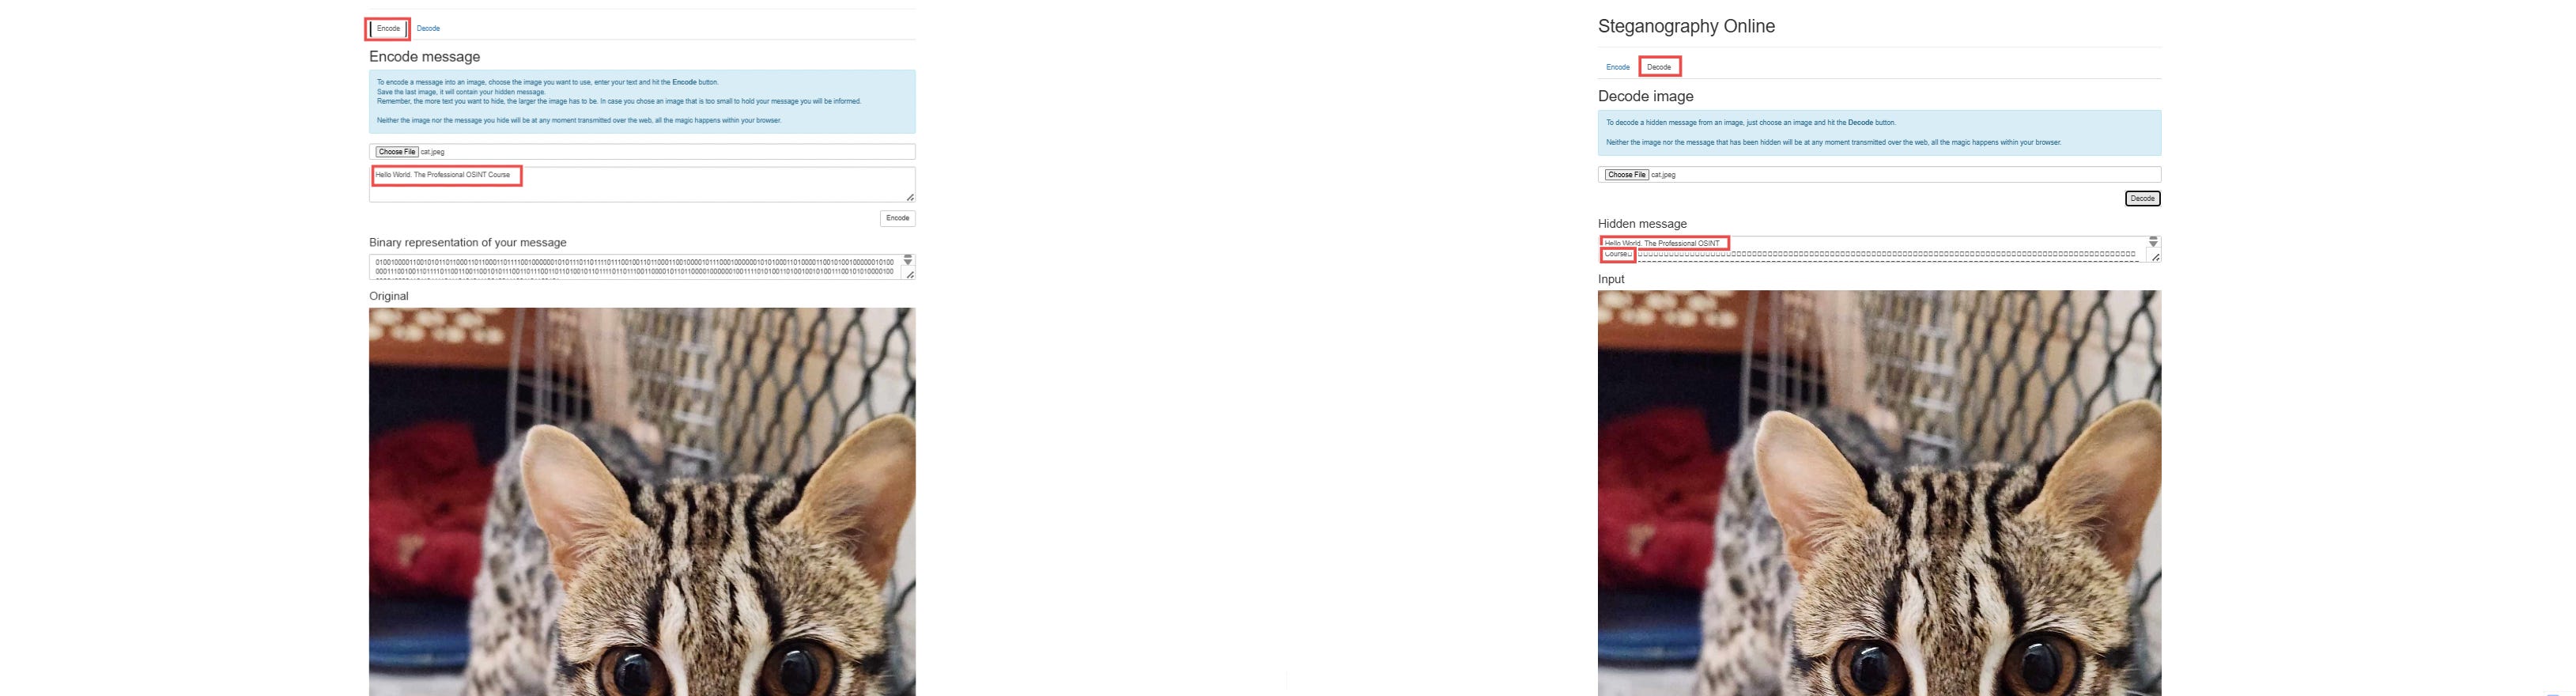
Steganography is the practice of hiding data inside other data. Unlike encryption, which makes a message unreadable, steganography makes a message invisible. A JPEG photo posted on social media might contain a hidden ZIP file. A PNG avatar on a forum might have a text document embedded in its pixel data.
For an investigator, steganography is both a threat and an opportunity. Threat actors use it to communicate covertly. Whistleblowers use it to exfiltrate data. You need to know how to detect it and extract what is hidden.
How Steganography Works
Digital images are made of pixels. Each pixel has color values (Red, Green, Blue). Steganography modifies the least significant bits of these color values. The change is so small the human eye cannot detect it. The image looks normal. But embedded in those tiny changes is an entire hidden file.
Common steganography techniques:
LSB (Least Significant Bit): The most common method. Data is stored in the last bit of each pixel’s color value.
Appended Data: A file is simply appended to the end of an image file. The image still opens normally. The extra data is ignored by image viewers.
Metadata Embedding: Data is hidden inside EXIF or comment fields.
Color Channel Hiding: Data is stored in a specific color channel (Red, Green, or Blue).
Tools for Detecting and Extracting Steganography
Steghide
Steghide is a command-line tool that hides and extracts data from JPEG and BMP images. It is included in Kali Linux.
Install:
sudo apt install steghideExtract hidden data from an image:
steghide extract -sf image.jpgWhen you run this command, steghide will prompt you to enter the passphrase that was used when the data was originally embedded. If there was no passphrase set, simply press Enter. If successful, the hidden file is extracted to your current directory.
Extract to specific filename:
steghide extract -sf image.jpg -xf output.txtCheck if an image contains hidden data (without extracting):
steghide info image.jpgThis tells you whether the image contains embedded data and what type of file it might be.
Format Support: steghide only works with JPEG, BMP, WAV, and AU files. If your image is a .png, steghide won't work on it.
Browser-Based Steganography Tool (No Command Line Required)
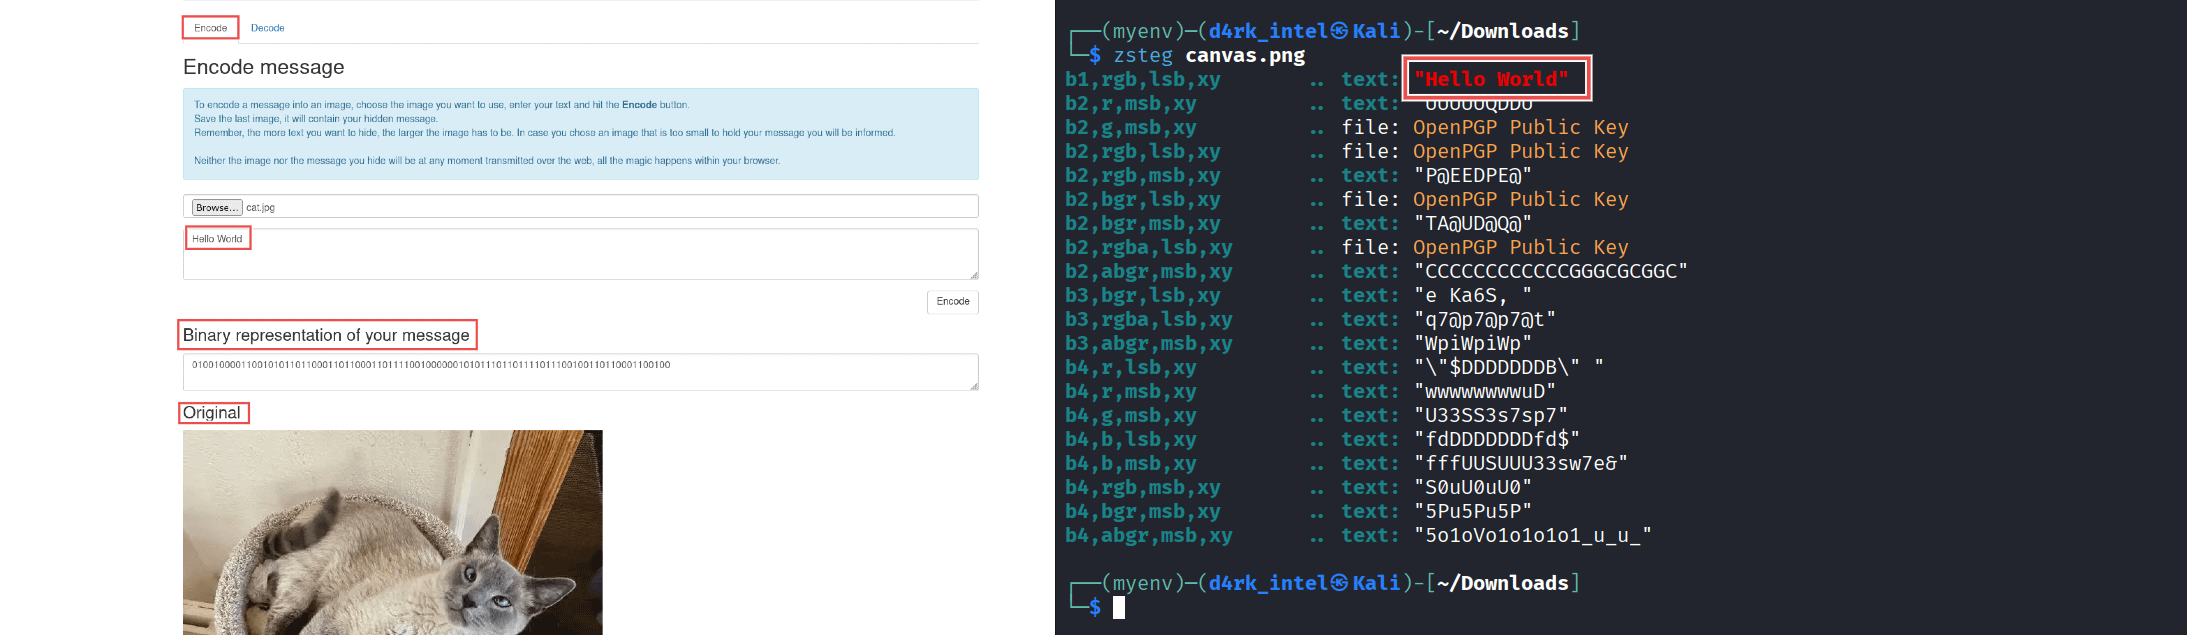
If you prefer a graphical interface without touching the terminal, use the browser-based steganography tool at: https://stylesuxx.github.io/steganography.
This tool runs entirely in your browser. No installation. No command line. You upload an image, and it decodes any hidden message embedded in the least significant bits. It also works in reverse. You can encode a message into an image to understand how the process works.
How to decode a hidden message:
Click the Decode tab.
Upload the image you want to analyze.
The tool extracts and displays any hidden text found in the image’s LSB data.
How to encode a message (for testing and learning):
Click the Encode tab.
Upload a clean image.
Type your message in the text field.
Download the new image with the hidden message embedded.
Use this tool when you need a quick steganography check without opening a terminal. It is fast, free, and requires zero setup.
zsteg
zsteg specializes in detecting LSB steganography in PNG and BMP images. It tries multiple methods and reports any hidden data it finds.
Install:
sudo apt install zstegIf the first command failed, use the below:
Step 1: Install Ruby and Gem
sudo apt install ruby ruby-dev -yStep 2: Install zsteg via Gem
sudo gem install zstegStep 3: Verify Installation
zsteg --helpIf it returns the help menu, it is installed correctly.
Step 4: Use zsteg
zsteg image.pngThe output shows whether data is hidden in any color channel or bit plane. If data is found, zsteg displays it.
Strings
The strings command extracts readable text from any file, including images. It works by scanning the file for sequences of printable characters and printing them out. If someone appended a text file to the end of an image, strings will find it.
Think of strings like an X-ray for files. The image looks normal on the surface. strings shows you what is inside.
Basic Usage
strings image.jpgThis prints every readable string in the file. The output can be long. You need to filter it.
Filtering with grep
Pipe the output of strings into grep to search for specific keywords.
strings image.jpg | grep -i “password”This searches for the word “password” anywhere in the file. The -i flag makes it case-insensitive. It matches “Password,” “PASSWORD,” and “password.”
Common Search Patterns
Here are the searches you should run on every suspicious image:
Find Credentials:
strings image.jpg | grep -i “password”
strings image.jpg | grep -i “login”
strings image.jpg | grep -i “username”
strings image.jpg | grep -i “email”
strings image.jpg | grep -i “@”
The @ symbol catches email addresses. Any string containing @ is likely an email.
Find Hidden Files:
strings image.jpg | grep -i “.zip”
strings image.jpg | grep -i “.txt”
strings image.jpg | grep -i “.pdf”
strings image.jpg | grep -i “.doc”
strings image.jpg | grep -i “.exe”
If someone appended a ZIP or other file, the filename may appear in the strings output.
Find URLs and Onion Addresses:
strings image.jpg | grep -i “http”
strings image.jpg | grep -i “.onion”
strings image.jpg | grep -i “www.”
Find Contact Information:
strings image.jpg | grep -i “@”
strings image.jpg | grep -E “[0-9]{10,}”    # Phone numbers (10+ digits)
strings image.jpg | grep -i “telegram”
strings image.jpg | grep -i “bitcoin”
strings image.jpg | grep -i “bc1”
Find Encryption Keys and Hashes:
strings image.jpg | grep -i “pgp”
strings image.jpg | grep -i “key”
strings image.jpg | grep -i “encrypt”
strings image.jpg | grep -E “[A-Fa-f0-9]{32,}”    # MD5/SHA hashes
Showing Context Around Matches
When you find a match, you want to see what is around it. The -A, -B, and -C flags show context.
Show lines AFTER the match:
strings image.jpg | grep -A 50 “CYBERSHIELD”This prints the matching line plus 50 lines after it. Use this when the data you want follows a header or keyword.
Show lines BEFORE the match:
strings image.jpg | grep -B 20 “END OF DATABASE”This prints 20 lines before the match. Use this to see what leads up to a known endpoint.
Show lines BEFORE and AFTER the match:
strings image.jpg | grep -C 30 “SELLER INFO”This prints 30 lines before and 30 lines after the match. Use this to capture an entire section of hidden data in one command.
Controlling String Length
By default, strings prints sequences of 4 or more printable characters. You can adjust this with the -n flag.
strings -n 3 image.jpgThis prints strings as short as 3 characters. Use this for finer granularity, but expect more noise.
strings -n 10 image.jpgThis prints only strings of 10 or more characters. Use this to filter out short, meaningless fragments and focus on longer, meaningful text.
Searching Binary Files Directly with grep
If strings does not find what you need, grep can search the raw binary file directly.
grep -a “CYBERSHIELD” image.jpgThe -a flag tells grep to treat the binary file as text. This searches every byte of the file for the keyword. It is slower but more thorough.
Online Tools
If you prefer a graphical interface, several online tools detect and extract steganography.
StegOnline: https://stegonline.georgeom.net — Upload an image. Browse hidden data across different bit planes. Extract embedded files.
Aperi’Solve: https://aperisolve.fr — Upload an image. It runs multiple steganography tools automatically and displays all results.
Forensically: https://29a.ch/photo-forensics — Provides multiple image forensic tools including steganography detection.
How to Detect Steganography Manually
Not all hidden data requires a tool to find. Some signs are visible.
File size anomalies: A simple 400x400 pixel photo that is 15MB is suspicious. JPEGs of that size are typically a few hundred kilobytes. The extra size may contain hidden data.
Image quality inconsistencies: An image that looks slightly grainy or has visible noise in dark areas may have LSB data embedded.
Metadata inspection: Run
exiftool image.jpg. Look for unusually long comment fields, software tags, or custom metadata entries.Hex dump inspection: Run
xxd image.jpg | less. Scroll through the raw data. Look for file headers likePK(ZIP archive) or‰PNG(PNG image) appearing in the middle or at the end of the file. This indicates an appended file.
Practical Example: Extracting a Hidden ZIP File
A target posts a photo on a forum. The photo looks normal. But the file size is 8MB for a 640x480 image. That is too large.
Step 1: Run strings on the image:
strings photo.jpg | grep -i “.zip”Output shows: secret.zip. A ZIP file is appended to the image.
Step 2: Extract the appended data using binwalk:
sudo apt install binwalk
binwalk -e photo.jpg
Binwalk scans the file for embedded file signatures and extracts them automatically.
Step 3: Check the extracted folder. The ZIP file is there. If it is password-protected, you will need the passphrase. But the existence of the hidden file is itself intelligence.
Practical Exercise Addendum: The Hidden ZIP Challenge
Return to the image from the Hidden Message Challenge. After decoding the visible message, you suspect there is more. Run steghide on the restored image. Run zsteg. Check the file size. Use strings. There is a ZIP file hidden inside the image. Extract it. The ZIP contains a text file. That file is your final answer.
Quick Reference — Updated
Objective ____________Tool/Method
Detect hidden files in images:
steghide info,zsteg,binwalkExtract hidden files:
steghide extract,binwalk -eFind appended data:
strings,xxdOnline steg analysis: StegOnline, Aperi’Solve, Forensically
Detect LSB steganography: Python script,
zstegInspect file structure:
xxd,hexdump
Quick Reference
Objective ____________Tool/Method
Brighten darkened images: Photopea → Levels, Exposure
Reveal hidden text: Photopea → Color channel isolation, Invert, Posterize
Decode Base64: CyberChef → From Base64
Decode Hex: CyberChef → From Hex
Decode Binary: CyberChef → From Binary
Brute force Caesar cipher: CyberChef → ROT13 Brute Force, or Python script
Image forensics is not magic. It is methodical analysis. Many manipulated darkened images can be brightened, and many encoded messages can be decoded. Many tools are free, and basic techniques are simple. Now you know them.
Module 10: Transportation OSINT — Tracing Cars, Vessels, and Aircraft
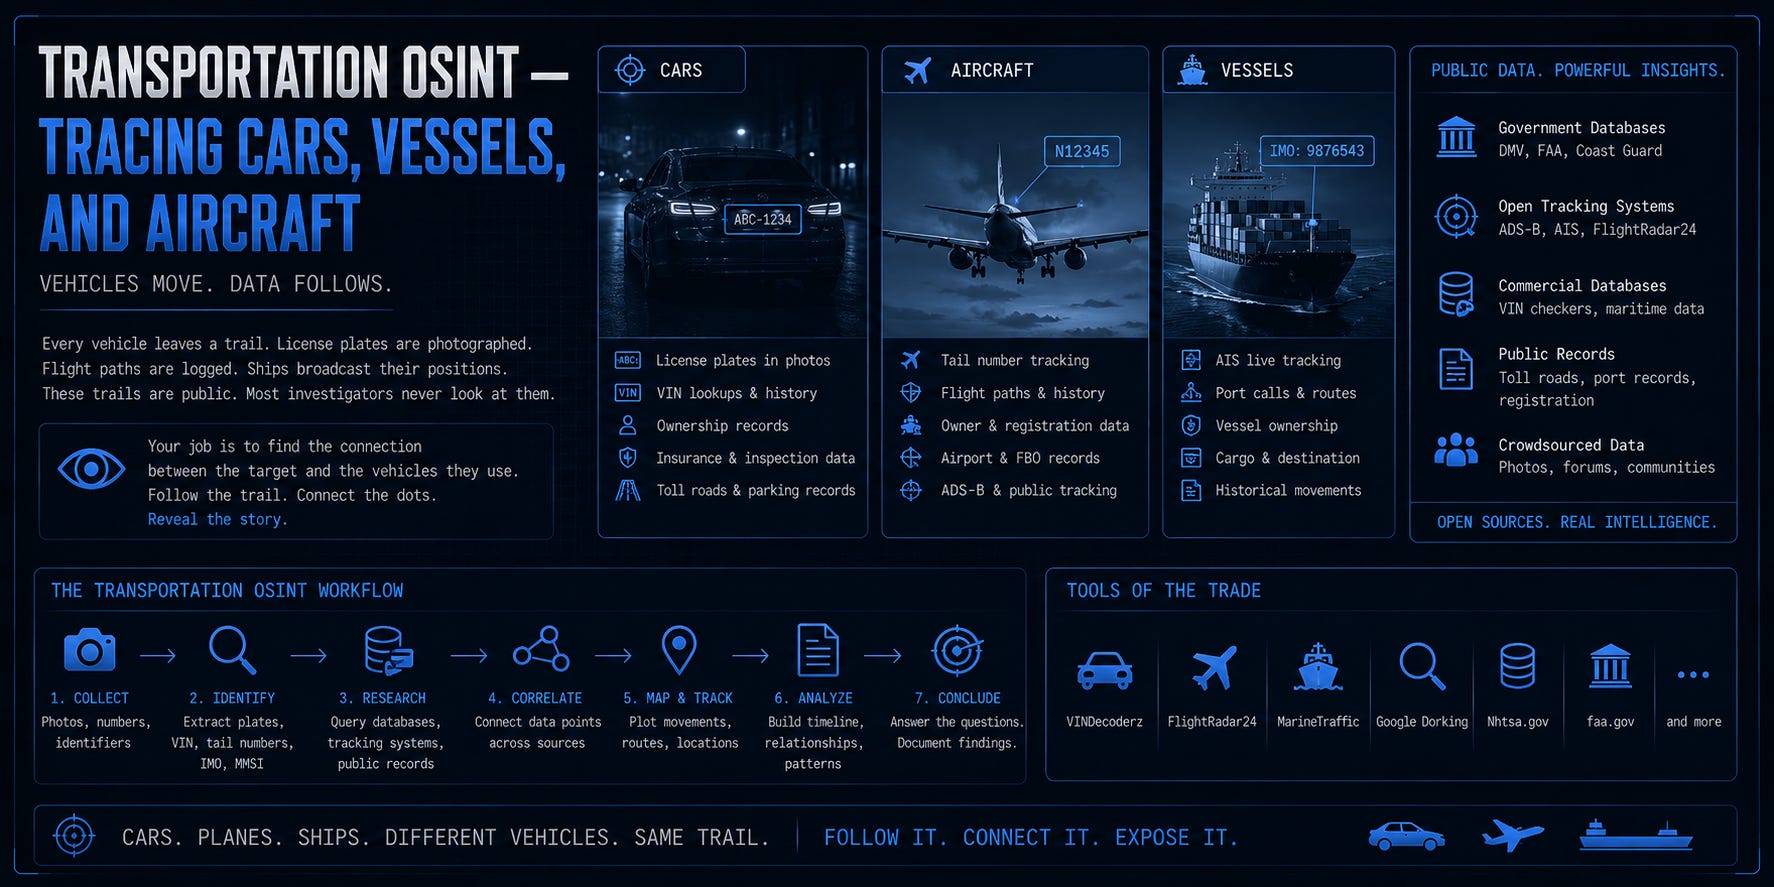
People are tracked by more than their social media accounts. They drive cars. They board planes. They ship cargo on vessels. Every vehicle leaves a trail. License plates are photographed. Flight paths are logged. Ships broadcast their positions. These trails are public. Most investigators never look at them.
This module teaches you how to trace a target through the vehicles they use. You will learn to identify cars from a single photo, pull ownership history from a VIN, track ships in real time, and follow aircraft by their tail numbers. Every technique is practical. Every data source is open.
Lecture 10.1: Vehicle Identification — Make, Model, and Year from a Photo

A single photo of a car can tell you more than you think. The make, model, and year are often identifiable from visual details.
What to Look For:
Body shape: Sedan, SUV, coupe, truck. This narrows the category immediately.
Headlights and taillights: Manufacturers design unique light signatures. A BMW’s angel eyes. An Audi’s LED strip. These are distinctive.
Grille design: The front grille is a brand signature. Lexus spindle grille. Jeep seven-slot grille. BMW kidney grille.
Badges and emblems: Often visible even in low-resolution images. The font and placement matter.
Wheel design: Alloy wheels are often model-specific. A particular rim style may only appear on one trim level.
Side profile and window line: The silhouette of a car is unique to each model.
Side mirrors: Shape and placement vary between models.
License plate placement: Some cars have center-mounted plates. Others are offset.
Practical Process:
Step 1: Screenshot the vehicle from the image. Crop tightly around the car. Remove distracting background.
Step 2: Upload the cropped image to Google Lens. Google Lens is surprisingly good at identifying car makes and models from photos.
Step 3: If Google Lens does not return a clear match, use reverse image search on Yandex. Yandex often performs better on vehicle images.
Step 4: Search the suspected make and model on Google Images. Compare the headlights, grille, and body lines of known models to your photo. Look for exact matches.
Step 5: Narrow down the year. Car models receive facelifts every few years. A 2018 Honda Civic has a different front bumper than a 2021 Honda Civic. Search for “Honda Civic 2018 vs 2021 front” and compare.
Step 6: Document your identification with annotated screenshots. Circle the matching features. This is your evidence.
Lecture 10.2: License Plate Lookup — Country-Specific Databases

License plates are unique identifiers. If you have a plate number, you can pull vehicle information from public databases.
Understanding License Plate Formats:
Every country has a different format. Learn to read them.
United States: State-specific. “ABC 1234” format varies.
United Kingdom: “AB12 CDE” format. The first two letters indicate the registration region. The numbers indicate the year.
Germany: “B-AB 1234” format. The first letter(s) indicate the city. “B” is Berlin. “M” is Munich.
Russia: “A123BC 77” format. The numbers at the end indicate the region. “77” is Moscow.
Before you search a plate, identify the country. The plate design, colors, and format tell you where to look.
Free License Plate Lookup Tools:
UK:
vehicleenquiry.service.gov.uk— Enter any UK plate. Returns make, color, engine size, CO2 emissions, tax status, and MOT history.US:
vehiclehistory.gov— Official US government database for vehicle history. Limited free access.US (Free):
vincheck.info— Enter a plate or VIN. Returns vehicle specs, title history, and accident records.Global:
platesmania.com— User-uploaded photos of license plates from around the world. Search by plate number.Global:
worldlicenseplates.com— Reference for identifying plate formats by country.
Practical Example:

A photo shows a car with a UK plate “AB12 CDE.” You go to vehicleenquiry.service.gov.uk. Enter the plate. The site returns: “FORD, FIESTA, RED, 1596cc, PETROL.” You now know the exact make, model, color, and engine size from a single plate number.
Lecture 10.3: VIN Decoding — What a Vehicle Identification Number Reveals
Every vehicle manufactured after 1981 has a 17-character VIN. This number encodes the manufacturer, model, engine type, year, and factory location.
Where to Find a VIN:
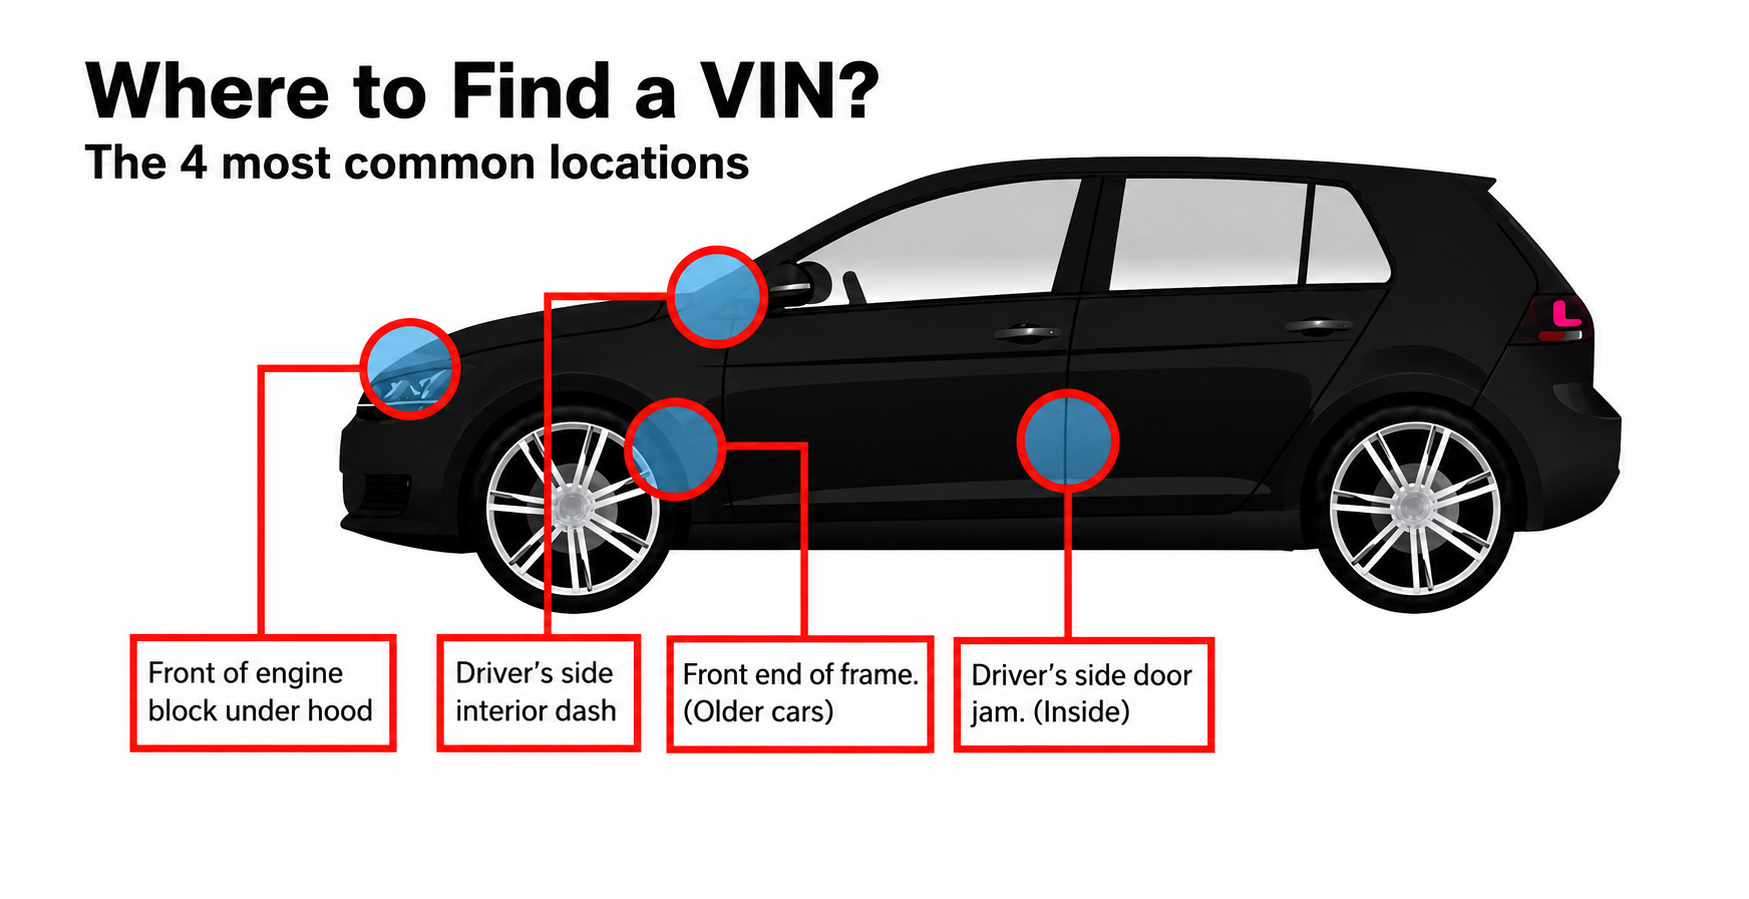
Dashboard near the windshield (visible from outside).
Driver’s side door jamb.
Insurance documents.
Registration papers.
Sometimes visible in car listing photos online.
How to Decode a VIN:
Position 1-3 (WMI - World Manufacturer Identifier):
Tells you the country and manufacturer. “1GC” is General Motors USA. “WBA” is BMW Germany. “JHM” is Honda Japan.
Position 4-8 (Vehicle Descriptor):
Tells you the model, body type, engine type, and transmission.
Position 9 (Check Digit):
Used to verify the VIN is valid.
Position 10 (Model Year):
A single character representing the year. “A” is 1980 or 2010. “L” is 1990 or 2020. “M” is 1991 or 2021. “N” is 1992 or 2022.
Position 11 (Plant Code):
Tells you which factory built the vehicle.
Position 12-17 (Serial Number):
The unique production sequence.
Free VIN Decoders:
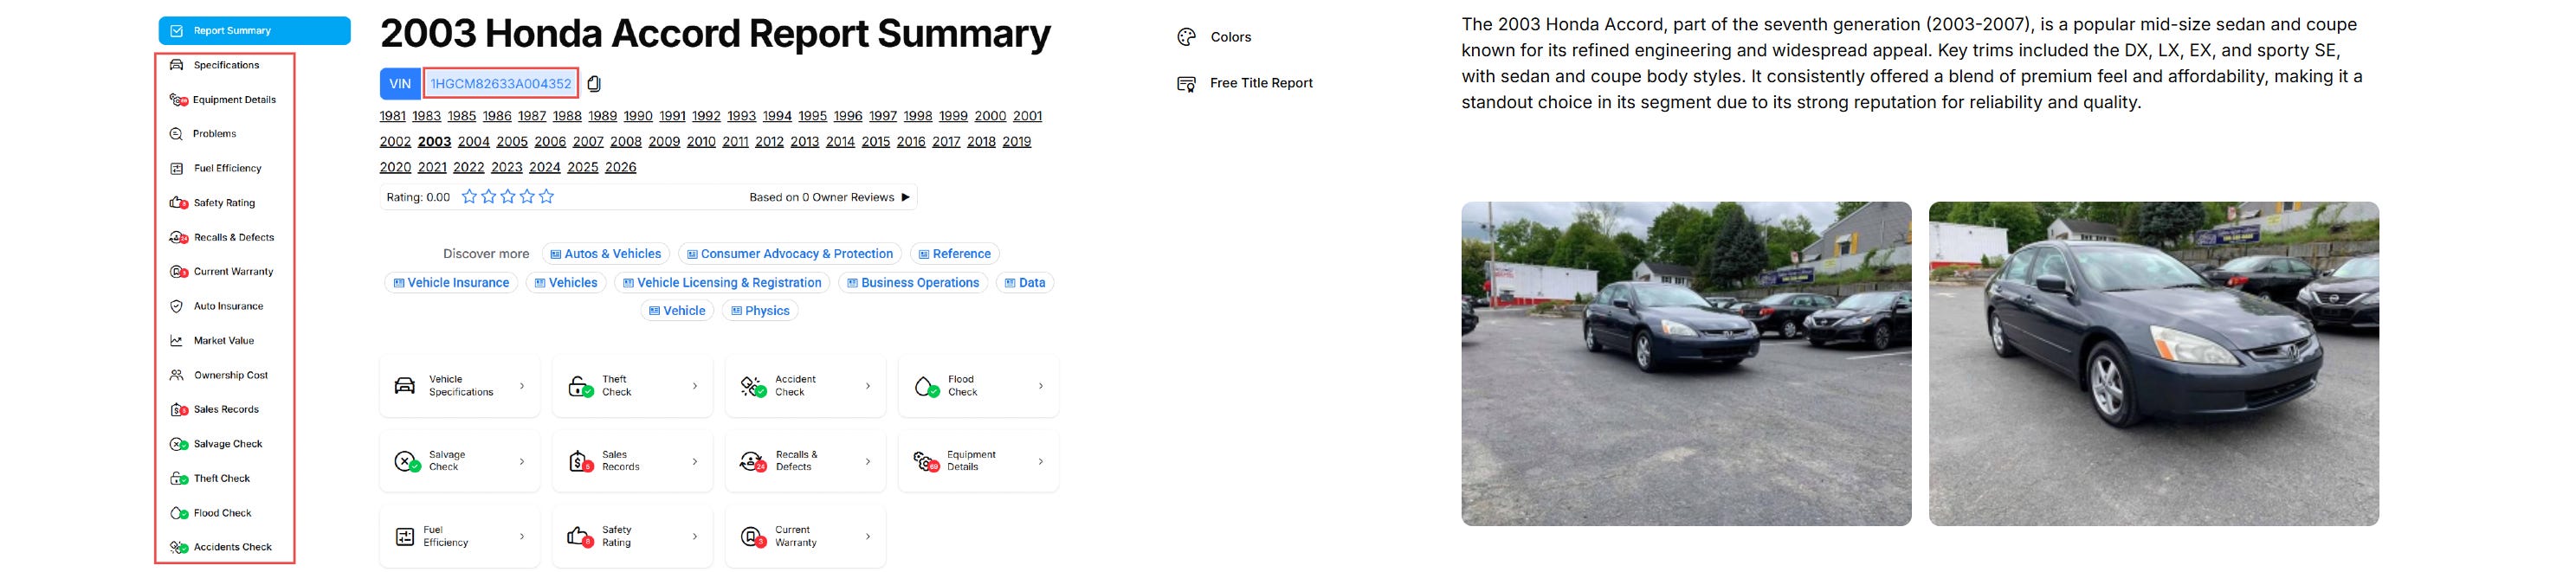
vindecoder.net— Enter any VIN. Returns full vehicle specs.vehiclehistory.gov— US official VIN lookup.vincheck.info— Free VIN check with title history.
Practical Example:
A target is selling a car online. The listing includes a photo showing the VIN on the dashboard. You copy the VIN. Enter it on vincheck.info. The site returns: “2018 Toyota Camry, 2.5L 4-cylinder, manufactured in Georgetown, Kentucky.” You now have the exact year, model, engine, and factory location.
Lecture 10.4: Marine Traffic Tracking — Following Ships in Real Time

Ships broadcast their position, speed, and destination publicly using AIS (Automatic Identification System). This data is collected and displayed on marine tracking websites. You can track any vessel in the world.
Marine Traffic
Go to https://www.marinetraffic.com. The map shows thousands of vessels in real time.
Click any ship icon. You see the vessel name, type, flag, speed, course, and destination.
Search by vessel name or IMO number. The IMO number is a unique permanent identifier for every commercial vessel.
View the vessel’s track history. See where it has been over the past days or weeks.
View port calls. See when it arrived and departed each port.
Vessel Finder
Go to https://www.vesselfinder.com. Is an alternative with similar functionality. Sometimes one platform has data the other does not. Check both.
What You Can Find:
A ship’s current location and heading.
Its destination port and estimated arrival time.
Its flag state (the country where it is registered).
Its owner and operator (for commercial vessels).
Historical track data showing past routes.
Practical Example:
A target claims to be importing goods from China. They mention a shipment on the vessel “EVER GIVEN.” You search “EVER GIVEN” on MarineTraffic. The vessel is currently in the Red Sea, heading for Rotterdam. The AIS data confirms the shipment timeline matches their claim.
Lecture 10.5: Aircraft Tracking — Following Planes by Tail Number

Every aircraft has a registration number, commonly called a tail number. It is painted on the fuselage and is unique to that aircraft. Flight tracking websites log every flight.
Flight Rader24
Go to https://www.flightradar24.com. The map shows thousands of aircraft in the air.
Click any plane icon. You see the flight number, aircraft type, altitude, speed, and route.
Search by tail number (registration) to find a specific aircraft.
Search by flight number to find a specific commercial flight.
View playback to see past flights.
ADS-B Exchange
https://globe.adsbexchange.com is unfiltered. FlightRadar24 and FlightAware allow owners to hide their aircraft. ADS-B Exchange shows everything that broadcasts ADS-B data. Military aircraft, private jets, government planes. All visible.
What You Can Find:
A private jet’s travel history over months.
A government aircraft’s movements.
A commercial flight’s actual departure and arrival times.
Aircraft owner information from registration databases.
Practical Example:
A target claims to be in London for a meeting. A photo on their Instagram shows a private jet interior. The tail number “N123AB” is visible in the window reflection. You search “N123AB” on ADS-B Exchange. The aircraft flew from New York to Miami on the date of the alleged meeting. The target lied. The tail number gave them away.
Lecture 10.6: Aircraft Registration Lookup
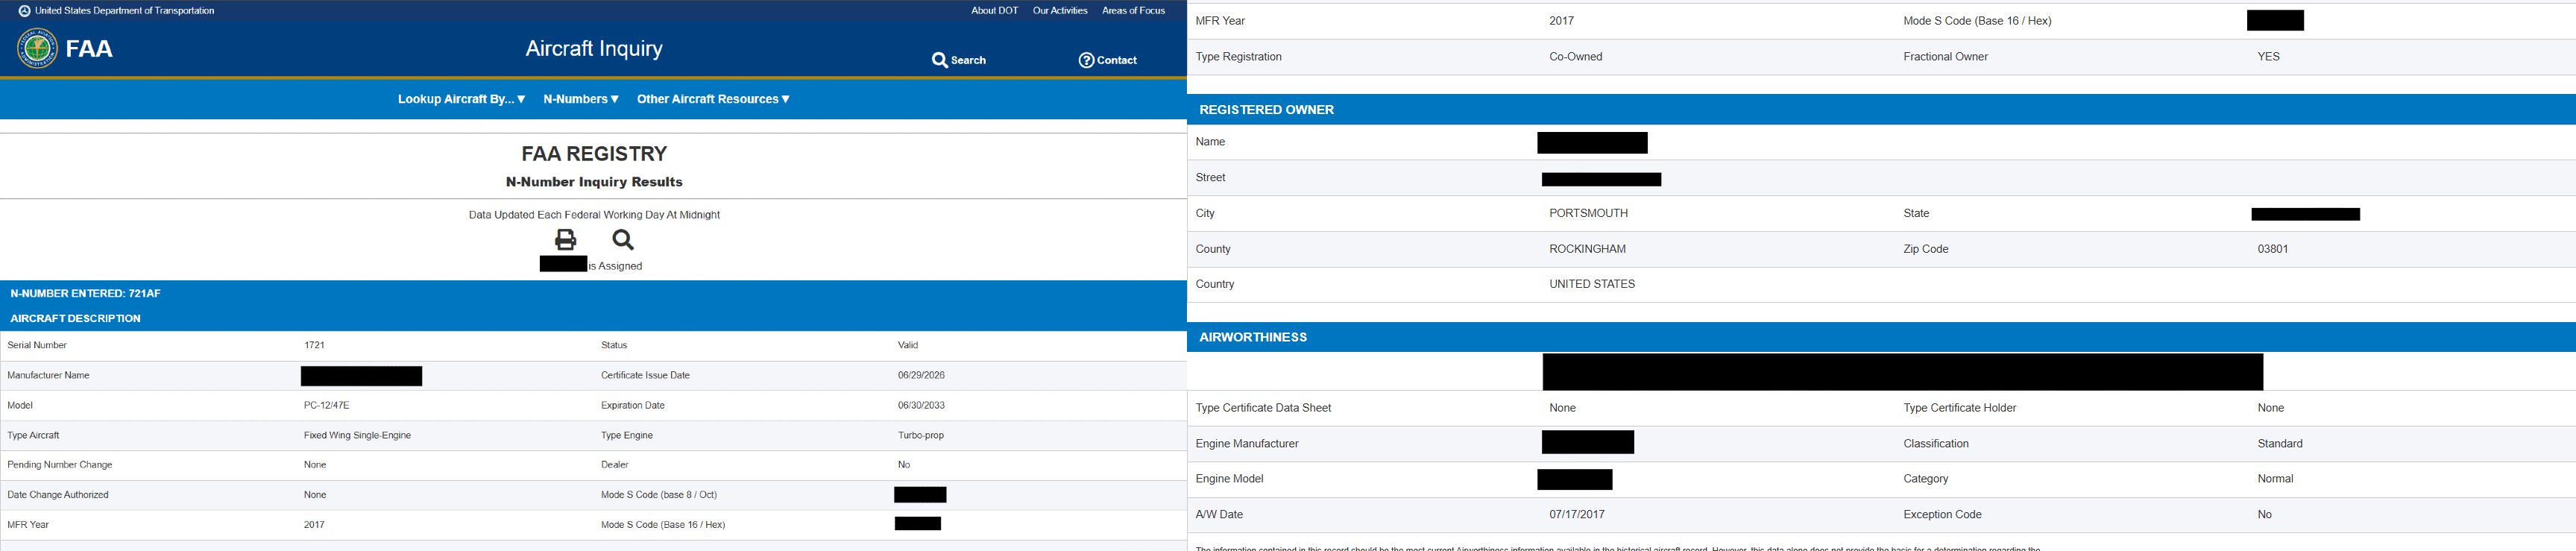
Every country maintains a public aircraft registry. Search by tail number to find the owner.
US (FAA Registry): https://registry.faa.gov/aircraftinquiry — Enter a US tail number (starts with “N”). Returns the registered owner, address, aircraft make and model, and serial number.
UK (CAA Registry): https://www.caa.co.uk — Search by registration (starts with “G-”). Returns owner and aircraft details.
Global: https://www.aircraft-registration.com — Links to registries by country.
Practical Example:
A private jet with tail number “N456CD” is seen at an airport near your target’s residence. You search the FAA registry. The owner is “XYZ Holdings LLC.” You search that company on OpenCorporates. The beneficial owner is your target. The jet is theirs.
Lecture 10.7: Satellite Imagery for Vehicle Tracking
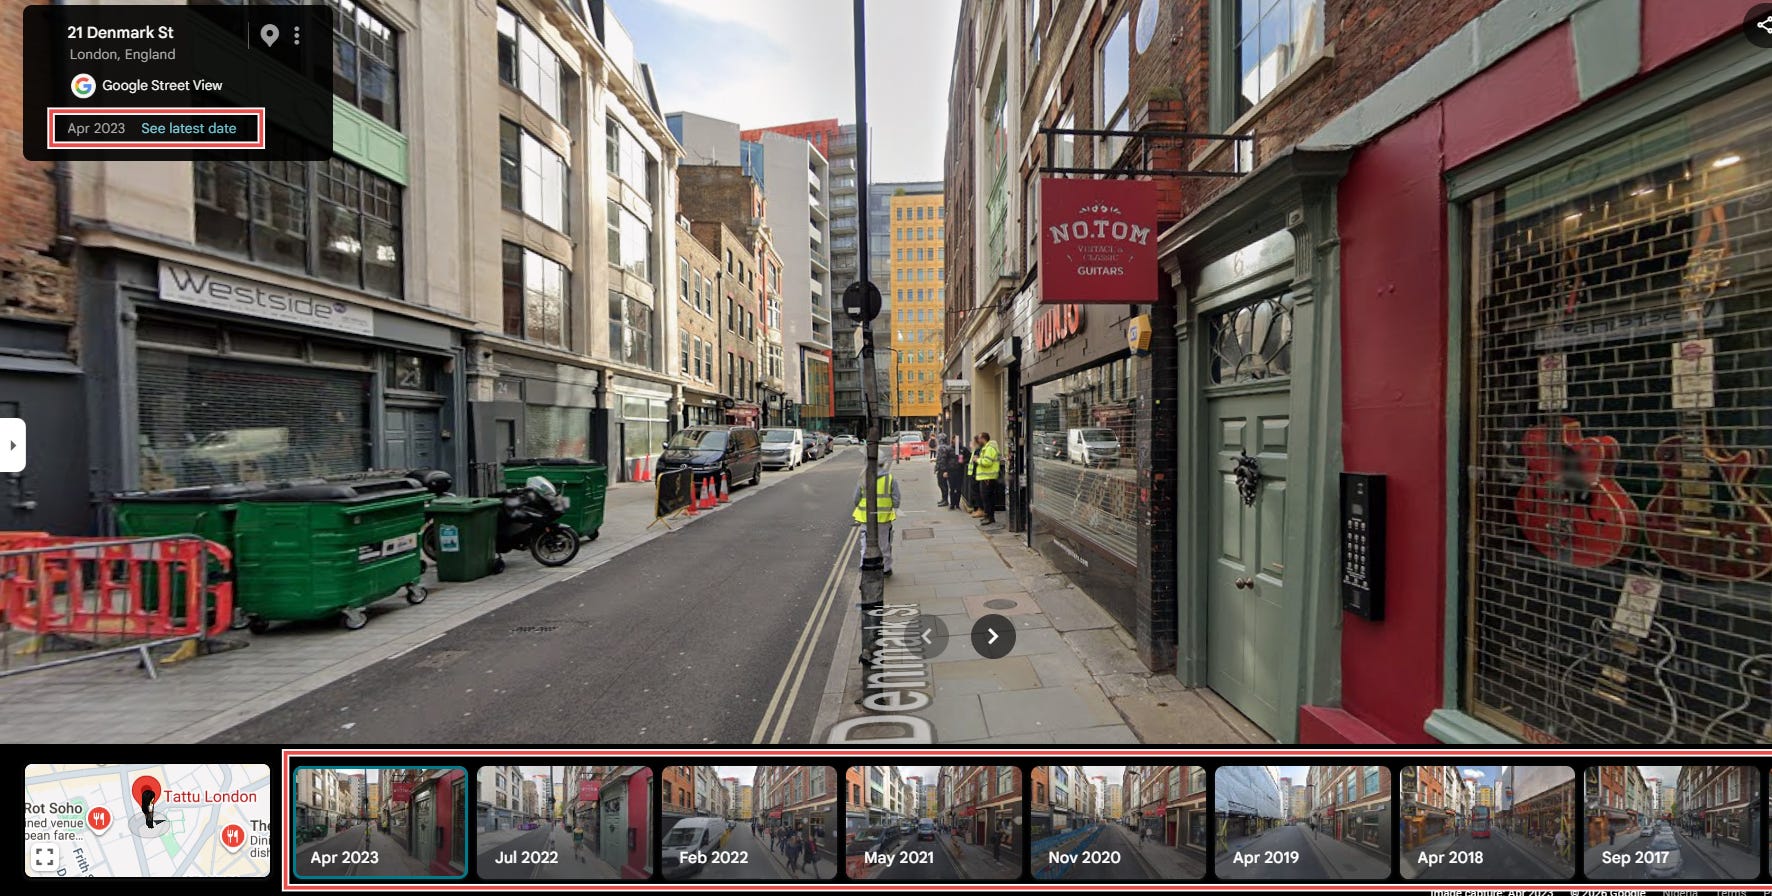
Satellite imagery can show vehicles parked at specific locations at specific times.
Google Earth Pro: https://www.google.com/maps
View historical imagery. Go back in time to see a location on different dates.
Zoom into parking lots, driveways, and industrial areas.
Look for vehicles. Note their presence or absence on different dates.
Sentinel Hub: https://www.sentinel-hub.com — Free satellite imagery updated every few days.
Not as high resolution as Google Earth but more current.
Practical Example:
A target claims to have sold a specific car in 2024. You use Google Earth Pro historical imagery. The car is visible in their driveway in March 2025. The car was not sold. The satellite imagery proves it.
Lecture 10.8: Building Movement Patterns from Vehicle Data
Individual vehicle sightings are data points. Combine them to map a target’s movements.
The Workflow:
Collect every vehicle sighting. License plate photos, AIS tracks, flight logs, satellite imagery.
Plot each sighting on a map with a timestamp.
Connect the dots chronologically.
Look for patterns. Frequent visits to a specific location. Travel routes that repeat.
Cross-reference vehicle data with other intelligence. Social media check-ins. Phone location data. Financial transactions.
Practical Example:
A target’s car is photographed at a warehouse on Monday. Their private jet flies to the same city on Tuesday. A ship they are connected to docks at the port on Wednesday. Three data points. One location. A pattern emerges.
Quick Reference
Objective ______________Tool
Identify car from photo: Google Lens, Yandex Images
UK license plate lookup:
vehicleenquiry.service.gov.ukUS license plate lookup:
vincheck.infoGlobal plate reference:
platesmania.com,worldlicenseplates.comVIN decoding:
vindecoder.net,vehiclehistory.govMarine tracking:
marinetraffic.com,vesselfinder.comFlight tracking:
flightradar24.com,globe.adsbexchange.comUS aircraft registry:
registry.faa.gov/aircraftinquirySatellite imagery: Google Earth Pro, Sentinel Hub
This is Transportation OSINT. Cars, ships, and planes are not just transportation. They are tracking devices that broadcast their identities, positions, and histories. Learn to read the signals. Follow the trails. Build the patterns. Every vehicle tells a story.
Module 11: Geospatial Intelligence (GEOINT) — Mapping the World from Open Sources
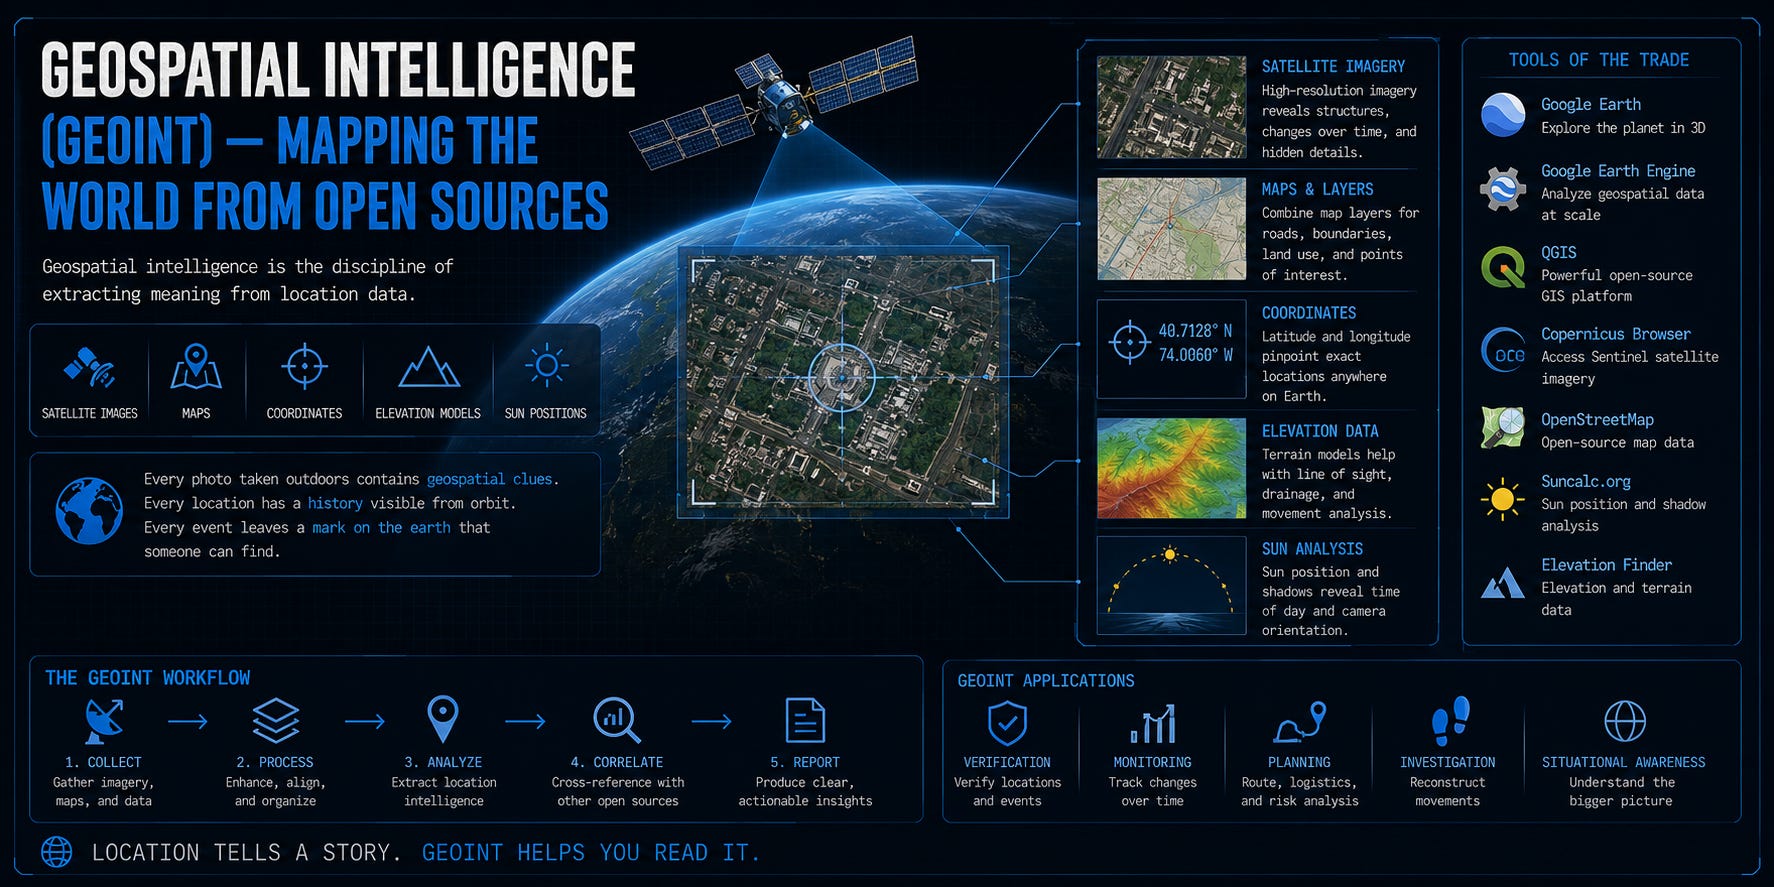
Geospatial intelligence is the discipline of extracting meaning from location data. Satellite images. Maps. Coordinates. Elevation models. Sun positions. Every photo taken outdoors contains geospatial clues. Every location has a history visible from orbit. Every event leaves a mark on the earth that someone can find.
This module is not a repeat of Module 2. Module 2 taught you to geolocate a single image. This module teaches you to think spatially. To work with satellite data. To analyze terrain. To map movements. To detect change over time. These are skills that intelligence agencies, war crimes investigators, and disaster response teams use daily.
By the end of this module, you will be able to take a satellite image and extract intelligence from it the way a professional GEOINT analyst would.
Lecture 11.1: Commercial Satellite Imagery — Your Eyes in the Sky

You do not need a spy satellite. Free and commercial imagery is available to anyone with an internet connection.
Google Earth Pro
Google Earth Pro is free. Download it from https://www.google.com/earth/versions. It is not the browser version. It is a desktop application with far more power.
What Google Earth Pro gives you:
High-resolution satellite imagery of most of the planet.
Historical imagery going back decades in many areas.
3D terrain and building models.
Measurement tools for distance and area.
The ability to import and export KML/KMZ files for mapping.
Sentinel Hub
Sentinel Hub at https://www.sentinel-hub.com provides free access to satellite imagery from the European Space Agency’s Sentinel satellites. These satellites image the entire planet every few days.
What Sentinel Hub gives you:
Imagery updated every 2-5 days.
Multiple spectral bands including infrared.
The ability to see through clouds using radar.
Free tier sufficient for most OSINT investigations.
Sentinel imagery is lower resolution than Google Earth, but it is current. Google Earth might show a location from 2022. Sentinel shows it from last week.
When to Use Which:
Google Earth Pro: High-resolution analysis, historical comparison, 3D terrain.
Sentinel Hub: Recent imagery, change detection, monitoring ongoing events.
Lecture 11.2: Historical Imagery and Change Detection
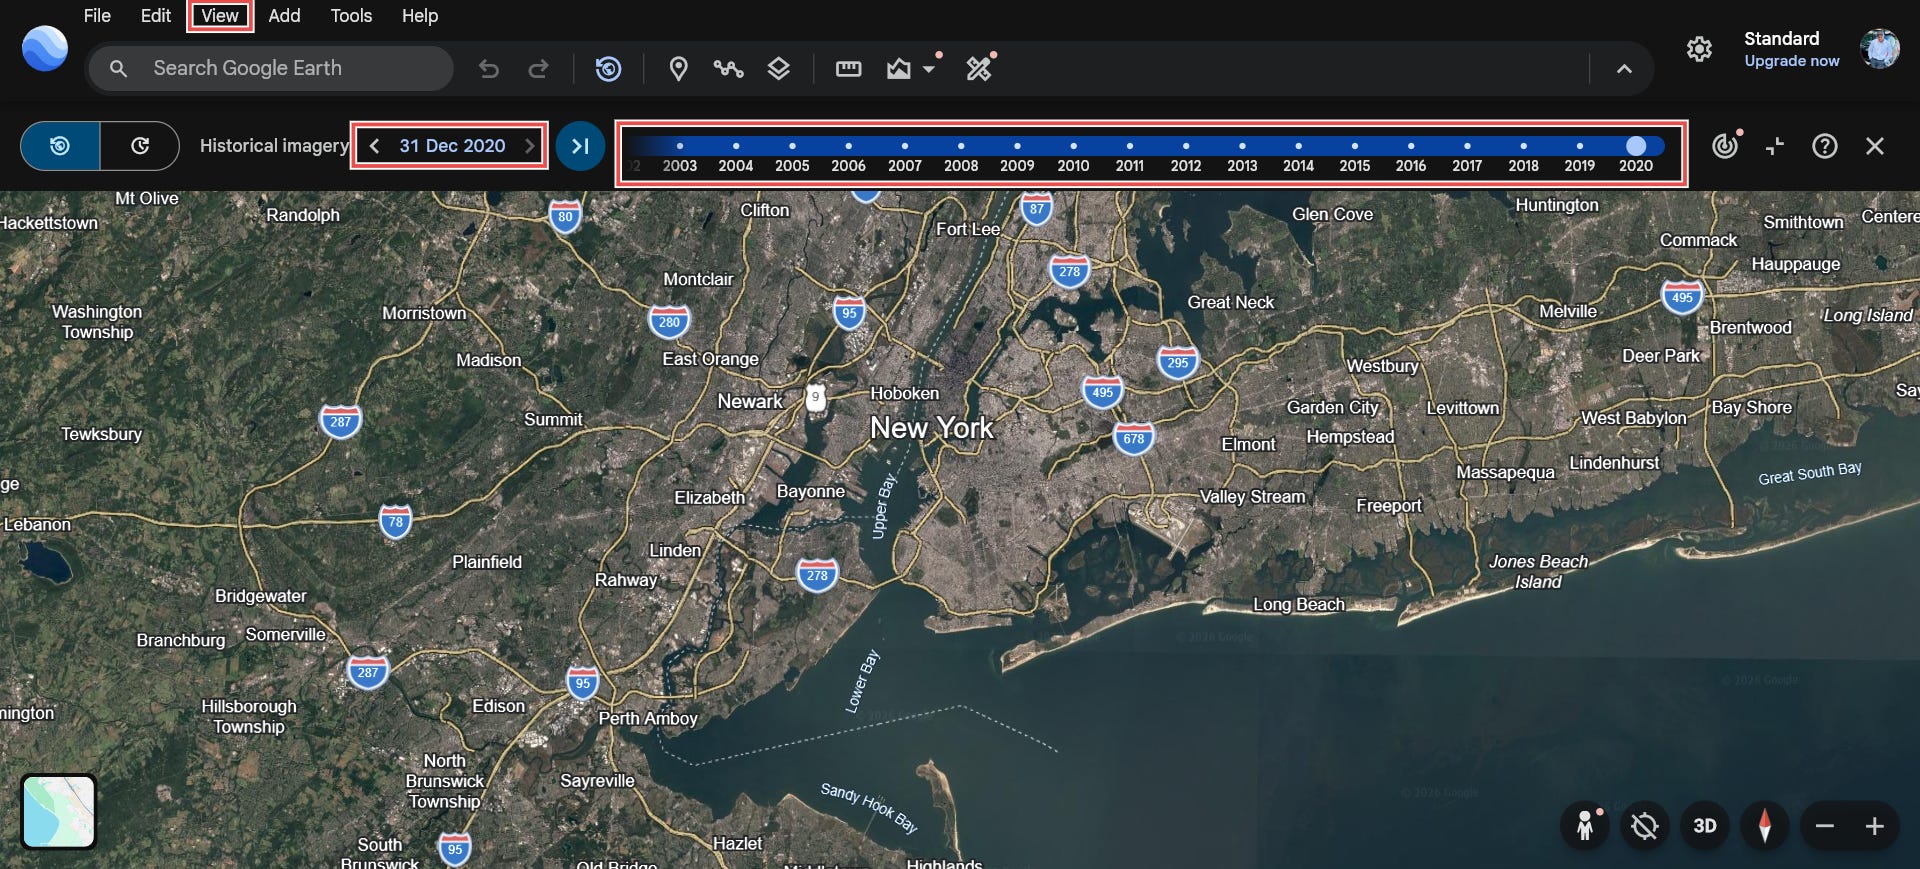
The most powerful feature of Google Earth Pro is the time slider. It lets you scroll back through years of satellite imagery to see how a location has changed.
How to Use the Time Slider:
Step 1: Open Google Earth Pro. Navigate to your target location.
Step 2: Look at the toolbar at the top. Find the clock icon with a green arrow pointing left. Click it.
Step 3: A slider appears. Drag it left to go back in time. Drag it right to return to the present. The imagery changes as you move the slider. Each position shows a different date.
Step 4: Note the date of each image in the bottom left corner of the screen. Document which dates are available.
Practical Example: Detecting Construction
A company claims they built a factory in 2023. You navigate to the location in Google Earth Pro. Open the time slider. The imagery from December 2022 shows an empty field. The imagery from March 2023 shows foundation work. The imagery from June 2023 shows a completed building. The timeline matches their claim.
Practical Example: Detecting Deception
A target claims a warehouse was destroyed by fire in 2024. You check historical imagery. The warehouse was already gone in 2021. The fire claim is false. The imagery proves it.
Change Detection with Sentinel Hub:
Sentinel updates every few days. Use it to monitor ongoing situations.
Track construction progress at a suspected facility.
Monitor troop buildup at a border.
Observe flood damage or deforestation.
Watch for vehicles or equipment appearing at a location.
Compare two Sentinel images side by side. One from last month. One from this week. What changed? Document every difference.
Lecture 11.3: QGIS for OSINT — Professional Geospatial Analysis

QGIS is a free, open-source Geographic Information System. It is the industry standard for geospatial analysis outside of paid tools like ArcGIS. Install it from https://qgis.org.
What QGIS Can Do for OSINT:
Import satellite imagery and overlay multiple data sources.
Plot coordinates from social media posts, photos, and reports.
Measure distances and areas precisely.
Create professional maps for reports.
Perform spatial analysis like buffer zones and heatmaps.
Work with geotagged data exported from other tools.
Basic Workflow:
Step 1: Install QGIS. Open it. You see a blank map canvas.
Step 2: Add a basemap. Go to Browser panel → XYZ Tiles → OpenStreetMap. Drag it onto the map canvas. You now have a world map.
Step 3: Add satellite imagery. Right-click XYZ Tiles → New Connection. Name it “Google Satellite.” Enter the URL:
https://mt1.google.com/vt/lyrs=s&x={x}&y={y}&z={z}Click OK. Drag this new layer onto the map. You now have satellite imagery in QGIS.
Step 4: Plot points. Create a new layer. Add points at coordinates you have collected. Each point can have attributes like name, date, and source.
Step 5: Analyze. Use the measuring tool to find distances between points. Use buffer zones to show areas within a certain radius of a location.
Step 6: Export. Create a print layout. Add a title, legend, scale bar, and north arrow. Export as PDF or PNG for your report.
Practical Example:
You have coordinates from ten geotagged Instagram posts made by a target over six months. You import them into QGIS. You plot each point with the date as an attribute. You use the heatmap tool to show where the target spends the most time. A dense cluster appears around a specific neighborhood. That is likely their home. The map goes into your report.
Lecture 11.4: Coordinate Systems — Making Sense of the Numbers
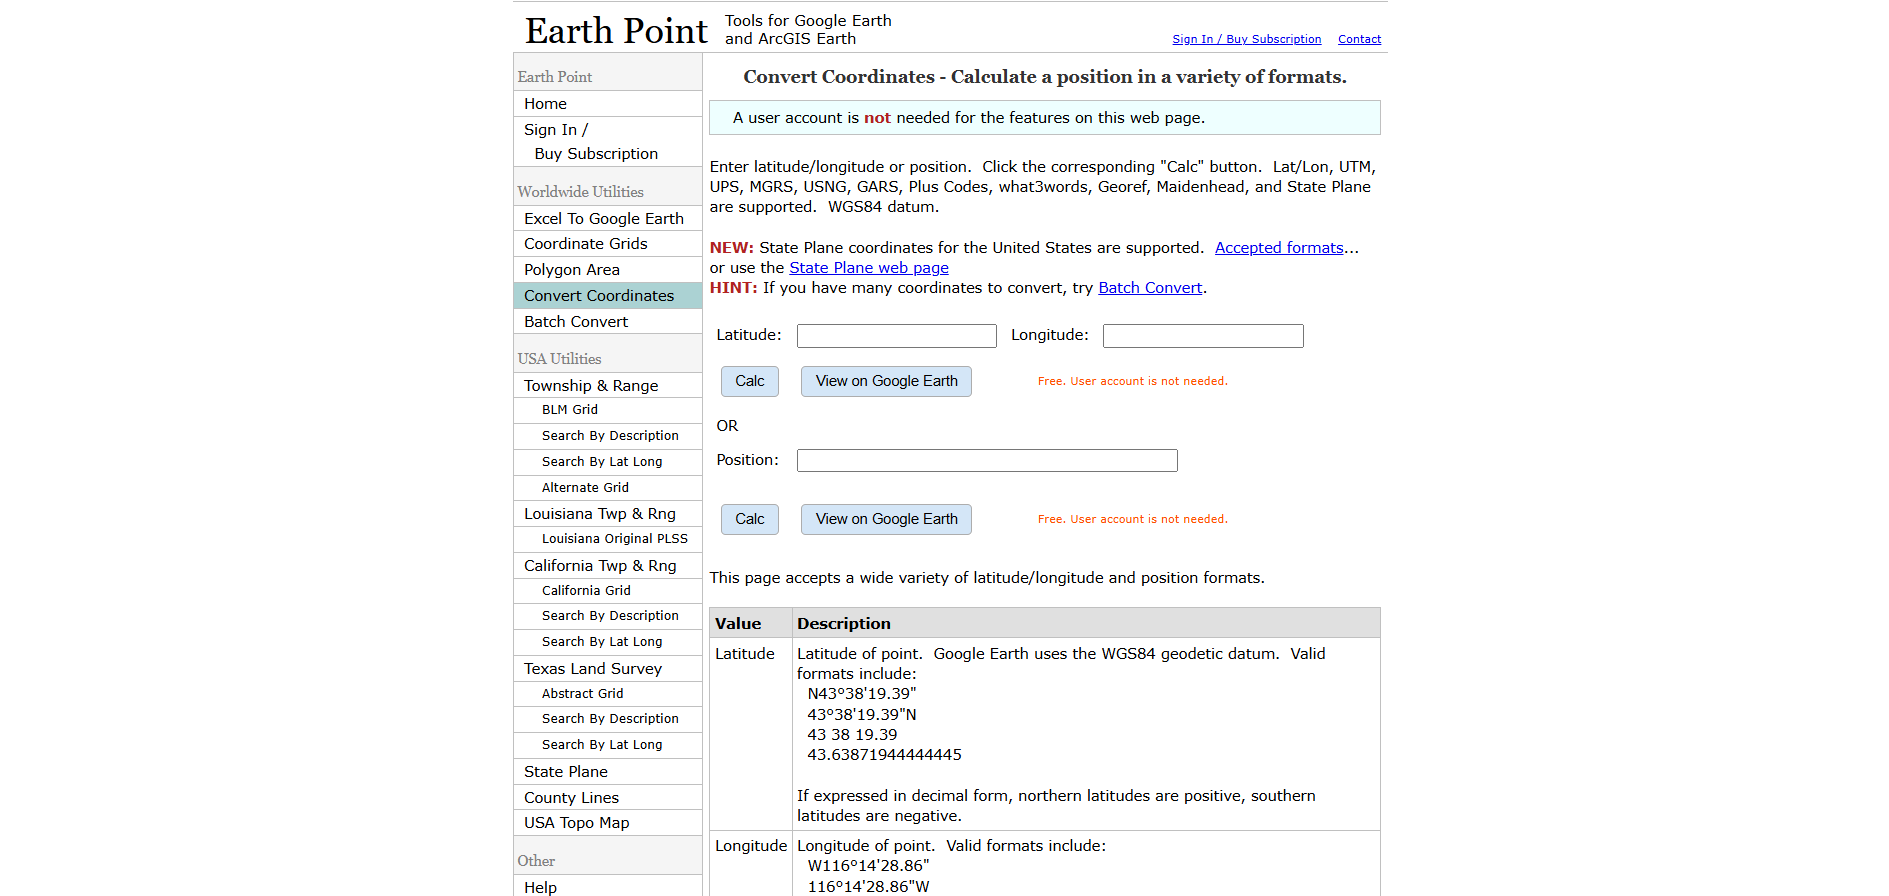
Coordinates are the language of GEOINT. You need to understand them to work with maps, satellite imagery, and geotagged data.
Latitude and Longitude (Decimal Degrees):
The most common format. Latitude is north-south. Longitude is east-west.
Positive latitude = North of the equator.
Negative latitude = South of the equator.
Positive longitude = East of Greenwich, UK.
Negative longitude = West of Greenwich, UK.
Example: 51.5074, -0.1278 is London. 51.5074 is the latitude (north). -0.1278 is the longitude (west).
Degrees, Minutes, Seconds (DMS):
An older format still used in some contexts. The same London coordinates in DMS: 51°30'26.6"N 0°07'40.1"W.
51°= 51 degrees.30'= 30 minutes (1/60 of a degree).26.6"= 26.6 seconds (1/60 of a minute).N= North.0°07'40.1"W= 0 degrees, 7 minutes, 40.1 seconds West.
MGRS (Military Grid Reference System):
Used by military and emergency services. It divides the world into grid zones. Example: 30U YC 12345 67890. Harder to read but very precise.
UTM (Universal Transverse Mercator):
Similar to MGRS. Divides the world into 60 zones. Coordinates are in meters within each zone. Example: Zone 30N, 699456E, 5710542N.
Converting Between Formats:
Use online tools to convert coordinates between formats:
https://www.earthpoint.us/Convert.aspx— Convert between decimal degrees, DMS, MGRS, and UTM.Google Earth Pro — Enter coordinates in any format. It converts automatically.
Practical Tip:
When you extract coordinates from a photo’s EXIF data, they are usually in decimal degrees. When you find coordinates in a military document, they may be in MGRS. Know how to convert between them. It takes seconds with the right tool.
Lecture 11.5: Sun Positioning and Shadow Analysis — How to Use SunCalc
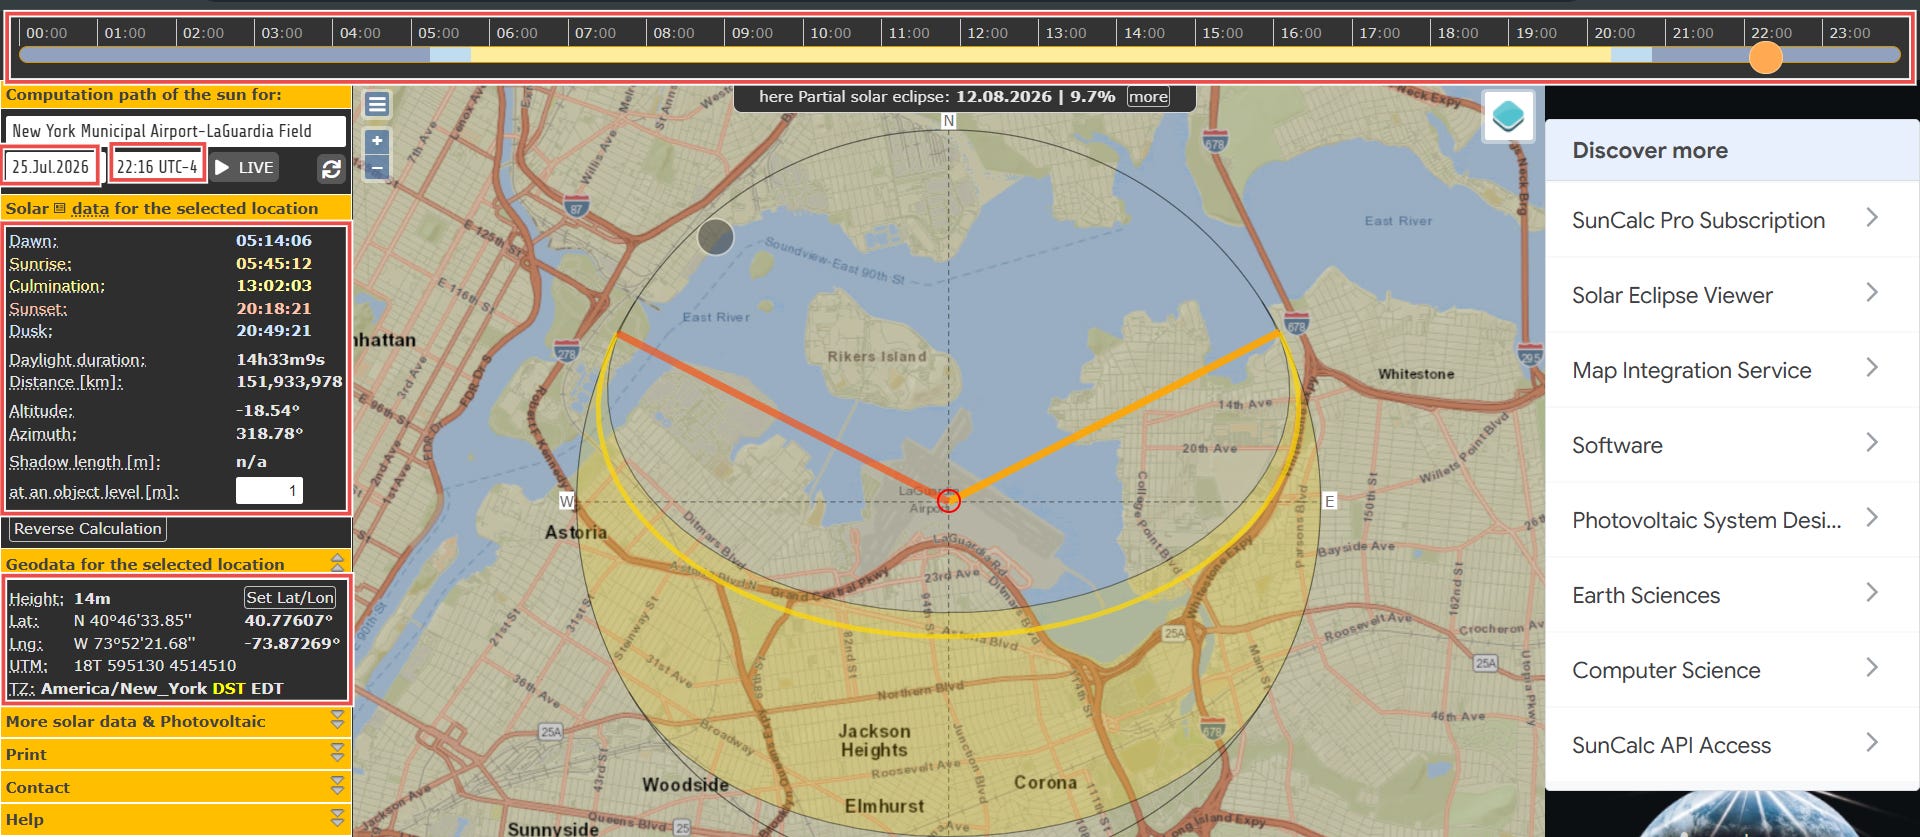
Every outdoor photo contains a hidden clock and compass. The shadows tell you when the photo was taken and which direction the camera was facing. You do not need to be a physicist. You just need SunCalc.
What Is SunCalc?
SunCalc is a free online tool at https://www.suncalc.org. It shows you the position of the sun at any location on any date and time. It draws a line showing the sun’s path across the sky and the angle of shadows.
How SunCalc Works:
Step 1: Go to https://www.suncalc.org. You will see a map of the world.
Step 2: Move the red pin to your location of interest. You can search for an address or drop the pin manually.
Step 3: At the top, set the date. If you know the date the photo was taken, set it. If not, you can experiment with different dates.
Step 4: Drag the time slider at the top. As you move it, the sun moves across the sky on the map. A colored arc shows the sun's path for that day. An orange line shows the current sun position and the direction of shadows.
Step 5: Look at the data panel. It shows:
Sunrise and sunset times.
Solar noon (when the sun is highest).
Sun altitude (angle above the horizon).
Sun azimuth (compass direction of the sun).
Shadow length relative to object height.
Using SunCalc for Photo Analysis:
Scenario: You have a photo of a building. You know the location. You do not know when it was taken.
Step 1: Look at the shadows in the photo. Which direction are they pointing? Shadows point away from the sun.
Step 2: Open SunCalc. Place the pin on the building’s location. Set the date to your best estimate (the year and month if you know it).
Step 3: Drag the time slider. Watch the orange shadow line. When the direction of the line matches the direction of the shadows in the photo, you have found the approximate time.
Step 4: Look at the shadow length. SunCalc tells you the shadow length relative to the object’s height. A shadow twice as long as the object’s height means the sun is low in the sky, likely early morning or late afternoon. A short shadow means the sun is high, near midday.
Step 5: Confirm. Check the sun altitude. Low altitude equals long shadows. High altitude equals short shadows. Match what you see in the photo.
Practical Example:
A photo shows a building with a shadow pointing directly to the right. The shadow is about the same length as the building is tall.
You place the pin on the building in SunCalc. You drag the time slider. At 8:30 AM, the shadow line points to the right. The sun altitude is 25 degrees. SunCalc shows the shadow length is 2.1 times the object height. This matches what you see in the photo. The photo was taken at approximately 8:30 AM local time.
You now have a timestamp. The target claimed to be elsewhere at 8:30 AM. The shadow proves otherwise.
What SunCalc Cannot Do:
SunCalc cannot tell you the exact minute. Cloud cover affects shadow visibility. Terrain like hills or buildings can block the sun. Use SunCalc for estimates, not forensic certainty. Combine it with other evidence. A shadow estimate that aligns with other timeline data is strong. A shadow estimate alone is suggestive.
Lecture 11.6: OpenStreetMap for Investigations
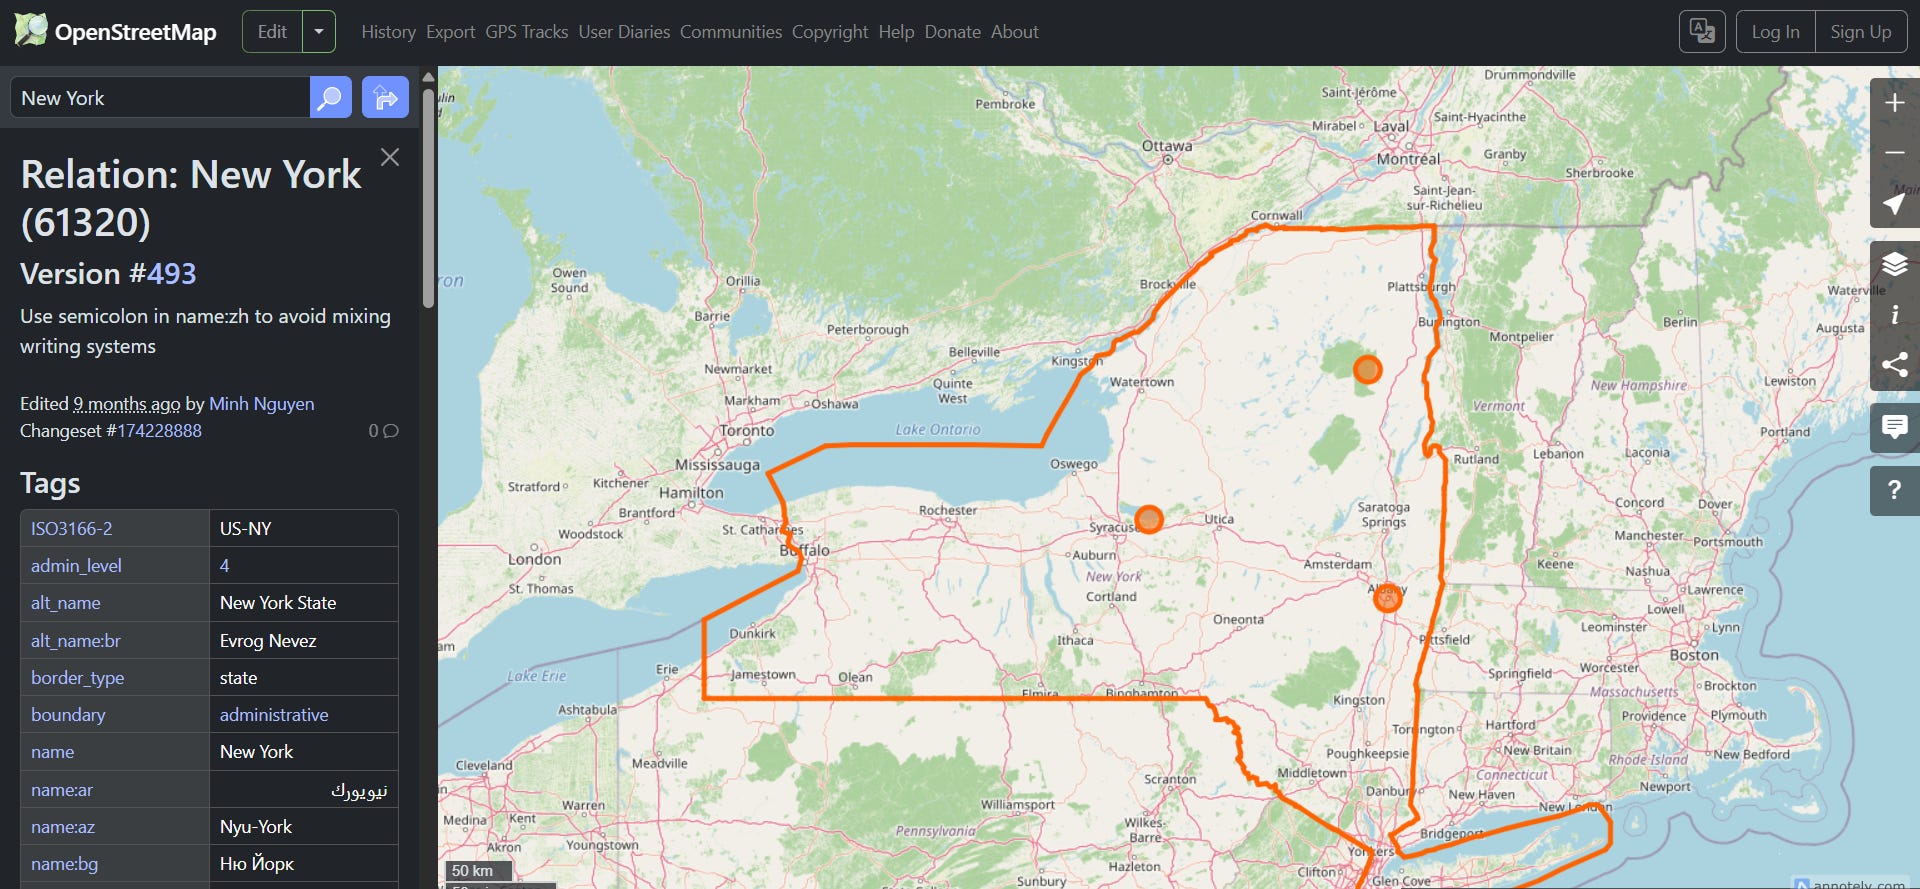
OpenStreetMap (OSM) is a free, editable map of the world. It is built by volunteers and often contains details that Google Maps does not. For an investigator, OSM is a source of building footprints, road networks, and points of interest.
What OSM Gives You:
Building outlines with heights and types.
Road networks with names and classifications.
Points of interest: schools, hospitals, military bases, industrial facilities.
Infrastructure: power lines, pipelines, water towers.
Administrative boundaries.
Using OSM Data:
Method 1: The Website
Go to https://www.openstreetmap.org. Search for a location. Zoom in. Buildings appear as outlined shapes. Click on a building. The sidebar shows its attributes if they have been mapped.
Practical Example:
You are investigating a target who claims to work at a specific office building. You find the building on OSM. The attributes show it is classified as “residential,” not “commercial.” The target’s claim does not match the map data. This is a discrepancy worth investigating.
Lecture 11.7: Overpass Turbo for OSINT — Extracting Contact Data and Business Intelligence
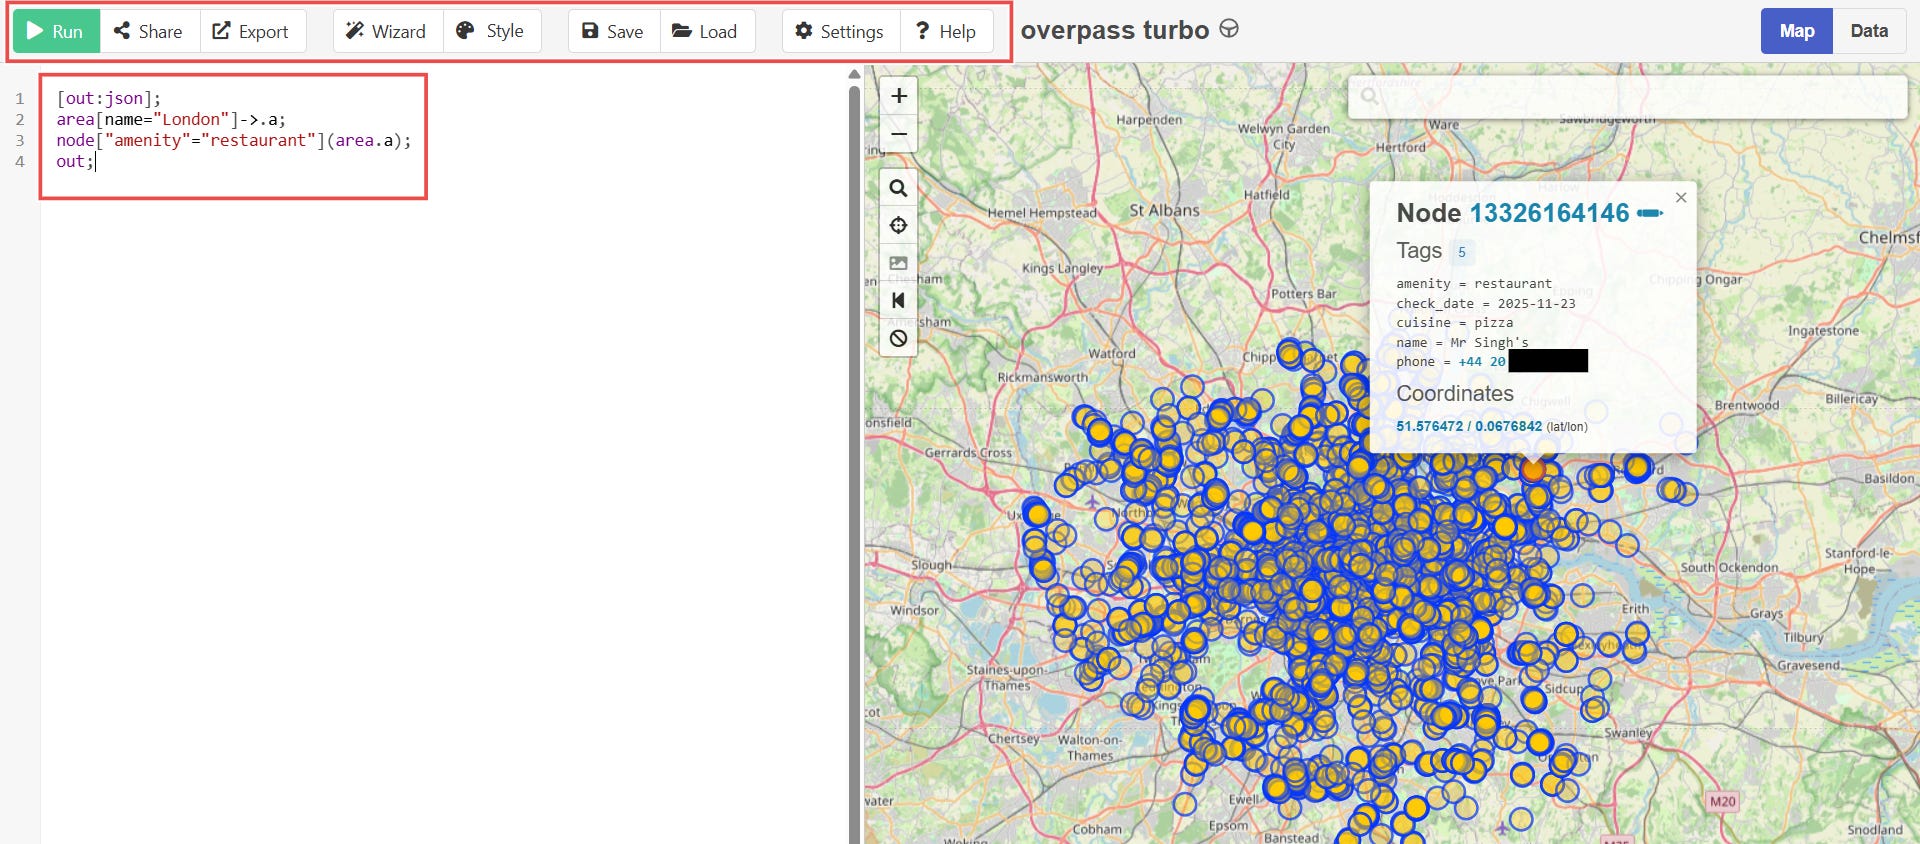
OpenStreetMap is not just a map. It is a database of businesses, facilities, and infrastructure with contact details, addresses, and operational data. Overpass Turbo lets you query this database and extract structured intelligence on targets.
What You Can Extract:
From a single Overpass query, you can pull:
Business names and types
Physical addresses with postcodes
Phone numbers
Email addresses
Website URLs
Opening hours
Social media links (where mapped)
Owner or operator names (for some facilities)
This data is publicly contributed by mappers and business owners. It sits in OSM, waiting to be queried.
Query 1: Extract All Restaurants in an Area with Contact Details
[out:json];
area[name=”London”]->.a;
node[”amenity”=”restaurant”](area.a);
out;
This returns every restaurant node in London. Click on any result. The properties panel shows the name, address, phone number, email, website, cuisine type, and opening hours.
Example:
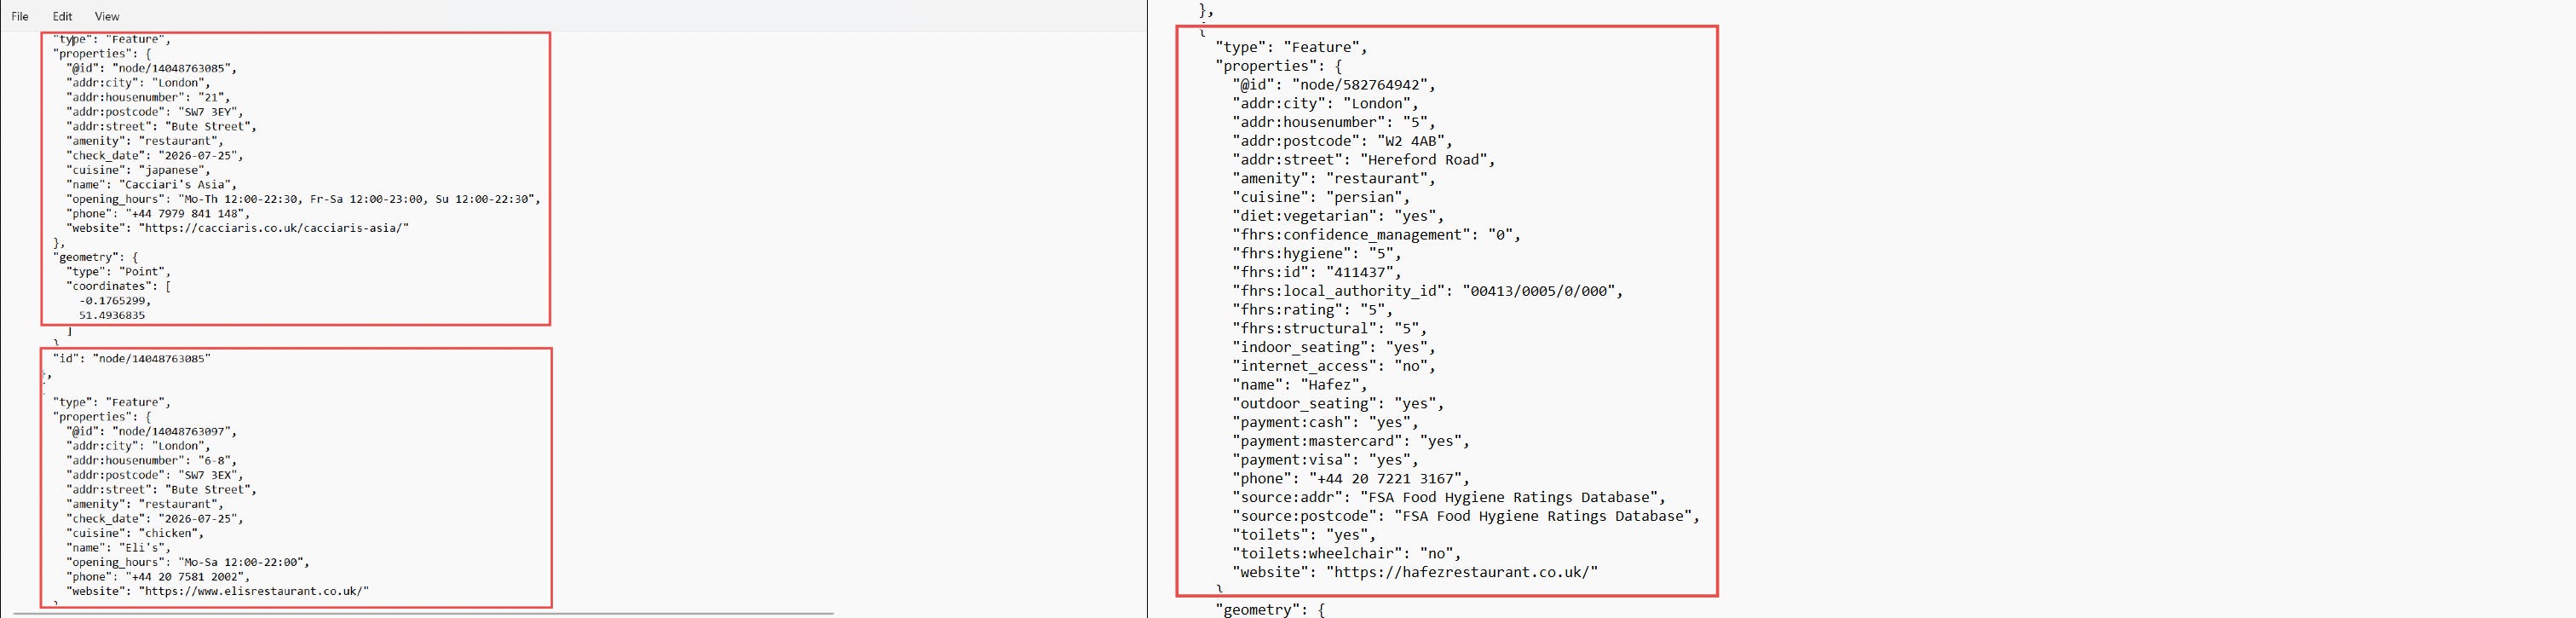
This is business intelligence pulled from a map. No breach data. No paid tools. Just a free query.
Query 2: Find All Businesses in a Specific Area with Email Addresses
This query is more targeted. It only returns nodes that have an email address listed.
[out:json];
area[name=”Camden”]->.a;
node[”email”](area.a);
out;
This returns every business, office, and facility in Camden that has an email address in OSM. Each result includes the name, email, and often phone number and website.
Query 3: Find All Facilities Linked to a Specific Domain
If you are investigating a company and want to find all their locations, search by website domain.
[out:json];
node["website"~"example.co.uk”];
out;
The ~ operator means “matches this pattern.” This query finds every node where the website field contains “example.co.uk.” You get every location linked to that domain.
Query 4: Find All Surveillance Cameras, ATMs, or Security Infrastructure Near a Target
[out:json];
node(51.5074,-0.1278);
node(around:500)[”man_made”=”surveillance”];
out;
This finds every surveillance camera within 500 meters of a coordinate. Use this for physical security assessment or to find cameras that may have captured a target.
Replace "man_made"="surveillance" with:
"amenity"="atm"— Find ATMs."amenity"="bank"— Find banks."man_made"="cctv"— Find CCTV cameras."barrier"="gate"— Find security gates."amenity"="police"— Find police stations.
Query 5: Map an Entire Corporate Presence in a City
If a company name appears in OSM data, find every location.
[out:json];
area[name=”London”]->.a;
node[”name”~”Tesco”](area.a);
out;
Replace "Tesco" with any company name. This returns every Tesco location in London with addresses, phone numbers, and opening hours.
Query 6: Find All Government or Military Facilities in a Region
[out:json];
area[”name”=”Berlin”]->.a;
way[”military”](area.a);
way[”government”](area.a);
out geom;
out geom returns the shape of each facility, not just a point. You see the actual footprint of military bases and government buildings.
Query 7: Extract Phone Numbers and Emails in Bulk
This query returns every node in an area that has both an email and a phone number.
[out:json];
area[name=”Manchester”]->.a;
node[”email”][”phone”](area.a);
out;
The double tag filter ["email"]["phone"] means “must have both an email tag AND a phone tag.” This filters out incomplete records and gives you only high-value targets.
The Reality Check: What Overpass Turbo Cannot Do
Before you get too excited, understand the limitations. Overpass Turbo is powerful, but it is not a guaranteed source of intelligence.
Coverage Is Inconsistent:
OpenStreetMap is built by volunteers. Some cities like London, Berlin, and New York have thousands of contributors and extremely detailed data. Businesses list their phone numbers, emails, websites, and opening hours. Small towns and rural areas may have almost nothing. You might query a city and get fifty restaurants with full contact details. You might query another city of the same size and get three results with only names.
Data May Be Outdated:
A business that was mapped in 2019 may have closed in 2022. The OSM entry may still exist. Phone numbers change. Emails get abandoned. Websites go offline. OSM relies on volunteers to update records. Many entries are years old and unchecked.
Not Every Node Has Contact Details:
Most nodes in OSM have only a name and a type. Only a fraction include email addresses, phone numbers, or websites. You can run a query for all restaurants in a city and get 200 results. Maybe 15 have phone numbers. Maybe 5 have emails. The rest are just names and locations.
Some Data Is Intentionally Minimal:
Business owners and mappers sometimes add only basic information. A restaurant might be tagged as amenity=restaurant with a name and nothing else. Not because the data is hidden, but because no one added it.
Search by Domain Often Returns Nothing:
Querying for ["website"~"targetcompany.com"] only works if someone explicitly added that website to OSM. Most companies do not bother. You will often get zero results even for large organizations.
How to Handle This:
Run the query. If you get results, great. Document everything.
If you get zero results or very few, that is not a failure. It tells you the target area has limited OSM coverage. That is intelligence in itself.
Cross-reference what you do find with other sources. An email found in OSM should be verified through Google dorks, breach databases, or social media.
Do not rely on Overpass Turbo as your only source. It is one tool in a larger investigation. Use it alongside WHOIS lookups, social media searches, and corporate registries.
When Overpass Turbo Is Most Useful:
Investigating businesses in major cities with active OSM communities.
Finding physical locations and addresses for companies.
Mapping infrastructure around a target location.
Discovering contact details that are not easily found through Google.
When Overpass Turbo Is Least Useful:
Investigating individuals rather than businesses.
Searching in rural or under-mapped areas.
Looking for highly specific or niche data.
Expecting every result to have full contact details.
Lecture 11.8: 3D Terrain Analysis
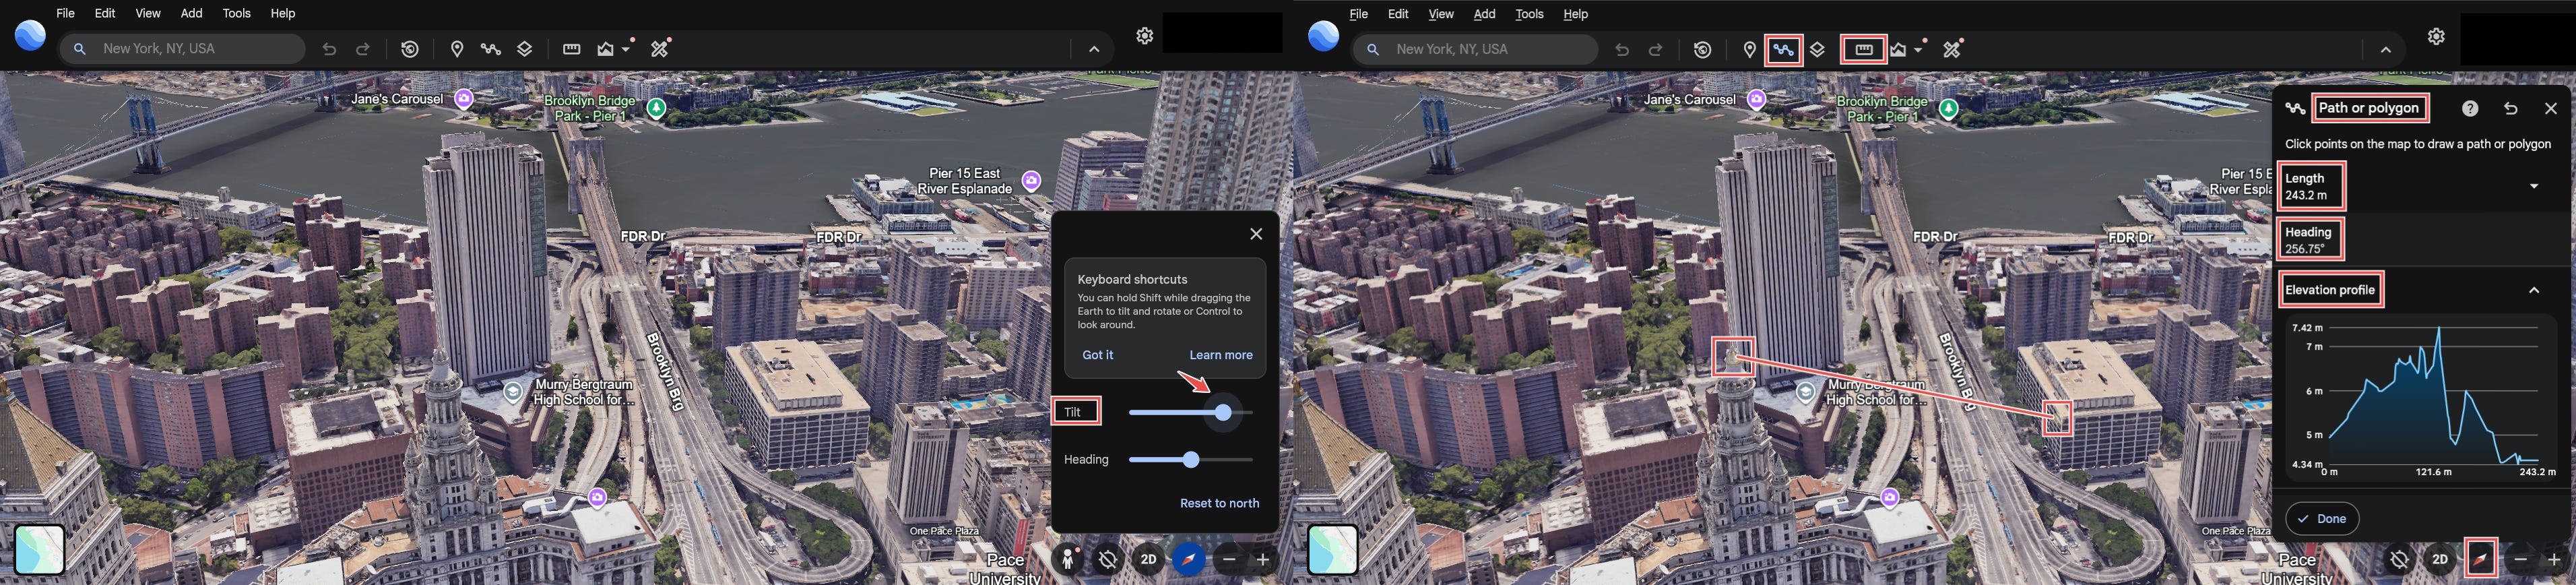
Google Earth Pro renders terrain in 3D. You can tilt the view to see elevation, mountains, and valleys. This helps with line-of-sight analysis and understanding what a photo’s background tells you.
How to Use 3D Terrain:
Step 1: Open Google Earth Pro. Navigate to your location.
Step 2: Hold the middle mouse button or Shift key and drag to tilt the view. The map becomes 3D. Mountains rise. Valleys sink.
Step 3: Use the “Add Path” tool to draw a line from a viewpoint to a distant feature. Right-click the path → “Show Elevation Profile.” This shows you the terrain between those two points.
Practical Example:
A photo shows a mountain in the background. You tilt Google Earth to match the angle. You find a mountain that has the exact same profile. The photo was taken from a specific hilltop. You now have the photographer’s approximate location.
Quick Reference
Objective ___________Tool
High-resolution satellite imagery: Google Earth Pro
Recent satellite imagery: Sentinel Hub
Historical imagery and change detection: Google Earth Pro time slider
Professional GIS analysis: QGIS
Sun position and shadow timing: SunCalc.org
Coordinate conversion: earthpoint.us, Google Earth Pro
Building and infrastructure data: OpenStreetMap, Overpass API
3D terrain and elevation profiles: Google Earth Pro
Basemap for QGIS: OpenStreetMap XYZ Tiles
This is Geospatial Intelligence. Not just finding a location on a map. Understanding terrain. Reading shadows. Analyzing change over time. Extracting data from satellite pixels. Building professional maps that prove your findings. This is the skill set that separates the investigator from the analyst. The analyst sees a photo. The GEOINT analyst sees a clock, a compass, and a timeline.
Module 12: Python for OSINT Automation — Building Your Own Tools

Every investigator eventually hits the same wall. You have a technique that works, but doing it manually across ten targets or a hundred data points is eating hours you do not have. Automation is the answer. But copying someone else’s script without understanding it makes you dependent. The moment the target platform changes its layout, or the API updates, or your needs shift, the script breaks and you cannot fix it.
This section is not about giving you five scripts to copy. It is about teaching you how to build your own. You will learn a repeatable process for turning any manual OSINT task into a working Python tool. You will use AI as your coding assistant. You will use Kali Linux as your development environment. By the end, you will not need anyone else’s scripts. You will write your own.
The Automation Development Framework
Every automation project follows the same five phases. Learn this framework, and you can apply it to any task you encounter.
Phase 1: Define the Manual Process
Before you write a single line of code, you must understand exactly what you do manually. Write it down step by step. Be specific. “I go to this URL. I type this query. I look for this element on the page. I copy this data. I paste it here.” If you cannot describe the manual process precisely, you cannot automate it.
Phase 2: Identify the Data Flow
Where does the data come from? Where does it go? What format is it in at each stage? The input might be a username from a text file. The output might be a CSV of profile URLs. The transformation happens in between. Map this flow before you code.
Phase 3: Select Your Tools
For OSINT automation on Kali Linux, your core toolkit is:
Python 3 — The language. It is installed by default on Kali. It has libraries for HTTP requests, HTML parsing, JSON handling, and file operations.
Requests — For making HTTP requests to websites and APIs.
BeautifulSoup — For parsing HTML and extracting specific elements.
aiohttp — For making many requests simultaneously when speed matters.
Subprocess — For calling external tools like ExifTool from within Python.
JSON/CSV modules — For structured data input and output.
Phase 4: Build with AI Assistance
You do not need to memorize syntax. You need to know how to ask the right questions. Modern AI coding assistants can generate boilerplate, suggest libraries, and debug errors. But they only produce good output when you give them good input.
The key is providing context. Do not ask “write me a script.” Ask:
“I need a Python script that sends a GET request to a URL, parses the HTML with BeautifulSoup, and extracts all links with the class ‘result-link’. Show me the code with error handling.”
“This function returns a list of URLs. I need to check each URL to see if it returns a 200 or 404 status code. Make it async with aiohttp for speed. Handle timeouts.”
“I have a JSON file with this structure. Show me how to extract the ‘email’ field from every object and write them to a CSV.”
The AI becomes your pair programmer. You provide the logic and the requirements. It provides the syntax. You review, test, and refine.
Phase 5: Test, Break, Fix, Repeat
Your first version will break. This is normal. Run it against a known target. See where it fails. Is the HTTP request timing out? Add a longer timeout. Is the HTML structure different than expected? Inspect the page again. Is the site blocking your requests? Add proper User-Agent headers. Each failure teaches you something about how the target platform works. Debugging is intelligence gathering.
The Kali Linux Advantage
Kali Linux is built for security work. It comes with Python pre-installed. It comes with network tools, proxy support, and a terminal environment designed for technical work. For OSINT automation development, Kali gives you:
Python 3 out of the box. No setup required. Open a terminal and start coding.
Virtual environment support. Create isolated Python environments for each project so dependencies do not conflict.
Proxy integration. Route your script’s traffic through Tor or a VPN with simple terminal commands.
Cron scheduler. Schedule your finished scripts to run automatically at set intervals.
Your development workflow on Kali:
mkdir osint_project

cd osint_project

python3 -m venv venv

source venv/bin/activate

pip install requests beautifulsoup4 aiohttp

nano my_tool.py

python3 my_tool.py
That is it. Five commands, and you have an isolated development environment ready for any automation project.
Scripting Lab 1: Multi-Engine Dork Orchestrator
The Manual Process
You have a Google dork. You type it into Google. You scroll through results. You copy the links. You type the same dork into Bing. You scroll. You copy. You type it into DuckDuckGo. You scroll. You copy. Then you combine all three lists, remove duplicates, and save the final list. This takes fifteen minutes per dork.
Building the Tool — Step by Step
Start by writing the manual process as pseudocode:
1. Take a dork query as input
2. Send query to Google
3. Extract all result links from Google’s response
4. Send query to Bing
5. Extract all result links from Bing’s response
6. Send query to DuckDuckGo
7. Extract all result links from DuckDuckGo’s response
8. Combine all links
9. Remove duplicates
10. Save to file
Now you have a blueprint. Each step becomes a function or a block of logic.
Ask your AI assistant: “I need a Python function that takes a search query, sends it to Google via HTTP GET, parses the HTML with BeautifulSoup, and returns a list of result URLs. Include a proper User-Agent header.”
It gives you the Google function. You test it. It works for some results but misses others. You inspect Google’s actual HTML and realize the class names vary. You update the parsing logic. You repeat this process for Bing and DuckDuckGo.
The orchestration function combines the results, uses Python’s set() to deduplicate, and writes the output file. You now have a working tool.
Testing and Refinement
Run it with a simple dork: site:example.com. Compare the results against a manual search. Are you getting the same links? If not, inspect the HTML of the search results page. The class names or element structures may have changed. Update the parsing logic. This is the reality of web scraping. Sites change. Your tools must adapt.
Add error handling. What if the request times out? What if the site blocks you? Wrap each request in a try-except block. Log errors instead of crashing.
Scripting Lab 2: Bulk EXIF Extractor & Geolocation Plotter
The Manual Process
You have a folder of images. You open each one in ExifTool. You copy the GPS coordinates. You paste them into Google Maps. You note the device model and timestamp. You do this for every image. After processing fifty images, you have a scattered collection of notes and no clear picture of the target’s movements.
Building the Tool — Step by Step
The pseudocode:
1. Walk through a directory and find all image files
2. Run ExifTool on each image in JSON mode
3. Extract GPS coordinates, timestamp, device make, model, serial number
4. Convert GPS from degrees-minutes-seconds to decimal
5. Write all data to a CSV file
6. Generate an HTML map with pins at every GPS location
The key decision is how to call ExifTool. Python’s subprocess module lets you run terminal commands and capture the output. You call exiftool -json image.jpg and parse the JSON response.
Ask your AI assistant: “Show me how to use Python’s subprocess module to run ExifTool with the -json flag on an image file, capture the output, and parse it into a Python dictionary.”
GPS conversion is the trickiest part. ExifTool returns GPS as strings like “40 deg 45’ 30.00” N”. You need to parse this and convert it to decimal degrees. Write this logic once, test it with known coordinates, and reuse it.
The map generation uses Leaflet.js, a JavaScript library for interactive maps. Your Python script generates the HTML file with JavaScript embedded. This is a clean approach. No external dependencies for mapping. Just a single HTML file that opens in any browser.
Testing and Refinement
Test with images that have known GPS coordinates. Verify the pins appear in the correct locations on the map. Test with images that have no GPS data. The script should handle these gracefully, skipping map pins but still recording metadata in the CSV.
Scripting Lab 3: Intelligent Permutation & Availability Engine
The Manual Process
You have a username. You guess variations. You type each variation into Twitter’s URL bar. You check if the profile loads. You repeat for Instagram, GitHub, Reddit, and a dozen other platforms. Each check takes thirty seconds. Checking fifty permutations across ten platforms is 500 manual checks. You will miss things.
Building the Tool — Step by Step
The pseudocode:
1. Take a username as input
2. Generate permutations using substitution rules, separator changes, and suffix additions
3. For each permutation, check against a list of platform profile URLs
4. A 200 status code means the profile exists
5. A 404 means it does not
6. Collect and report only the hits
The permutation logic is the intelligence. You are encoding the patterns you already know from Module 3. Character substitution: o becomes 0, e becomes 3. Separator variation: underscores become periods become hyphens. Suffix addition: appending 123, 2024, official, real.
Ask your AI assistant: “I need a Python function that takes a username string and generates permutations using character substitution, separator variation, and common suffix addition. Return a deduplicated list.”
The profile checking must be fast. Checking 500 combinations sequentially takes minutes. Async with aiohttp drops this to seconds. Ask: “Show me how to use aiohttp to asynchronously check 100 URLs and return the status code for each. Handle timeouts and errors.”
Testing and Refinement
Start with a known username. Run the script. Do the hits match platforms where you know the account exists? Are there false positives? Some sites return 200 for nonexistent profiles because they show a “page not found” message with a 200 status code instead of a proper 404. You must handle this by checking the page content, not just the status code. Look for “not found” text in the response body.
This is real-world scraping. The status code is a starting point, not the final answer. Validate with content checks.
Scripting Lab 4: Username-to-User ID Cross-Reference Tool
The Manual Process
You have a list of Twitter usernames. For each one, you view the page source, search for id_str, and copy the numeric ID. You do the same for Facebook, searching for profile_id or userID. Each username takes two minutes. A list of 50 usernames takes nearly two hours of repetitive work.
Building the Tool — Step by Step
The pseudocode:
1. Read usernames from a text file
2. For each username, request the public profile page on Twitter
3. Search the HTML for the id_str pattern using regex
4. Request the public profile page on Facebook
5. Search the HTML for profile_id, userID, or entity_id patterns
6. Write results to a CSV
The core technique is regular expressions. You are searching raw HTML for specific patterns. Twitter embeds the user ID in a JSON block within the page. The pattern is "id_str":"123456789". Facebook uses multiple patterns depending on how the page loads.
Ask your AI assistant: “I need a Python function that takes HTML source text and uses regex to extract the value of id_str from a JSON-like structure. Show me the regex and error handling.”
Testing and Refinement
Test with known accounts where you have manually verified the numeric IDs. Does the script return the correct values? Test with accounts that have custom URLs versus default numeric URLs. Test with accounts that are private versus public. Each variation may require a different extraction approach.
Facebook is particularly challenging because it changes its page structure frequently. Your regex patterns that work today may break next month. This is why you build the tool yourself instead of relying on someone else’s unmaintained script. When it breaks, you know how to fix it.
Scripting Lab 5: Reddit Historical Monitoring Bot
The Manual Process
You check a Reddit user’s profile every day. You scroll through their recent comments. You try to remember what you have already seen and what is new. You copy interesting posts into your notes. You wonder if they deleted anything since your last check. This is unreliable and time-consuming.
Building the Tool — Step by Step
The pseudocode:
1. Take a Reddit username as input
2. Request the user’s comment JSON feed from Reddit’s public API
3. Compare returned comment IDs against a local storage file of previously seen IDs
4. New comments are appended to an activity log
5. The storage file is updated with the latest comment IDs
6. Schedule the script to run daily
Reddit provides a public JSON API at reddit.com/user/username/comments.json. No authentication required. No API key. Just add .json to the end of the user profile URL. This returns structured data with comment IDs, timestamps, subreddits, and content.
Ask your AI assistant: “Show me how to request JSON data from Reddit’s public API using Python requests, parse the nested structure to extract comment ID, subreddit, body, and timestamp, and handle the case where the user has no comments.”
The state tracking is what makes this a monitoring tool instead of a one-time scraper. You store seen comment IDs in a local JSON file. Each run compares new IDs against stored IDs. Only unseen comments are reported.
Testing and Refinement
Run the script twice on the same user without any new activity between runs. The second run should report zero new comments. Have the user post a new comment. Run the script again. It should detect exactly one new comment. Verify the timestamp and content are correct.
Schedule it with cron on Kali Linux:
0 8 * * * /home/user/osint_project/venv/bin/python3 /home/user/osint_project/reddit_monitor.pyThis runs the script every day at 8 AM. You wake up to a fresh activity report.
Building Your Own Automation Toolkit
The five labs above are templates. The real skill is applying this development framework to any task you encounter.
When you find yourself doing something manually, stop. Write down the manual process. Convert it to pseudocode. Identify the data sources and outputs. Ask your AI assistant for help with specific functions. Test against known targets. Refine until it works reliably. Save the tool. You now own it.
Over time, you build a personal library of automation tools. Each one solves a specific problem you have faced in real investigations. Each one is code you understand because you built it. When a platform changes, you adapt your tool. When a new investigative need arises, you build a new tool.
This is not about learning Python perfectly. It is about learning how to solve problems with code. The syntax you can always look up. The logic is what matters.
The Automation Mindset
Start small. Automate one repetitive task. Gain confidence. Automate another. Before long, you will have a suite of tools that handle the mechanical work of OSINT collection, freeing your mind for the work that actually requires human intelligence. Analysis. Attribution. Judgment.
The machine collects. The investigator thinks.
Module 13: Intelligence Report Writing & Entity Graph Visualization
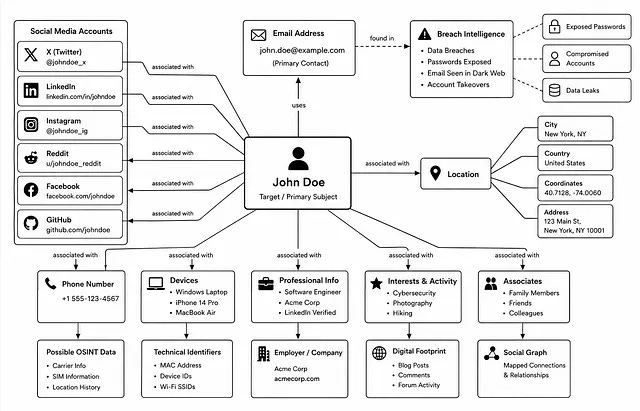
You can run the most brilliant investigation of your career. You can uncover connections nobody else found. You can piece together a target’s entire digital footprint from a single username. But if you cannot communicate what you found in a way that your client understands, believes, and can act on, your investigation - failed.
Report writing is not the boring part of OSINT. It is the part that gives everything else meaning. The report is your product. The client does not see your late nights. They do not see your clever dorks or your elegant scripts. They see the document you put in front of them. That document must be clear, accurate, sourced, and professional. This module teaches you how to build it.
Lecture 13.1: Structuring the Intelligence Report
A professional intelligence report follows a predictable structure. This is not about being creative. It is about being clear. The client should know exactly where to find the answer to any question within seconds of opening your document.
Here is the standard structure. Use it for every report you write
Executive Summary
This is the most important section. Many clients will read nothing else. The executive summary must answer the original question in plain language, with no jargon, in under one page. State the investigation objective. State the key findings. State the risk rating or assessment. State the recommended next steps.
If your executive summary is vague, the client assumes the whole report is vague. Write it last. Write it after you know everything. Then make it sharp.
Example:
This investigation examined John Doe in connection with a proposed business partnership. Public records confirm Mr. Doe is a British national, born May 1962, residing in London. He is the sole director of HALL OR NOTHING MANAGEMENT LIMITED (dissolved January 2023). No adverse media, sanctions listings, or legal actions were identified. Open source intelligence revealed three additional social media profiles consistent with the subject’s known identity. Based on available information, the subject presents a LOW risk for partnership. A full finding summary follows.
2. Investigation Objective
Restate exactly what you were asked to do. This sets the scope. If something is outside scope, note it here. This protects you if the client later asks why you did not investigate something you were never asked to investigate.
3. Methodology
Explain how you gathered information. Do not list every tool. Summarize the approach. “Public records searches were conducted using UK Companies House and OpenCorporates. Social media analysis was performed using native platform search and public profile review. Historical data was retrieved via the Internet Archive Wayback Machine. All information was collected from publicly available sources without contacting the subject.”
This section establishes that your methods were legal, ethical, and repeatable.
4. Key Findings
This is the body of the report. Organize findings by category. Corporate records. Personal identity. Digital footprint. Historical intelligence. Risk indicators. Each finding gets its own subsection with a clear heading. Each claim is supported by evidence.
5. Evidence Log
A table linking each finding to its source. This is what makes your report defensible. If a client questions a claim, you point to the evidence log. Every row contains the finding, the source URL or document reference, the access date, and any relevant notes.
6. Risk Assessment
A clear rating of Low, Medium, or High with justification. Do not hedge. The client is paying you for your professional judgment. Give it.
7. Recommendations
What should the client do with this information? Proceed? Investigate further? Decline the partnership? Be specific.
Lecture 13.2: Writing for Your Audience — Client, Legal, or Internal
Your writing style changes depending on who reads the report. The structure stays the same. The language adapts.
Corporate Client
A business client wants answers, not education. Use plain language. Avoid jargon. Put the conclusion first. Bullet points are your friend. They are not paying you to show off your vocabulary. They are paying you to help them make a decision.
Legal Referral
If your report may end up in court, every word matters. State facts, not opinions, unless clearly labeled as such. Use precise language. “The subject’s LinkedIn profile listed employment at XYZ Corp from 2018 to 2022” is a fact. “The subject appears to have exaggerated their employment history” is an opinion. Label opinions clearly. Cite every source. Courts destroy reports with unsupported claims.
Internal Security Team
An internal team wants technical detail. They want your methodology in depth. They want to replicate your findings. Give them the dorks you used. Give them the API endpoints. Give them the tool commands. They may need to run the same investigation again in six months. Your report should make that possible.
Lecture 13.3: Evidence Documentation & Source Citation Standards
Every claim in your report needs a source. Not most claims. Every claim. If you cannot cite it, you cannot write it.
The Standard Citation Format
For each piece of evidence, record:
Source URL or Document Reference: The exact web address or filing number.
Access Date: When you retrieved the information. Websites change. The access date proves what you saw existed on that date.
Screenshot Reference: A filename or page number pointing to the visual record you preserved.
Notes: Any context about the source’s reliability or limitations.

Preserving Evidence

Screenshots are not optional. Websites disappear. Profiles get deleted. Filings get updated. Your screenshot is the permanent record. Take full-page screenshots. Save them with descriptive filenames. Store them in a folder alongside your report. If your report says something, there should be a screenshot proving it.
Lecture 13.4: Entity Graph Visualization — Tools & Methodology
An entity graph turns your written findings into a visual map. It shows connections between people, companies, accounts, emails, and locations in a way that text cannot. A good graph tells the story at a glance.
Why Graphs Matter
Your client may not read all twenty pages. They will look at the graph. If the graph clearly shows the target at the center with connections radiating outward to companies, social media accounts, and risk indicators, they understand the investigation immediately. The graph is your executive summary in visual form.
Tools for Entity Graph Building
Maltego is the industry standard for OSINT graph building. It is commercial software with a free Community Edition. Maltego allows you to create entities (people, companies, domains, emails), connect them with relationships, and run transforms that automatically discover new connections. The learning curve is real, but the output is professional-grade.
Gephi is a free, open-source graph visualization platform. It is less automated than Maltego but gives you complete control over the visual output. You build a spreadsheet of nodes and edges, import it into Gephi, and the software renders the graph. This is the tool to use when you need publication-quality visuals.
Obsidian is a free knowledge management tool that doubles as an investigation mapping platform. It uses Markdown files and supports a graph view that visually connects your notes. Create a note for each entity (person, company, email, account). Link notes together using wiki-style links. Obsidian’s graph view renders the connections automatically. This is ideal for building an investigation knowledge base that grows over time. You can toggle between reading your structured notes and viewing the connection graph. For long-term investigations with many entities, Obsidian keeps everything organized and visually traceable.
OSINTTracker is a purpose-built OSINT investigation management tool. It is designed specifically for investigators who need to track entities, relationships, and findings across complex cases. Unlike general-purpose graph tools, OSINTTracker understands OSINT workflows. You log entities, define relationships, attach evidence, and the platform generates connection maps automatically. It bridges the gap between note-taking and graph visualization in a single interface built for the work you actually do.
Google Drawings / draw.io are free, simple options for small graphs. If your investigation found five entities and six connections, you do not need Maltego. A clean diagram in draw.io is faster and equally clear.
Lecture 13.5: Building the Final Intelligence Package
The final package is more than the report. It is everything the client needs to understand, verify, and act on your findings.
The Package Contents
The Written Report (PDF) — The structured document from Lecture 10.1.
The Entity Graph (PNG or PDF) — The visual map from Lecture 10.4.
The Evidence Folder — All screenshots, organized by finding. Filenames match the evidence log.
The Raw Data (Optional) — CSV files, JSON output, tool results. Include this if the client has technical staff who may want to verify or extend your work.
Packaging for Delivery
Zip everything into a single archive. Name it clearly: Investigation_SubjectName_YYYY-MM-DD.zip. Include a README file that lists the contents and explains the folder structure.
If delivering via email, encrypt the attachment. The report contains personal data. Protect it.
The Final Review Checklist
Before you submit, go through this list:
Every claim in the report has a cited source.
Every cited source has a matching screenshot in the evidence folder.
The entity graph is clear and labeled.
The executive summary answers the original question.
The risk rating is justified.
The report has been proofread for spelling and grammar.
The client’s name, your name, and the date are on the cover page.
The file is encrypted if sent electronically.
If any item on this list is unchecked, you are not done.
Additional Resources for Report Writing
These OSINT practitioners have published excellent content on report writing and investigation methodology. Study their work.
Tactical OSINT Academy — Entity graph building and investigation workflow. The video referenced in Lecture 8.4 is a strong starting point.
Bellingcat — The public face of professional open source investigation. Their published reports are models of structure, sourcing, and clarity. Read them. Study how they present findings.
Trace Labs — Missing persons OSINT. Their methodology emphasizes speed, accuracy, and actionable intelligence. Their report templates are worth reviewing.
Michael Bazzell (IntelTechniques) — His books and training materials cover report writing for private investigators. Practical, no-nonsense guidance.
Building Your First Entity Graph — A Walkthrough
This video by CyberSudo / UK OSINT Community are one of the clearest tutorials on entity graph building for investigators. Watch it before you build your first graph:
These videos covers selecting entities, establishing relationships, and structuring the graph so it tells a coherent story rather than becoming a tangled mess. This is essential viewing.
Graph Methodology
Start with the primary entity. Your target. Place them in the center.
Add confirmed connections. Companies they direct. Social media accounts you verified. Email addresses you extracted. Each connection gets its own node.
Add secondary connections. The company’s other directors. The email domain’s owner. Each layer moves outward from the center.
Color code by confidence. Green for confirmed. Yellow for probable. Red for unverified. The client sees immediately what is solid and what needs further work.
Label every edge. Do not just draw lines. Label them. “Director of.” “Owns.” “Linked via profile picture hash.” “Registered email address.” The label explains the connection.
Keep it clean. A graph with 200 nodes is noise. A graph with 20 nodes and clear relationships is intelligence. If the graph is too dense, split it into multiple views. One for corporate structure. One for digital footprint. One for risk indicators.
Choosing the Right Tool
Tool________Best_________ForCost
Maltego — Automated transforms, large investigations > Free CE / Paid Pro
Gephi — Publication-quality static graphs > Free
Obsidian — Investigation knowledge base with graph view > Free
OSINT — TrackerPurpose-built OSINT case management and graphing > Free / Paid
draw.io / Google — Drawings Simple, small graphs > Free
Capstone Course: The Integrated Investigation
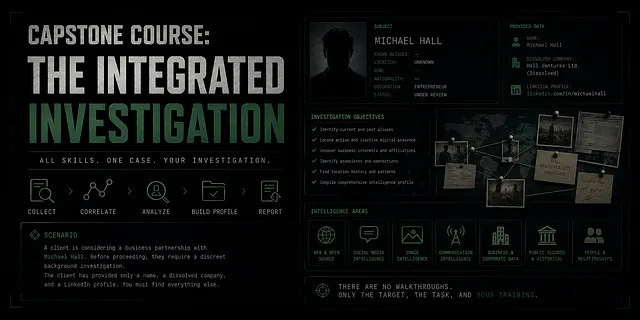
Capstone Course: The Integrated Investigation
This final module is not a lecture. It is a simulated, real-world investigation. Every technique, every tool, every methodology you have learned across this course now comes together in a single assignment. There are no walkthroughs. Only the target, the task, and your training.
Challenge One:
Scenario
A client is considering a business partnership with an individual named Michael Hall. Before proceeding, they require a discreet background investigation. The client has provided only a name, a dissolved company, and a LinkedIn profile. You must find everything else.
Target Information
Subject Name: Michael Hall
Known Company: HALL OR NOTHING MANAGEMENT LIMITED
LinkedIn Profile:
https://www.linkedin.com/in/michael-hall-8256b964/
Investigation Tasks
Using only open-source intelligence, gather comprehensive intelligence on the subject to inform your client’s decision. Answer the following questions with documented methodology for each.
Task 1: Who is Michael Hall, and what is his affiliation with HALL OR NOTHING MANAGEMENT LIMITED?
Task 2: What is his role within the company? Provide any appointment dates, resignation dates, or changes in position.
Task 3: What is his country of residence and date of birth? Cite the source document.
Task 4: What is the company registration number?
Task 5: What was the company’s previous name, and during what period was that name in use?
Task 6: What is the current company status? Is it still active?
Task 7: On 22 May 2008, what was the company’s full legal name, registered office address, post town, country, and postcode?
Task 8: Extract Michael Hall’s LinkedIn numeric User ID. Document your extraction method.
Task 9: Discover any corporate or personal email addresses associated with Michael Hall or his company. Document how each was found and validated.
Deliverable Requirements
Your report must include:
Clear, concise answers to each task.
The methodology, techniques, and tools used for each phase of intelligence collection.
Source citations for every finding (URLs, document references, access dates).
A professional tone suitable for client delivery.
Submission
Submit your completed report to: cybershieldmentor@gmail.com
Operational Boundaries
Use only publicly available information.
Do not contact the subject or any associated individuals.
Do not attempt to access any private accounts or systems.
This is a training exercise. All findings are for educational purposes only.
Begin your investigation. Your client is waiting.
Challenge Two:
Practical Exercise: Operation Dark Leak — The Intercepted Image
Classification: TRAINING EXERCISE // OSINT-2026-089
Threat Vector: Data Exfiltration / Dark Web Credential Sale
Scenario: A threat actor was intercepted attempting to sell stolen corporate credentials on a dark web marketplace. The evidence is a single image file. Your task is to extract the hidden data, identify the threat actor, and build a complete intelligence profile.
The Evidence
You have been provided with one image file:
File Name: invoice_2026_03.jpg
Download Link: https://drive.google.com/file/d/1i-Noh21EavnWH8zprQlmjVoHGaLmYvDP/view?usp=sharing
The image appears to be a standard invoice template. Nothing more. Everything you need is hidden within it.
Your Tasks
Phase 1: Breach Intelligence
Extract the hidden data from the image. Identify:
The breached company name.
The number of compromised employees.
The CEO’s full name, email address, and office location.
Any other compromised individuals and their roles.
The date of the breach.
Hint: The techniques you need are covered in Module 9 — Image Forensics & Hidden Data Recovery. Start with the simplest tool first.
Phase 2: Threat Actor Intelligence
Within the extracted data, you will find a seller information section. Document:
The threat actor’s alias.
The dark web onion URL.
The Telegram username.
The Bitcoin address.
The PGP Key ID.
The encryption key.
Phase 3: GitHub Attribution — Unmasking the Threat Actor
The seller information contains an alias. This alias is a GitHub numeric user ID. Your task is to resolve it to a real identity.
Step 1: Resolve the numeric GitHub ID to a username. Use the GitHub API or the techniques covered in Module 4.6 — GitHub Recon.
Step 2: Pull the full GitHub profile. Document:
Username.
Real name (if listed).
Email address.
Company affiliation (if listed).
Location.
Personal website or blog URL.
Twitter/X/LinkedIn handle.
Account creation date.
Step 3: Analyze the threat actor’s repositories and provide intelligence on their:
Commit email addresses
Skills and interests.
Any leaked credentials or sensitive files accidentally committed.
Step 4: Using the information extracted from GitHub, map the threat actor’s wider digital footprint:
Real name and username across LinkedIn, Twitter/X, and Google.
Their email breach integrity
Profile intelligence
Document every additional account, platform, and piece of personal information discovered.
Step 5: Geolocate the threat actor. From the location found on GitHub or other platforms, identify the city and country. If a specific address or landmark is visible in any discovered content, locate it on Google Earth Pro. Screenshot and annotate.
Phase 4: Comprehensive Intelligence Report
Compile everything into a structured intelligence report.
Report Sections:
Executive Summary — One paragraph overview of findings.
Breach Intelligence — Full details of the compromised company and employees.
Threat Actor Profile — Identity, location, contact details, and digital footprint.
Dark Web Findings — Marketplace listing documentation.
Cryptocurrency Trace — Bitcoin address analysis.
Entity Graph — Visual map showing the threat actor, their GitHub profile, email addresses, social media accounts, the breached company, the dark web marketplace, and the Bitcoin address. Use Maltego, Obsidian, draw.io, or any graph tool.
Risk Assessment — Low, Medium, or High with justification.
Recommendations — For law enforcement or client action.
Deliverable Format
Submit a single PDF report with all sections. Include screenshots of every step. Annotate images to show key findings. Cite all sources with URLs and access dates.
Cybershieldmentor@gmail.com
Disclaimer
The GitHub user ID used in this exercise is real and resolves to a public profile used for educational purposes. All names, email addresses, phone numbers, IP addresses, physical addresses, Bitcoin addresses, dark web URLs, and Telegram handles are fabricated. They do not represent real individuals or organizations. This challenge is for educational purposes only.
A Final Word to the Analyst
You have reached the end of this course. You now know how to extract unchangeable numeric IDs from social media platforms. You know how to geolocate an image from a single street sign. You know how to trace a company’s real owners through layers of offshore entities. You know how to recover deleted Reddit posts, extract commit emails from GitHub, and pull profile pictures from phone numbers without ever making a call.
These skills are powerful. Do not confuse power with permission
Every technique in this course works on real people. Real people with real lives, real families, and real expectations of privacy, even when they post publicly. The fact that you can find something does not mean you should. The fact that information is publicly accessible does not mean the subject intended for it to be collected, analyzed, and filed in a report about them.
Before you investigate anyone, ask yourself three questions
First, is the purpose legitimate? Due diligence for a business partner. Locating a missing person. Supporting a legal case. Investigating a threat. These are legitimate purposes. Investigating an ex-partner out of jealousy is not. Investigating a stranger out of curiosity is not. If you cannot explain your purpose to a colleague without feeling uncomfortable, stop.
Second, are you minimizing harm? Collect only what you need for the investigation. Do not hoard data. Do not share findings with anyone outside the authorized audience. When the investigation is complete, securely dispose of what you no longer need. The less personal data sitting in your investigation folders, the less can be leaked, stolen, or misused.
Third, are you operating within the law? Laws vary by jurisdiction, but the principle is universal. If you are unsure whether a technique is legal, consult a lawyer before using it. “I read it in an OSINT course” is not a legal defense. This course has taught you what is technically possible. It is your responsibility to determine what is legally permissible in your jurisdiction and your context.
The OSINT community has a saying: “Trust but verify.” I will add one more: “Investigate, but do not become the story.”
Your operational security failures become someone else’s headline. Your ethical failures become ammunition against the entire profession. Every time an investigator uses these techniques for harassment, stalking, or personal gain, it damages the credibility of legitimate OSINT work. Do not be that person.
You have the tools. You have the methodology. You have the technical skills. What you do with them defines who you are as a professional.
Go do good work. Be thorough. Be accurate. Be ethical. The field needs more investigators like that.
About the Author
This course was built by someone who does the work. No theory without practice. No technique without testing.
If you want to connect, ask questions, or share what you have built using these skills, you can find me here:
- LinkedIn: https://www.linkedin.com/in/precious-vincent-669279263/`
- X (Twitter): https://x.com/d4rk_intel`
- GitHub: https://github.com/techenthusiast167`
End of Course
Appendices
Appendix A: Glossary of OSINT Terms & Appendix B: Complete Tools Index
Every term and tool referenced in this course, organized by category, with URLs.
https://drive.google.com/file/d/1GUvsefNWHBbngd8bE1_enrFjvq0zMANt/view?usp=sharing
NEED TO REVISIT THE FOUNDATIONS?
If you need to refresh your operational security setup, review the Google Dorking syntax bible, or look up target verification protocols for specific social platforms, you can return to the initial volume at any time. > > CLICK HERE TO GO BACK TO VOLUME 1: FOUNDATIONS & SOCMINT DEEP DIVES:
The Professional OSINT Practitioner: From Foundations to Advanced Attribution
·This is not a theoretical course. It is a practical, hands-on deep dive into the mindset and methodologies of a professional OSINT investigator. Every module is designed to answer not just the “what,” but the “how” and the “why,” with a strict focus on legal, ethical, and operational security (OPSEC) considerations. The goal is to transform a student fr…
